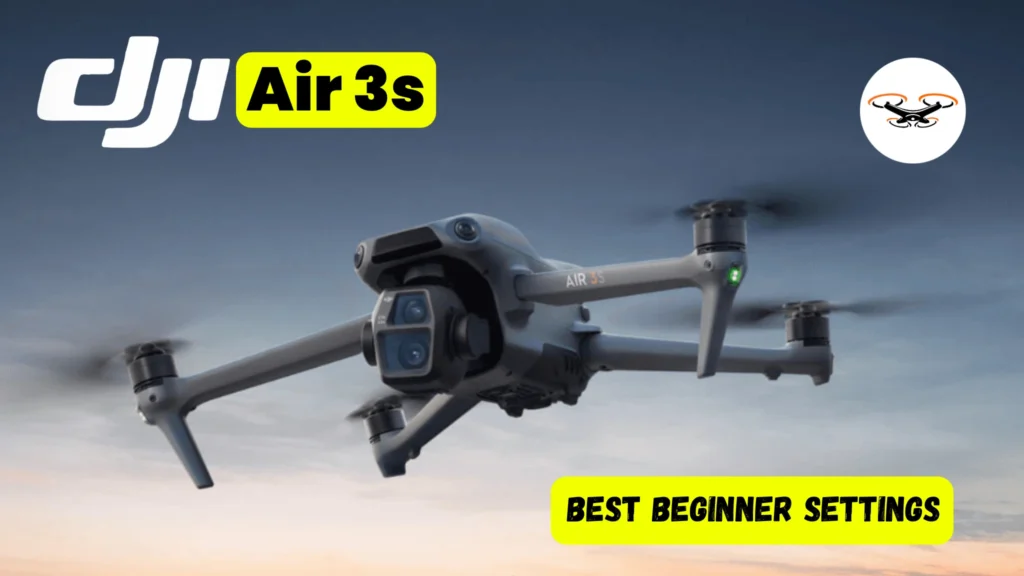
The DJI Air 3S is an impressive drone for enthusiasts, and the new DJI Air offers some additional settings to enhance performance. Adjusting these settings can greatly improve your drone’s capabilities. Every user should be familiar with these tips to get the best experience with the DJI Air 3S, as they significantly boost overall performance. From maximizing flight control to capturing stunning shots, these best tips & settings for dji air 3s article is designed to help you unlock the full potential of your drone.
1. FPV MODE
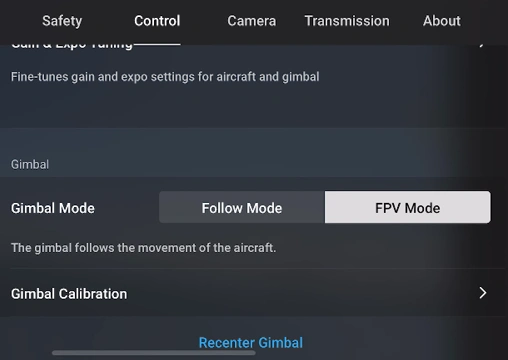
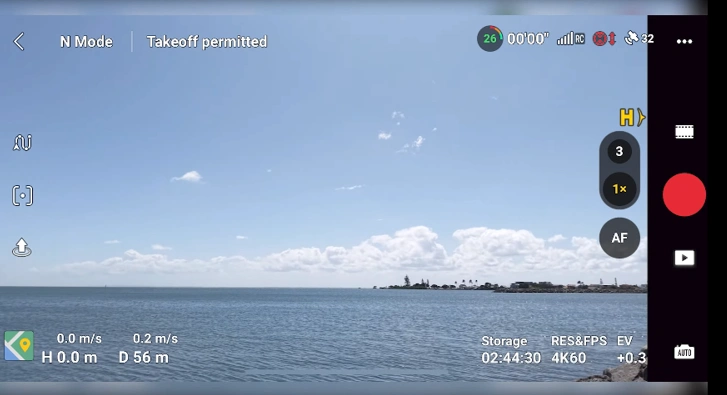
In FPV Mode, under Gimbal Mode, we currently have it set to “Follow”. When I lift the drone and rotate it, the movements appear very smooth, even with sudden motions. However, when I go back to the settings, switch to FPV Mode, and turn the drone left and right, you’ll see a banking effect, giving it more of an FPV (first-person view) look. This setting provides a dynamic effect while still allowing the drone to hover safely. It’s easy to enable or disable FPV Mode in the settings, so give it a try if you’re interested in a different visual style.
2. FOCUS TRACK SAFETY
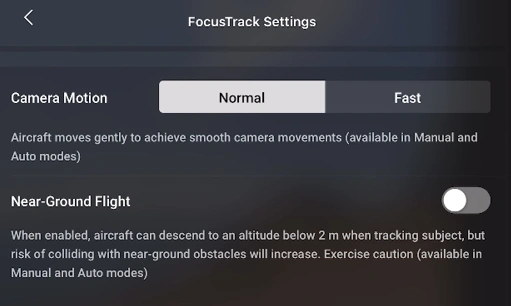
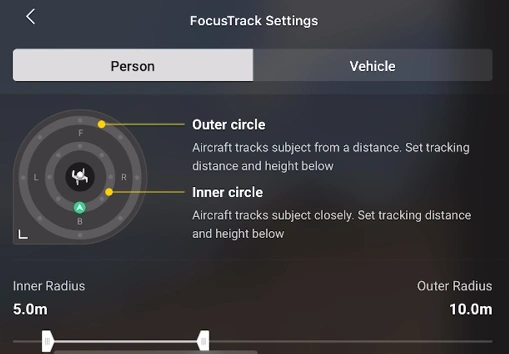
Explore the powerful tools in Active Track 360 mode! This feature gives you great control for tracking both people and vehicles.
You can adjust between the Outer and Inner Circles, with a radius ranging from 4 to 20 meters, to customize the tracking range. You can also set different heights for each circle to keep the ideal altitude based on your environment.
For low-angle shots, try the Near-Ground Flight option, which lets the drone track below 2 meters. Use this with caution, as it requires extra attention for safe flying. Enjoy experimenting with these settings to capture the best shots!
3. GAIN & EXPO TUNING
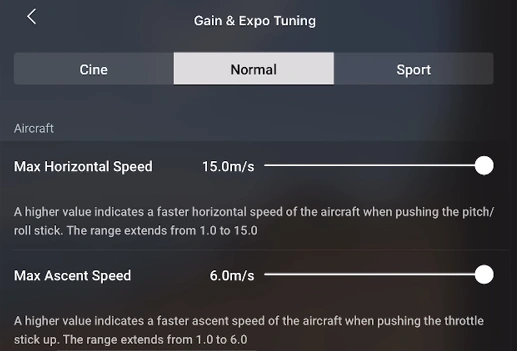
You can adjust various gimbal settings, switching between Cine, Normal, and Sport modes. Each mode has different parameters for max horizontal speed, max ascent speed, and brake sensitivity.
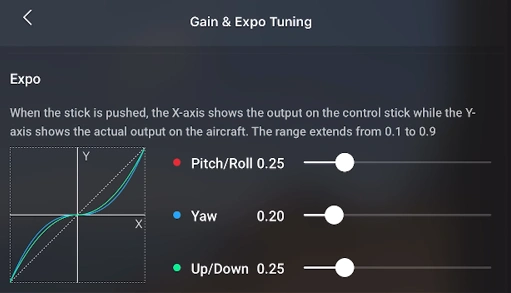
Further down, you’ll find options for adjusting the Expo settings for pitch and roll. As you adjust, you’ll see the graph change, allowing you to control the gimbal tilt speed. Lower values make the tilt slow, while higher values make it instant.
You can also adjust the smoothness. Increasing it will create a trailing effect, making the movement smoother and more cinematic. Lower values make it more jerky. There’s an option to reset everything, so feel free to experiment with these settings for each mode (Cine, Normal, and Sport).
Recommended Accessories
| Image | Product | Price |
 |
ND FilterBrand: |
|
 |
Flight BatteryBrand: Qmint |
|
 |
Propeller GuardBrand: STARTRC |
4. GIMBAL CALIBRATION
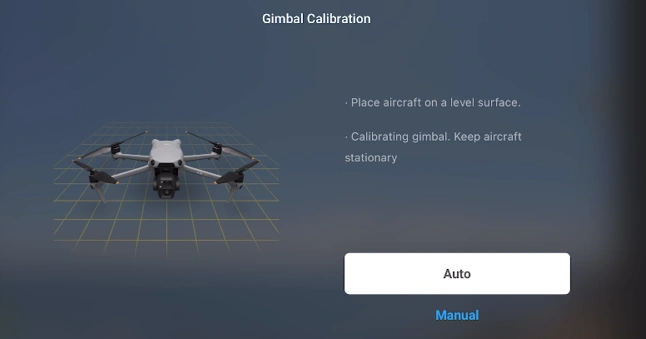
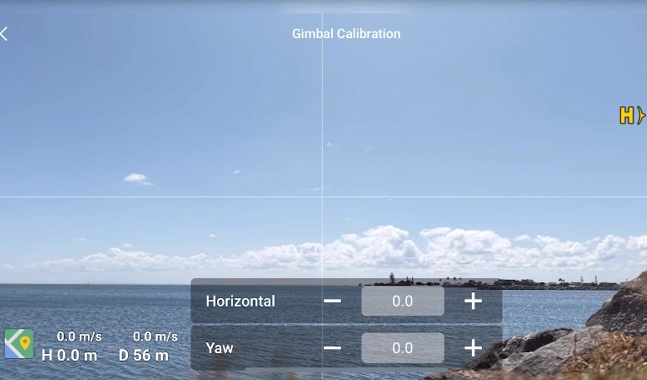
The Gimbal Calibration option allows you to calibrate the gimbal by following on-screen prompts. You can also choose “Manual” to adjust the horizon and yaw, which is helpful if you’re experiencing horizon issues. However, in most cases, we recommend simply selecting “Gimbal Calibration” and letting it run automatically.
5. ADVANCED SAFETY SETTINGS
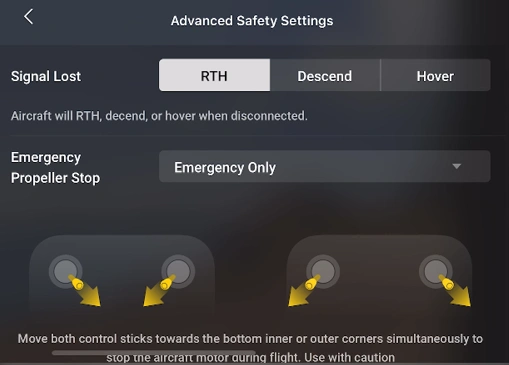
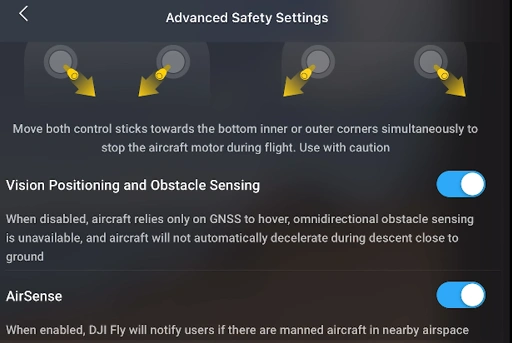
In the Advanced Safety Settings, you’ll find key options for your drone’s safety. The default settings for “Signal Lost” (Return to Home) and “Emergency Propeller Stop” (for emergencies) are recommended for most users, though you can adjust them if needed.
Ensure “Air Sense” is enabled. This feature alerts you to nearby aircraft and displays their location on the map for added safety.
The “Vision Positioning and Obstacle Sensing” feature is helpful for stable flight, as it uses sensors to keep the drone from descending too low. Disabling it may be useful for experienced pilots flying low for unique shots, but it’s best to leave it on for general use.
6. COLOR SETTINGS
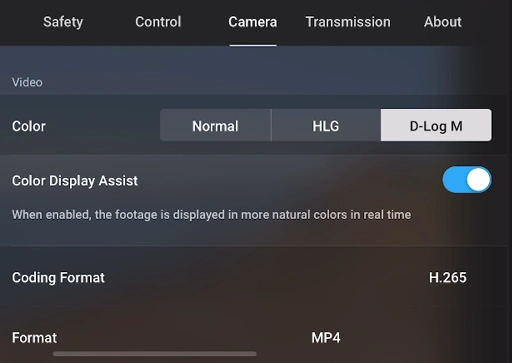
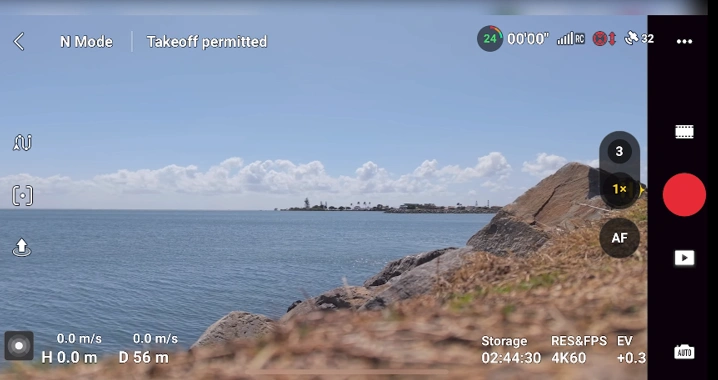
In the Color Settings menu, the default setting is “Normal”, which works well for most users and provides a good look. You can also select “HLG” or “D-Log M” if you want more control in post-production. These options keep more data in the video, giving you better flexibility in editing.
Additionally, you can toggle the CDA “Color Display Assist” feature on or off. When it’s off, the video may appear flat, allowing you to extract more details during editing. Turning on Color Display Assist provides a rough color preview, so you’re not flying in a nearly black-and-white view. For maximum editing flexibility, D-Log M is a preferred choice, but if you’re not planning extensive post-production work, “Normal” is a good option.
7. HISTOGRAM
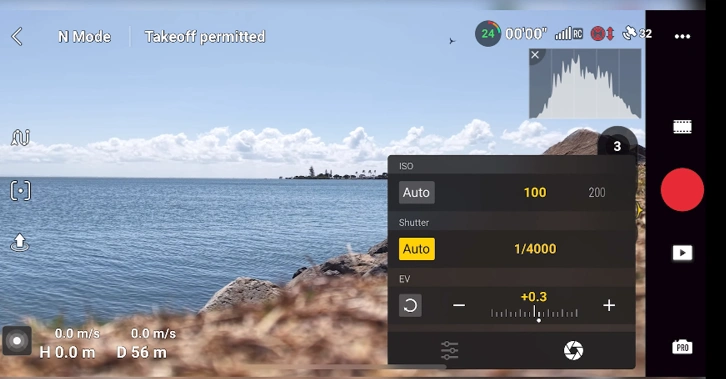
The option enables the histogram. Once enabled, the histogram appears on the screen, and you can move it to any location you prefer, though resizing isn’t possible. The histogram provides a visual representation of the exposure in your image. For example, if you adjust the ISO and the image becomes overexposed, the graph shifts to the far right. Reducing the exposure will bring the graph to a balanced bell-shaped curve, which is ideal. It’s helpful to switch to Auto mode with the histogram on to observe the drone’s default settings, so when you switch to Pro mode, you can replicate that balanced exposure and gain more control over your image.
8. FRAME GUIDE
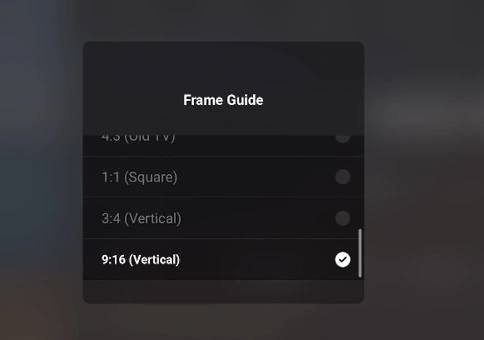
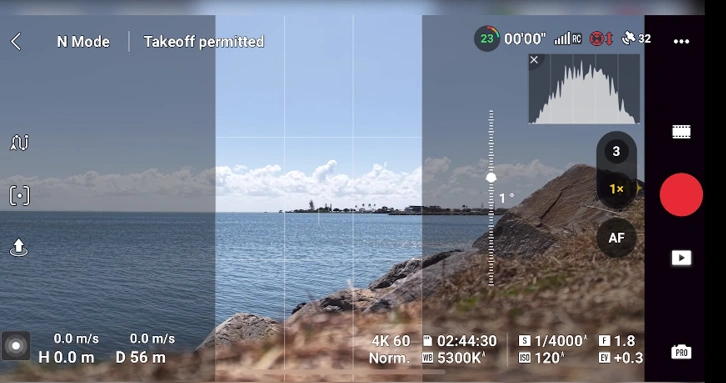
The Frame Guide is off by default, but if you enable it, you’ll see several different guide options. For example, selecting the 9×16 guide (ideal for vertical content) displays a visual guide on the screen. Although it records the full horizontal frame, this guide helps you frame content with a 9×16 area in mind, which is useful if you’re creating content for social media. Similarly, selecting the 1×1 guide gives you a reference for a square format, while still recording everything outside the guide. Having the frame guide on is handy if you’re capturing content for different platforms.
Recommended Accessories
| Image | Product | Price |
 |
PropellersBrand: DJI |
|
 |
Control SticksBrand: DJI |
9. STYLE
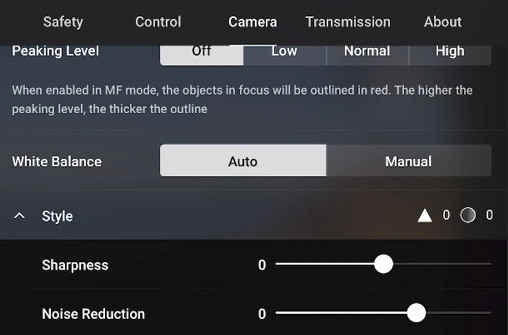
We see the White Balance options. You can select “Manual” to adjust these settings yourself, or leave it on “Auto.” What I really like here, though, is the “Style” setting, as it gives you more control over sharpness and noise reduction. You can adjust sharpness from -2 to +2 setting it to -2 allows you to add sharpness later in post-production, if needed. Similarly, noise reduction can be adjusted from -2 to +2. While you can leave these settings at their defaults, experimenting with them gives you a bit more control over the final look.
10. Reset Drone & Clear Data
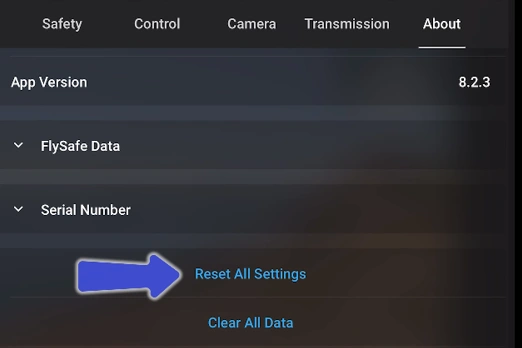
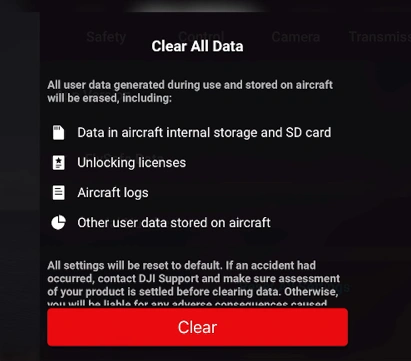
You’ll show how to reset the drone and clear the data. Scroll down, and you’ll see options to “Reset All Settings” and “Clear All Data.” This is useful if you’re preparing to sell your drone. Make sure to unlink your account from the drone first, then reset all settings and clear all data. This will return the drone to its factory reset state.
11. Firmware Auto-Download
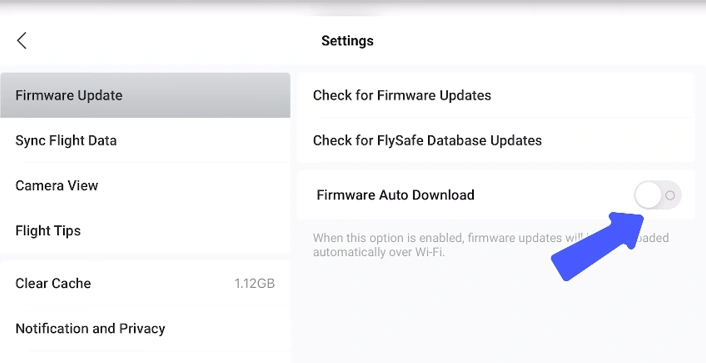
You’ll show the Firmware Auto Download option. This feature is great if you prefer not to view the detailed information about each update. We leave this off because We like to see what the update includes. However, if you’d prefer the firmware to download automatically in the background, you can enable it here. This will save you time, as the firmware will be ready to install whenever you decide to update.
12. Auto Enter Camera View
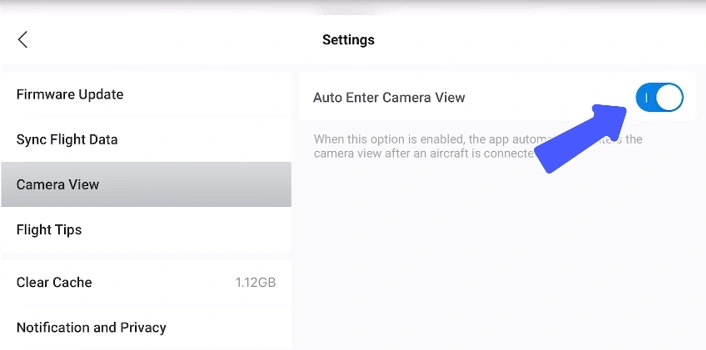
This feature is really useful! You can enable “Auto Enter Camera View” by clicking on “Camera View.” With this setting, the app automatically enters the camera view as soon as the aircraft connects to the controller. You won’t need to open the Fly app or tap any other buttons—it’ll take you directly to the camera view, making it a very convenient setting.
13. Clear Cache
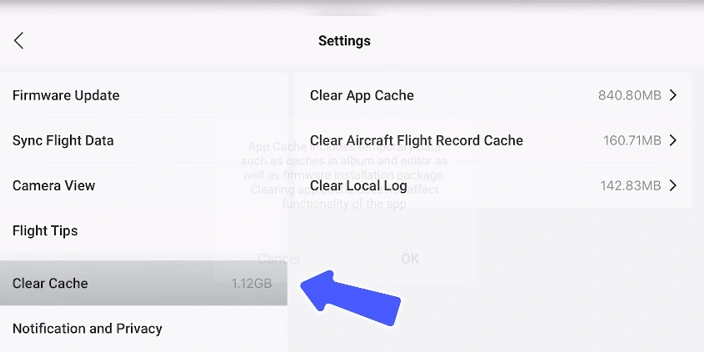
Here’s how to clear the cache. Tap on “Clear Cache,” and you’ll see several options: “App Cache,” “Aircraft Flight Record Cache,” and “Local Log.” These can accumulate over time, increasing the app’s storage size. If you notice your phone is running low on storage—especially if you’re using a device like the RC-N3 with your phone-simply come here to clear the cache.
14. Check For Updates
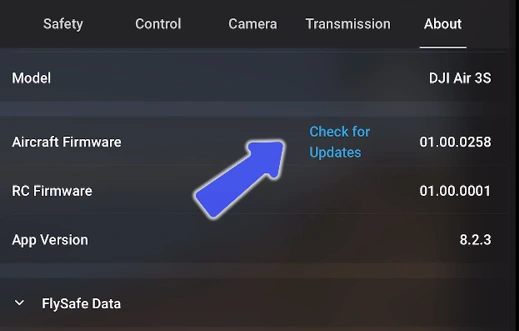
We have the “Aircraft Firmware” option here. When you tap on it, it will check the current version. We know there’s an update available, so let’s wait a moment, and the update notification should appear soon. There it is—new firmware is available! I can click “Update” now, but I’ll cancel it for now. You can also click on “Fly Safe Data” to manually check if there are any updates.
15. Change Frequency
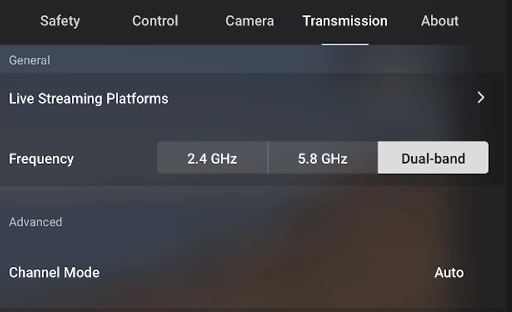
It’ll show how to change the frequency settings. By default, it’s set to “Dual Band.” As you scroll down, you’ll see the different frequencies available in the area. Note that the drone needs to be grounded to view this information. If you’re experiencing connectivity issues, you can switch to 5.8 GHz or 2.4 GHz to check for interference in the area. However, in most situations, it’s best to leave it on Dual Band by default. This option just gives you a way to monitor interference if needed.
Recommended Accessories
| Image | Product | Price |
 |
Car ChargerBrand: DJI |
|
 |
MicroSD CardBrand: Kingston |
16. Format Card/Internal Storage
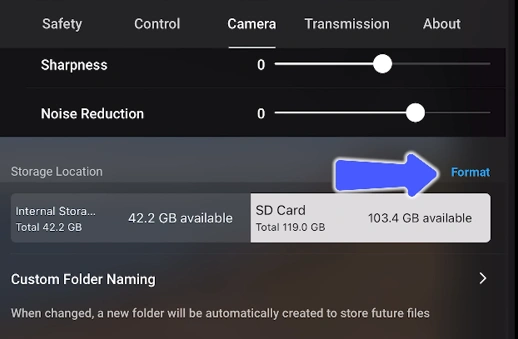
This is where you can format your SD card and internal storage. You’ll see a blue “Format” button-tap on it, then select either the internal storage or the SD card, depending on which one you want to format. It’s a straightforward process: tap “Format,” then choose the storage option you need. This is probably the easiest way to manage storage. Now, moving on to the Transmission menu, which doesn’t have too many settings, but you’ll show a few useful options here.
17. Peaking Level
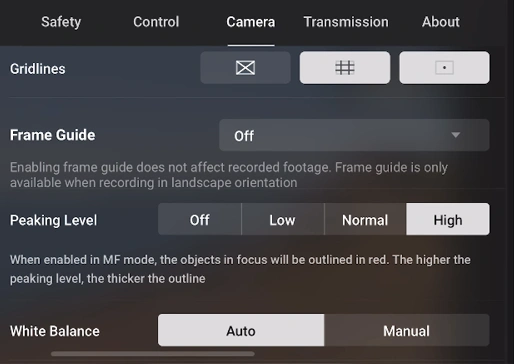
The Peaking Level setting is related to the manual focus mode. For example, if you set it to “High,” you’ll see the focus points more clearly. When you press “MF” (Manual Focus), the display shows what’s currently in focus. As you press and hold, you can drag to adjust the focus point, which helps get a clear reference of what’s sharp. This feature is especially useful for those who prefer manual focus, as it provides a high level of control for a professional-grade camera system. It’s not just a drone-it offers a bit more customization for precise focusing.
18. Gridlines
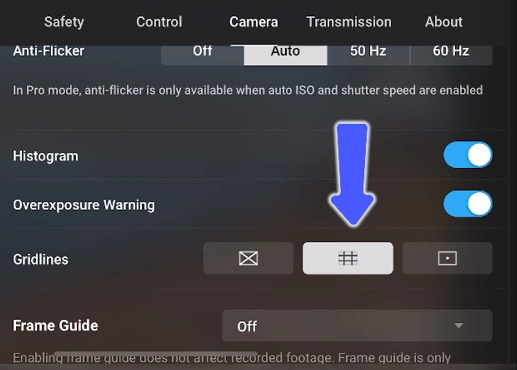
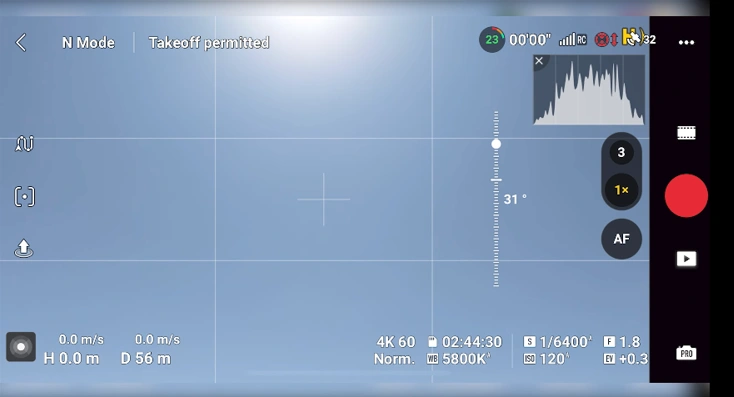
The Grid Lines feature offers a few different options that you can enable by tapping on them. Once enabled, you’ll see grid lines on the screen, along with a crosshair in the center to mark the focal point. I prefer having both the grid lines (for the rule of thirds) and the center crosshair enabled, as they help with composition and framing.
19. Overexposure Warning
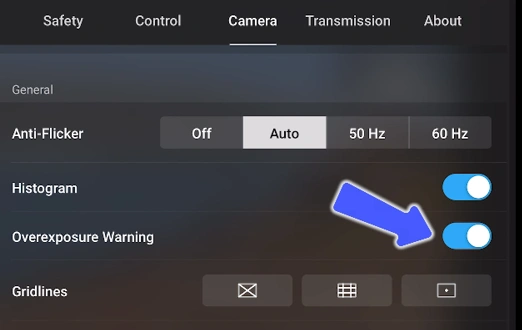
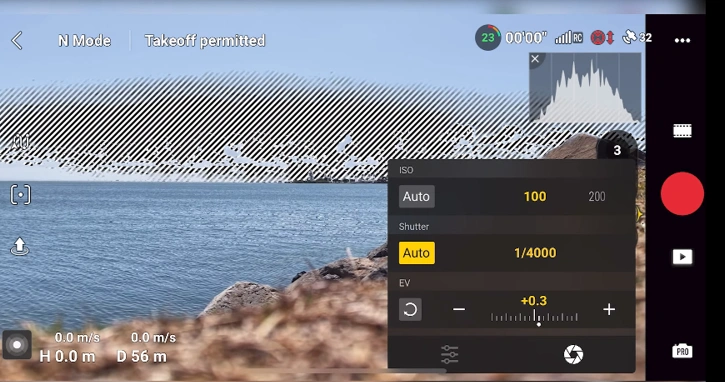
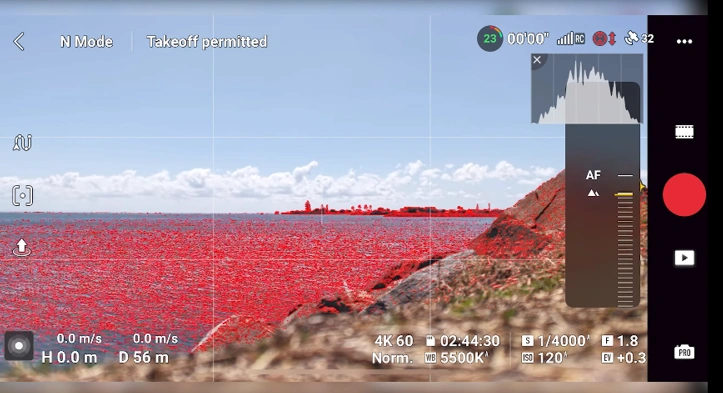
We recommend enabling the Overexposure Warning. This feature alerts you if parts of the image are overexposed. For example, if you start to overexpose the image, the screen will highlight the overexposed areas, making it clear that they won’t be usable. By default, you might see some overexposure warnings, especially with bright elements like clouds. However, enabling this feature provides helpful feedback to ensure the image remains properly exposed.
20. Button Customization
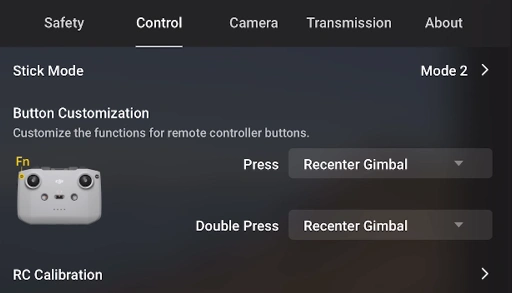
In the control menu, you’ll find Button Customization options. Depending on your controller, the display may look different. For most, you can set a single or double press of the FN button to toggle between various modes.
you’ve set to open Camera Settings with a single FN press. With a double press, you get even more options, including Vision Assist, which provides in-flight visual aids (though it only activates when the drone is flying).
One standout feature We recommend is Cruise Control. This lets the drone continue moving in the direction and speed you set, freeing up your hands. For example, if you’re flying forward and gaining altitude, tapping Cruise Control will lock in those movements until you stop it. To activate, simply double-tap the FN button.
21. Aircraft LEDs
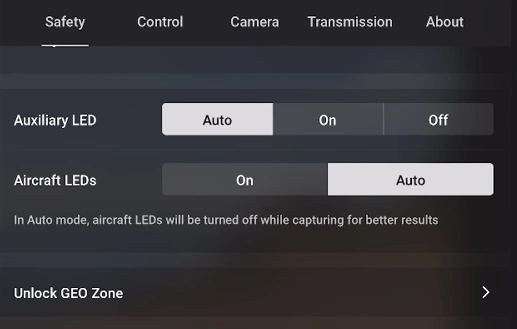
Setting the lights to “Auto” means that when you start recording video, the front lights on the aircraft will turn off. This can be helpful in low-light situations, as the camera might otherwise pick up the flashing lights. With the “Auto” setting, the lights will stay on while you’re flying to the location, but once you start recording, they will turn off, allowing the camera to focus solely on the subject.
22. AR Settings
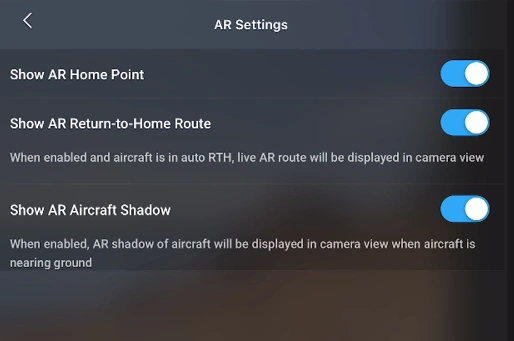
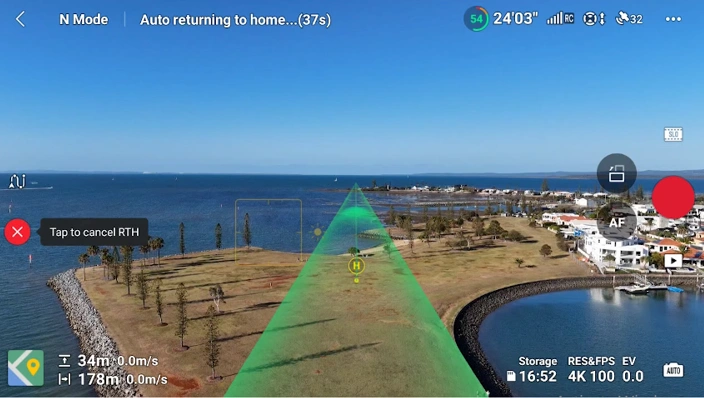
The AR (Augmented Reality) settings offer helpful navigation tools. Here, you can enable the AR home point, which displays the drone’s home location-a very handy feature. You can also show the AR return-to-home route, which provides a pathway indicating the drone’s flight path back home. Additionally, there’s an option to display the AR aircraft shadow, which points the camera downward to show the drone’s shadow, giving you a rough idea of where it will land.
23. RTH Altitude
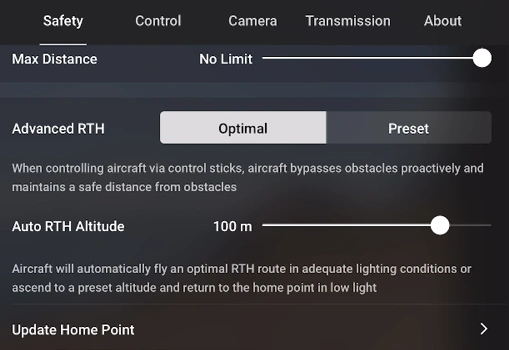
The Auto Return to Home altitude is set at 100 meters. We recommend setting it between 80 and 100 meters. If you press Return to Home, the drone will ascend to 100 meters before flying back to you. This setting adds safety if there are trees or buildings around. Set the Auto Return to Home altitude high enough to clear any obstacles.
24. Advanced RTH
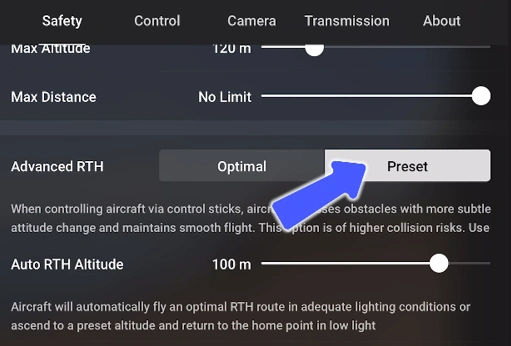
In the advanced “Return to Home” settings, you’ll find a few options, including “Optimal” and “Preset.”
The “Preset” option uses a predefined return-to-home altitude, which is currently set to 100 meters. We recommend setting this between 80 to 100 meters to ensure safe clearance.
Alternatively, you can select the “Optimal” option, which automatically chooses the best altitude based on the surrounding terrain. Keeping the setting on “Optimal” is generally recommended, but whichever option you choose, ensure your return-to-home altitude is between 80 and 100 meters.
25. Flight Protection
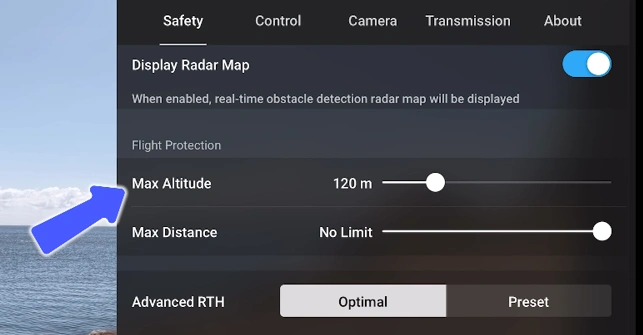
Flight Protection settings control altitude and distance limits. Scrolling down, you’ll see options for Max Altitude and Max Distance. For instance, if you want to let someone try flying the drone, you can limit it to a 20m radius so they can only fly 20m away from the controller. You can also adjust the maximum altitude, with 120m being the legal limit. Increasing this will trigger a warning, alerting you to any regulatory restrictions.
26. Obstacle Avoidance
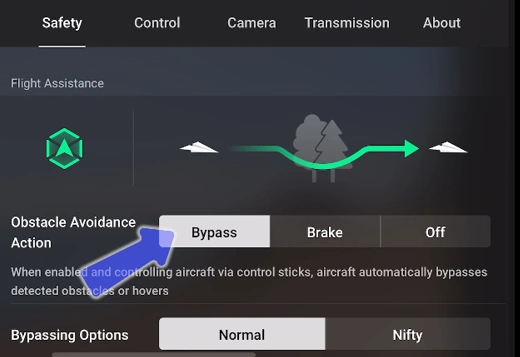
You can set obstacle avoidance to “Off,” the drone will not detect obstacles. This means that if You fly toward a tree, it won’t recognize, and it will likely collide with the tree.
The second option is “Break.” While active, the drone detects a tree, it will stop, hover, and hold its position instead of continuing forward.
My favorite mode, however, is “Bypass”. In this mode, the drone detects obstacles, bypasses them, and continues on its path. This provides a dynamic viewing experience and effectively avoids obstacles. Additionally, within the obstacle avoidance settings, there’s a bypass option called “Nifty“. This model is more dynamic, though it comes with a warning as it’s a bit riskier. You can leave it in normal mode by default or switch to Nifty if you want more dynamic movements when bypassing.
27. Pro Mode & Vertical Video
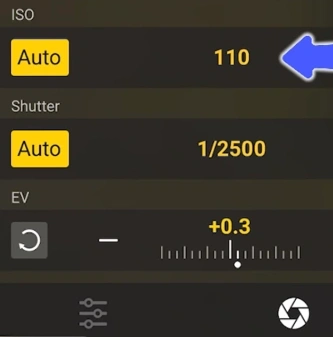
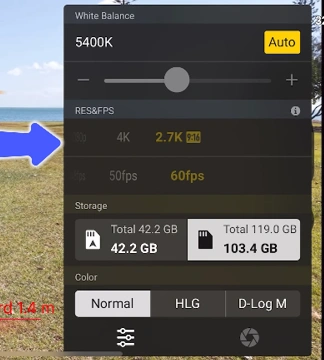
By default, the camera is set to Auto mode, but you can tap on it to switch to Pro mode, which gives you full control over ISO, shutter speed, and EV. In Pro mode, you can also adjust various settings like resolution, white balance, and color options (Normal, HLG, and D-Log M). Additionally, you can select the format and encoding options.
On that note, We also want to show you how to enable vertical video. To do this, tap on the resolution and FPS settings, where you’ll see an option for “2.7K” with a “9×16” aspect ratio. This 9×16 format is for vertical video, and you can record in this mode at up to 60 frames per second at 2.7K.
When you select 9×16, the areas that won’t be included in the video are darkened, highlighting the area where the video will be focused. This feature is quite handy, and face tracking still functions, showing what will appear in the 9×16 video.
28. Digital Zoom
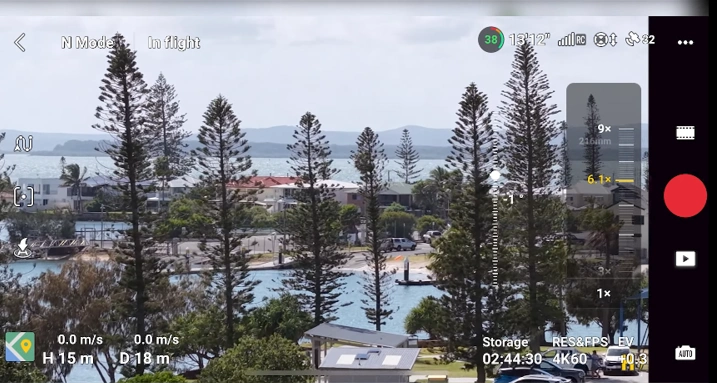
We’re looking at the zoom options. Just above where it says “AF,” you’ll see “1x.” Tapping on it will take you to “2x,” which uses digital zoom.
“1x” represents the wide camera angle. Pressing “3x” switches to the medium telephoto camera system. Pressing again will take you to “6x,” and another press brings it to “9x.” The zoom levels from 3x to 9x are digital zoom. “3x” is the focal length of the telephoto camera, while “1x” is for the wide camera system.
Alternatively, you can press and hold on “1x” and drag your finger down to adjust zoom levels. This allows up to 2.9x digital zoom. At “3x,” the medium telephoto system activates, and you can also press and hold here to drag to other zoom levels. Equivalent focal lengths are displayed as a reference; for example, “6x” is 144mm, and “9x” is 216mm. This feature is handy when you need a bit more zoom, though it’s worth noting that higher levels involve digital zoom.
29. Map & Attitude Indicator
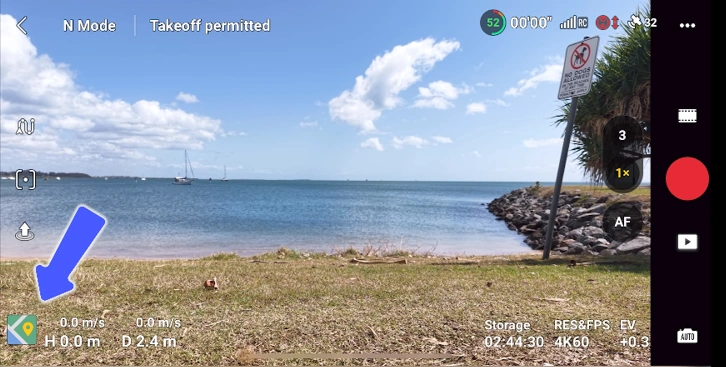
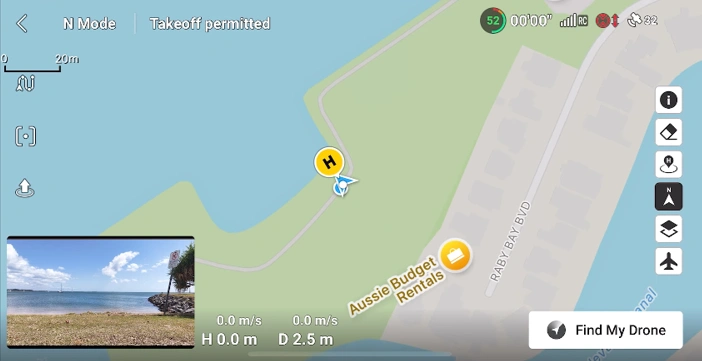
You show how to interact with the map interface and explore its settings. In the bottom left corner, there’s a map icon-tap it to enlarge the map, then tap again to make the map the main focus, moving the flight menu or video feed to the bottom left corner. Tap the video feed to return the map to its original position.
Find the buttons to adjust map orientation and zoom in or out. A small icon in the bottom right corner of the map opens the attitude indicator, which shows the drone’s angle and orientation in real-time. As the drone rotates or banks, the indicator reflects this movement.
30. Auto Exposure Lock
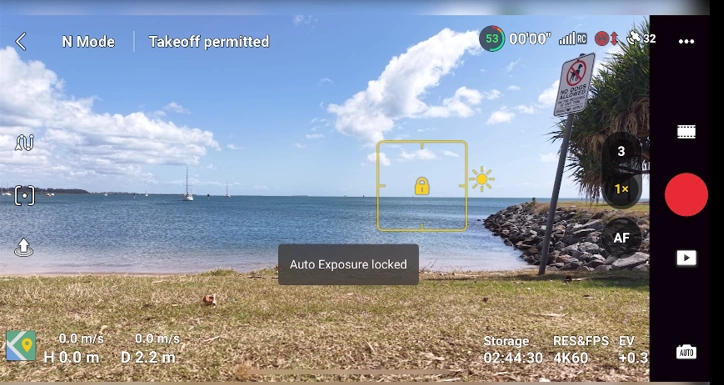
Getting auto exposure lock, simply tap on the area where you’d like to lock the exposure. Once you’ve set the box on that spot, press and hold in the middle of the box, and “Auto Exposure Locked” will appear. This locks the auto exposure for that specific location. You can tap again to disable it, and if needed, tap and hold on another area (like the grass) to lock it there.
Table of Contents
Read More: DJI Air 3S Specs & Key Features: You Need to Know


