If you have just purchased or upgraded to the DJI Avata 2, there are a few DJI Avata 2 settings you will want to be aware of when you first start using the drone. These settings will ensure you get the best possible experience when flying and capture the highest quality videos. In this article, I will go through these settings, explain what they do, and why you should change them.
Bind Controller Or Googles To Drone
Now, if you have DJI Care Refresh, which is DJI’s version of insurance, it’s very important to bind your controller or goggles to your drone before you go flying for the first time.

The reason you want to do this is so that you get the full DJI Care Refresh coverage. You only get FlyAway coverage if you have bound your controller or goggles to your drone.
To do this, you will need the DJI Fly app. Download the app to your smartphone, and then “turn on” your drone, goggles, and controller. Next, connect your goggles to your smartphone via a USB-C cable, and open the DJI Fly app. From the home screen, press Profile > Device Management > DJI Avata 2 > Value-Added Service > Bind New Device. Follow the on-screen steps and press “Confirm”. After a few seconds, you will get a message saying Binding Successful, ensuring that you are fully covered by DJI Care Refresh.
Beginner Mode
The first time you start flying the DJI Avata 2, the drone will be in Beginner Mode. This mode provides a tutorial on how to fly and limits the maximum speed of the aircraft to 1 m/s. This safety feature ensures that you don’t get caught off guard by the drone’s speed and accidentally hit an obstacle or crash. However, you will soon want to remove this speed limit.
When you’re ready to remove the restriction, press right on the joystick on the goggles to bring up the left menu. Navigate to Settings > Control > Beginner Mode option and “turn it off”. This will remove the maximum flight speed restriction, allowing the drone to fly faster than 1 m/s.

RTH Altitude
Another very important setting to adjust before you go flying is the Return to Home altitude. The Return to Home functionality of the Avata 2 allows the drone to automatically fly back to its takeoff point if one of three things happens: you manually trigger Return to Home by pressing and holding the mode button on the controller, if the Avata 2 has a low battery, or the remote control signal or video transmission signal is lost.
When Return to Home is triggered, the drone will stop in place, rise to a set altitude, fly back to above its home point, and then automatically land. It is crucial to adjust this altitude setting in the menu to ensure the drone rises above any obstacles in the area. Remember, the Avata 2 will not avoid obstacles on its own during Return to Home, so if the altitude is set too low below the height of the tallest trees or buildings the drone could collide with these obstacles on its way back.
To set this altitude, bring up the Settings > Safety > RTH Altitude. Set this higher than any obstacles around you to ensure the drone safely rises above them as it returns home.

Avatar 2 Motion Controller Gain Tuning
Now, if you’ve used the joystick on the Avatar 2 Motion Controller, you may have noticed that the Avata 2 ascends, descends, and flies sideways very slowly, even in Sport Mode. This is because, by default, the lateral and vertical flight speeds of the Avata 2 are locked at 0.5 m/s. However, you can change this by adjusting the settings.

To do this, bring up the settings menu, go to Settings > Control > Motion Controller > Gain Tuning. Here, you can adjust the maximum flight speeds for lateral, vertical, forwards, and backwards movements of the drone. You can set these speeds separately for Normal Mode and Sport Mode.
- Immersive Motion Control: Experience the thrill of piloting with the RC Motion 2’s intuitive wrist movements and joystic…
- Easy-to-Use and Feature-Rich: Designed with a streamlined ergonomic grip, the RC Motion 2 offers a comfortable and user-…
Normal Mode
For Normal Mode, I recommend setting the max lateral speed and max vertical speed to half of the Avata 2’s maximum capabilities. This way, the drone won’t be flying at its fastest in Normal Mode. Set the max lateral flight speed to 4 m/s and the max vertical speed to 4.5 m/s.

Sport Mode
For Sport Mode, you likely want the drone to fly as fast as possible. Therefore, set the max lateral flight speed to its highest speed of 8 m/s and the max vertical speed to 9 m/s.

These adjustments will ensure that the drone no longer moves slowly when using the joystick on the Avatar 2 Motion Controller. When you switch to Sport Mode, you will be able to ascend, descend, and fly the drone sideways at much higher speeds using the joystick.
- Engineered for DJI O4 video transmission with an integrated antenna design, it is lighter than its predecessor and boast…
- In addition to Normal and Sport modes, the DJI FPV Remote Controller 3 offers Manual mode, better suited for advanced pl…
Manual Mode
Now, if you have the DJI FPV Remote Controller 3 and you’re looking to fly the Avata 2 manually, you might wonder why the drone switches into Sport Mode when you use the flight mode button on the back of the controller, regardless of your settings. The drone won’t switch to Manual Mode because this is a safety feature to prevent beginners from accidentally switching into Manual Mode without realizing it.

To switch into Manual Mode, bring up the settings menu, go to Settings > Control > Remote Controller > Button Customization > Custom Mode and set it to “Manual Mode”.

You’ll receive a warning on the screen, prompting you to confirm your selection and reminding you to adjust the throttle joystick to prevent the drone from automatically reentering another mode. Press “Confirm”.


Now, when you change the mode button on the back of the controller to Manual Mode, you’ll see that the drone switches into Manual Mode as desired.

Real View PIP
Now, Real View Picture-in-Picture is an exciting new feature of the DJI Go 3. If you double-tap on the side of the goggles, you can see the camera feed from the two cameras on the front of the goggles, allowing you to view your environment without taking the goggles off. However, by default, the entire screen will display the feed from the front cameras, and you won’t see the drone’s camera view in the top left corner, making this mode less useful.

To enhance this feature, go to the Settings > Display > Enable Real View PIP, now “Turn on” the option.

Now, when you double-tap on the side of the goggles, you will not only see the camera feed from the two front cameras, but you will also get a small preview of the drone’s camera feed in the top left corner of the screen. This makes the feature much more useful, as you can see your surroundings through the goggles while keeping an eye on the drone’s camera feed.

Camera View When Recording
Now, if you have a micro SD card, insert it into the Goggles 3 to simultaneously record video footage to the internal storage or micro SD card inserted into the Avata 2, and store a lower resolution version on the micro SD card in the Goggles 3. This is super useful because if you ever crash the drone or lose the Avata 2 and can’t recover the micro SD card from it, you will still have a copy of the video files on the micro SD card within the Goggles 3.

To ensure this feature is active, go to the Settings > Camera > Advanced Camera Settings > Record With Make sure set to “Both”.

- Blazing Fast Data Transfers: Powered by UHS-I tech, the Lexar Blue microSD card achieves read speeds topping 160MB/s. Ef…
- Premium Media Support: The mini SD card, with up to 2TB capacity and a V30 rating, enables seamless 4K video recording. …
Camera View Recording
Now Below this, you will see an option called ‘Camera View Recording.’ Here, you have a choice to make. If this option is turned on, the version of the video file stored on the Goggles 3 will include the interface, allowing you to see details such as the flight mode, flight parameters, battery life, etc. However, if you turn this option off, the video file stored on the Goggles 3 will not include the interface.


Center Point
If you’re flying your Avata 2 through gaps or narrow spaces and finding it difficult to line the drone up correctly either being too far to the left or too far to the right, a setting you can turn on to make this much easier is the Center Point setting. To enable this go to the Settings > Camera > Center Point now “Turn on” the option.

Now, when you go back to the camera view, you will see a small ‘X’ superimposed over the center of the screen. This allows you to see exactly the direction the drone is flying, making it much easier to line up and fly through narrow spaces or gaps.

Grid Lines
Another setting that I recommend turning on is grid lines, which will help you line up your shots and compose your images. To enable grid lines go to the Settings > Gridlines, You will see three options.

Cross Lines

The first option places a large ‘X’ over the camera feed. This is super useful for helping you line up your shots when flying through narrow gaps or tight spaces.
Grid Lines

The second option places a large grid over the camera preview. This can be extremely helpful for composing your videos using techniques like the rule of thirds.
Gird + Diagonals option

The last option combines the grid and the ‘X’ over the camera feed at the same time. However, I find this makes the screen too complicated. Personally, I prefer using the large ‘X’ as I find it invaluable, especially when lining up shots and flying through narrow spaces.
Video Resolution
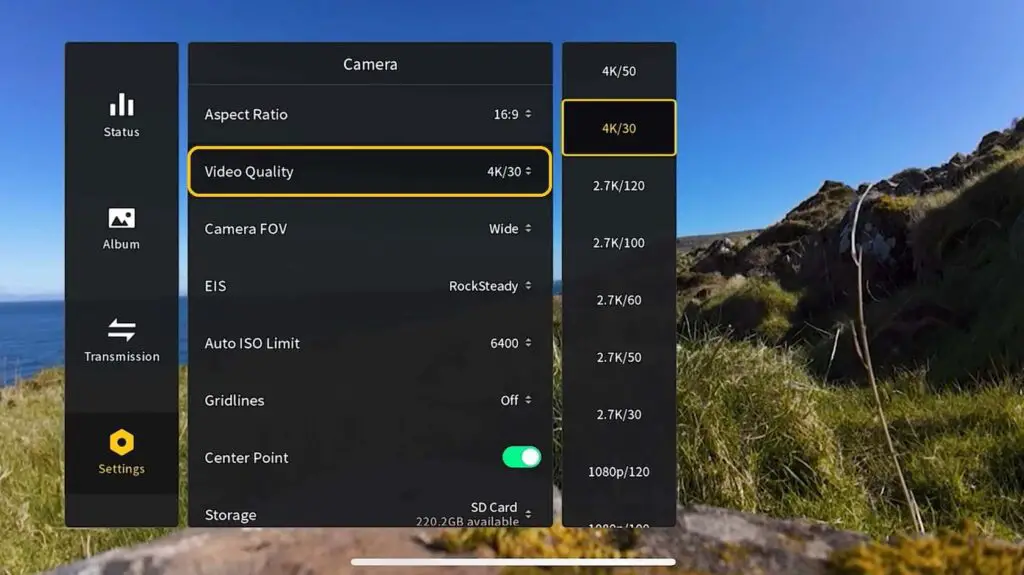
Now, if you’re looking for the highest quality video possible from the Avata 2, the first setting you will want to change is the video resolution setting. Although the Avata 2 is capable of 4K, the default resolution is set to 1080p. To change this go to Settings > Camera > Video Quality and Change the setting to “4K” to get the highest resolution possible from the Avata 2.
Manual Exposure
Another setting I recommend changing if you’re looking for the highest quality video possible from the Avata 2 is the exposure mode. The Avata 2 offers two exposure modes: Auto and Manual. In Auto exposure mode, the drone automatically adjusts the ISO and shutter speed to achieve what it considers a properly exposed image. While Auto mode generally performs well, you might notice jarring exposure shifts, especially when flying into and out of dark areas. These shifts occur because the drone is constantly adjusting the ISO and shutter speed, which can look unappealing in your footage.
To avoid these exposure shifts, you should manually set the ISO and shutter speed by switching to Manual exposure mode. To do it Bring up the Bottom Menu > Mode change it to “Manual” And Navigate to Bottom Menu > ISO and ensure it is not set to “Auto” Set the ISO manually to maintain consistent exposure while flying. By using Manual exposure mode, you can control the ISO and shutter speed, preventing unwanted exposure changes and ensuring smoother, more professional-looking video.

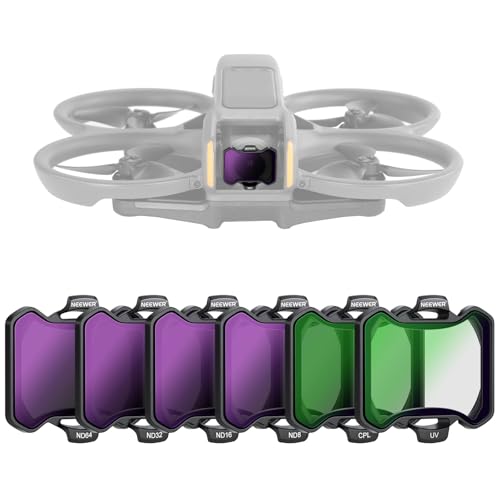
- 【6 Pack Avata 2 Filter Kit】This 6 Pack Filter Kit from K&F CONCEPT is specially designed for DJI Avata 2, which includes…
- 【Light Reduction & Balanced Exposure】 This K&F CONCEPT Avata 2 ND filter kit reduces exposure by 3 stops to 6 stops, ide…
ISO
I recommend setting the ISO to the lowest value possible. On a bright sunny day, you should set it to 100. If you’re flying in darker conditions, such as indoors or in a forest, you will need to increase the ISO value until your image is properly exposed. However, try to maintain the ISO at the lowest possible level.

The reason for this is that, although the image gets brighter as you increase the ISO value, you also start to introduce grain and noise into the image. For the cleanest image possible, always aim to keep the ISO value as low as you can.

Shutter Speed
The next setting to adjust is the shutter speed. When flying FPV, motion blur is very important because you’re generally flying fast, low to the ground, or close past obstacles. The human eye is accustomed to seeing motion blur when viewing fast-moving objects, so footage without motion blur can appear unnatural, jittery, or too sharp. Adding motion blur will make your footage look much better and more natural. To achieve motion blur, use the 180° shutter rule.
which states that your shutter speed should be twice your frame rate. For example, if you’re using 30 FPS, set your shutter speed to 1/60. If you’re using 60 FPS, set your shutter speed to 1/120.
180° shutter rule

Following this rule will ensure that your footage has the desired motion blur. However, on a bright sunny day, with your ISO set to 100 and a lower shutter speed, your image might become overexposed or completely blown out. To compensate for this, you will need to use ND filters. ND filters act like sunglasses for your drone’s camera, reducing the amount of light that hits the sensor. This allows you to use lower shutter speeds while still achieving a properly exposed image.


Sharpness
After capturing footage with the Avata 2, you might notice that the footage is very sharp out of the box, giving it a somewhat digital look. To make the footage appear less digital and more natural, I recommend lowering the sharpness setting.
You can access Sharpness setting go to Settings > Camera > Advanced Camera Settings > sharpness. Here, you can either increase or decrease the sharpness of the image. I recommend setting it to -1, which reduces some of the sharpness and, in my opinion, makes the footage look much better and more natural.

Electronic Image Stabilization
Unlike flying traditional drones, which you generally fly slow and smoothly, with an FPV drone like the DJI Avata 2, you’re flying fast and making lots of sharp turns. This can result in jittery footage. Thankfully, the DJI Avata 2 comes with a feature called RockSteady, which provides electronic image stabilization to your footage, making it smooth.
You want to make sure this feature is turned on because, without it, your footage will be very jittery and have lots of harsh movements. To ensure RockSteady is activated, go to the Settings > Camera > EIS (Electronic Image Stabilization) and make sure it is set to “RockSteady”.

Auto Record On Takeoff
If you often take off with the drone, start flying around, and then realize after a few minutes that you forgot to hit record missing out on capturing all the epic clips you thought you did there is a setting that can prevent this from happening. It’s called “Auto Record on Takeoff”.
To enable this go to Settings > Camera > Advanced Camera Settings > Auto Record on Takeoff and “Turn on” the option. Now, when you take off with the drone, it will automatically start recording. This will prevent those frustrating scenarios where, after flying around for a few minutes, you realize you forgot to hit record.

Those are a few settings I recommend changing to ensure you get the best flying experience possible from the DJI Avata 2.
Table of Contents
Read More: DJI Avata 2 Review


