
If you have been flying the DJI Mavic 4 Pro and think you already know everything it can do, think again. After flying the Mavic 4 Pro for over a year, I have discovered 15 hidden features and settings that most pilots have no idea exist. Some of these will help you get smoother, more cinematic footage, and some of them could literally save your drone from crashing. Let us dive right in.
Table of Contents
Hidden Feature 1: Cruise Control
Cruise control is one of the most useful DJI Mavic 4 Pro hidden features, and you will not find it anywhere on the main screen. To access it, go into the settings menu, head over to the Control tab, and scroll down to Button Customization. Set one of your custom buttons to Cruise Control. I have mine set to Custom 1, which you will find under the Control tab of settings.
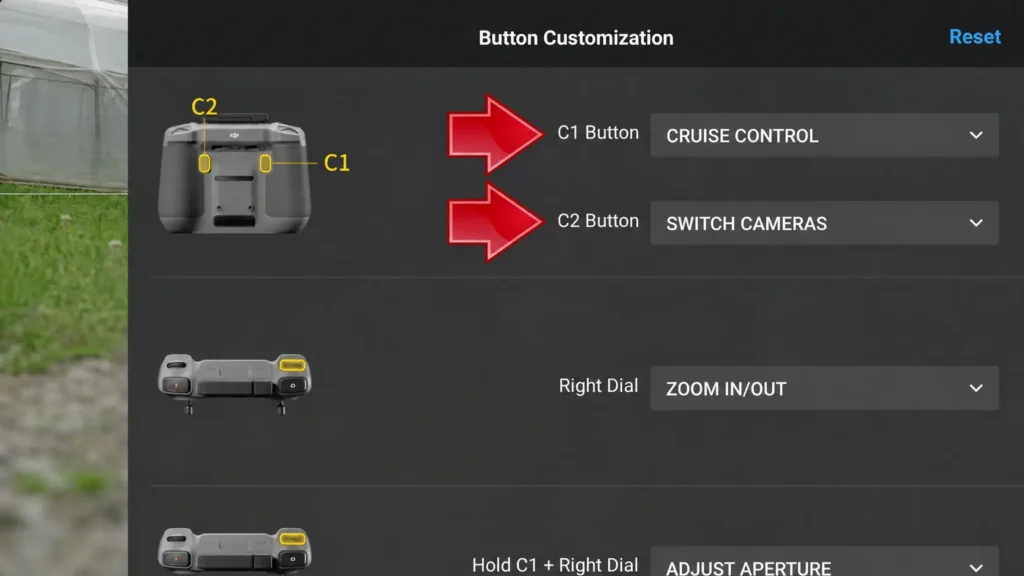
Once you are out flying, instead of holding down your sticks the entire time, you simply click the Custom 1 button on the back of your remote. The drone will confirm that cruise control is enabled and will continue your current movement without any further stick input. If you want to adjust the direction, just make the change with your sticks, click the button again, and it will lock in the new movement.
This feature is especially great for longer shots where you want perfectly smooth, consistent movement without micro jitters caused by imperfect stick control. For example, if you want a slow side-moving shot over a valley with a gradual turn, just start the move, engage cruise control, and let the drone do the rest.
Hidden Feature 2: Unlocking the Max Speed in Sport Mode
You may have heard that the DJI Mavic 4 Pro can reach speeds of up to 60 miles per hour in Sport Mode. However, if you are using the drone straight out of the box with default settings, you are probably not hitting that top speed.
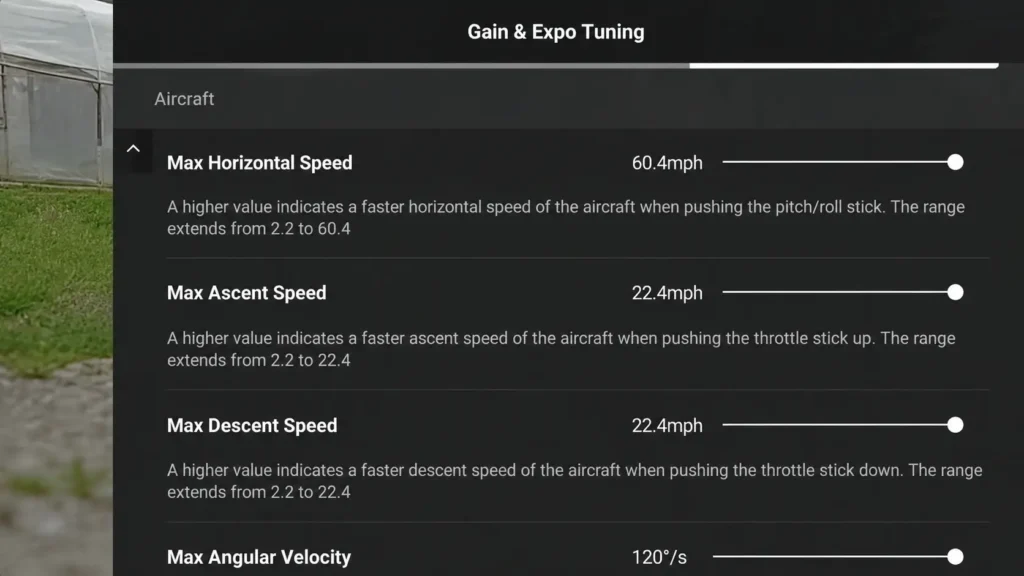
To fix this, go back into settings, head to the Control tab, and select Gain and Expo Tuning. Click on the Sport tab and check that the Max Horizontal Speed is set all the way up to 60 mph. By default, it is often set somewhere around 50 mph. A quick adjustment here ensures you are getting the full performance your drone is capable of.

Hidden Feature 3: Gain and Expo Tuning for Cinematic Shots
Gain and expo tuning settings control how your drone responds to your stick inputs. The default settings that come with the Mavic 4 Pro are not ideal for getting smooth, cinematic footage, so adjusting these can make a huge difference in the quality of your shots.
To access these settings, go back to Gain and Expo Tuning under the Control tab in settings. You will find separate settings for both Normal and Sport Mode, with a wide range of options to customize.
The settings I recommend come from seven years of flying DJI Mavic drones, so they are well tested. That said, you can always do your own testing and find what works best for your flying style.
Hidden Feature 4: Switch Between Cameras With a Physical Button
Tapping the touchscreen to switch between cameras mid-flight is awkward and inefficient. A much better approach is to assign camera switching to a physical button on your remote.
To do this, go into settings, head to the Control tab, and scroll all the way down to Button Customization. Assign the C2 button to Switch Cameras. You will notice several similar-sounding options like Switch to Lens with High Zoom or Adjust Focal Length, but the one that actually cycles through all cameras correctly is simply Switch Cameras.
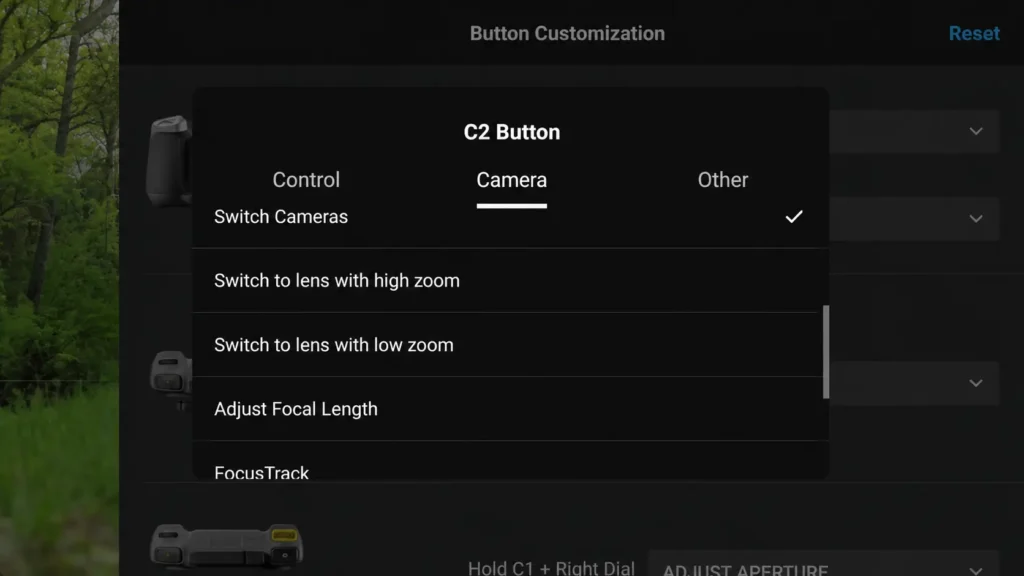
With this set up, you can press the button on the back of your remote to cycle through the 1x, 2.5x, and 6x cameras without ever taking your fingers off the controls. It is a simple change that makes a big difference during active flying.
Hidden Feature 5: Subject Tracking Autofocus
This is one of those DJI Mavic 4 Pro hidden features that many people overlook completely. When you are filming a person, and in some cases animals, you will notice a small yellow box appear around their head or body as soon as they enter the frame. This is subject tracking autofocus, and it keeps your subject perfectly sharp in real time.
Whether your subject is walking toward the camera, moving away, or you are flying closer or further from them, the drone continuously adjusts focus to keep them sharp. You do not need to tap the screen or manually refocus at any point. It works quietly in the background and ensures your footage stays crisp no matter what is happening.
Hidden Feature 6: Color Display Assist
When shooting in D-Log M or especially D-Log, your footage will look extremely flat and washed out on the screen. This can make it very difficult to judge your exposure and composition while flying. Color Display Assist solves this problem by adding contrast to your live view so the image looks more natural while you are shooting.
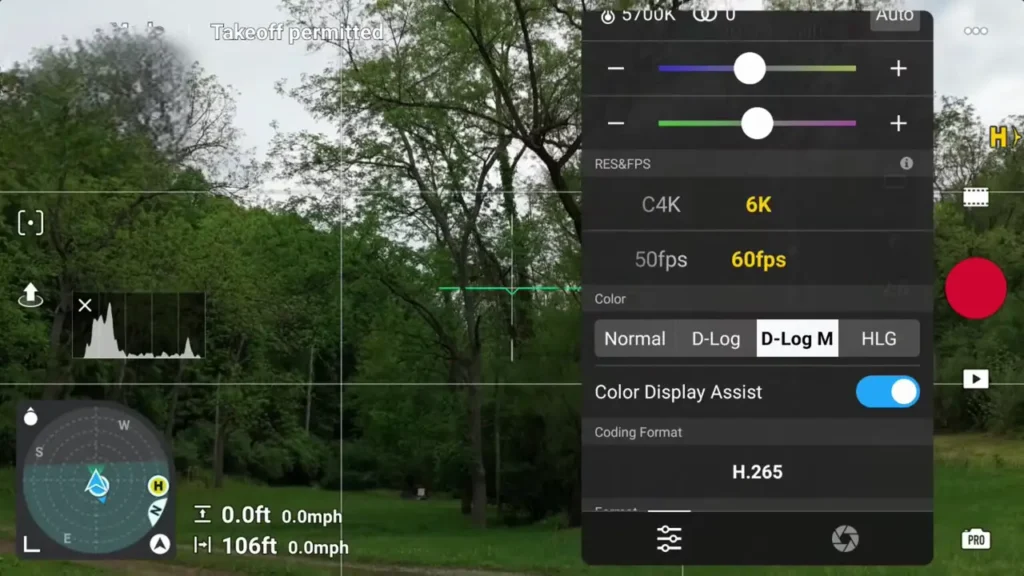
To turn it on, just flip the toggle right below where you select your color profile. Even in D-Log M, it will not make the image super contrasty, but it looks significantly better than having the flat log image on your screen. It makes real-time monitoring much more manageable.
Hidden Feature 7: Use a Wider Aperture for Sharper Footage
The Mavic 4 Pro produces sharp footage across most of its aperture range, but it does lose some sharpness at the narrower end of the spectrum. Apertures from F5.6 to F11 are noticeably less sharp, with F8 through F9 being the weakest range.
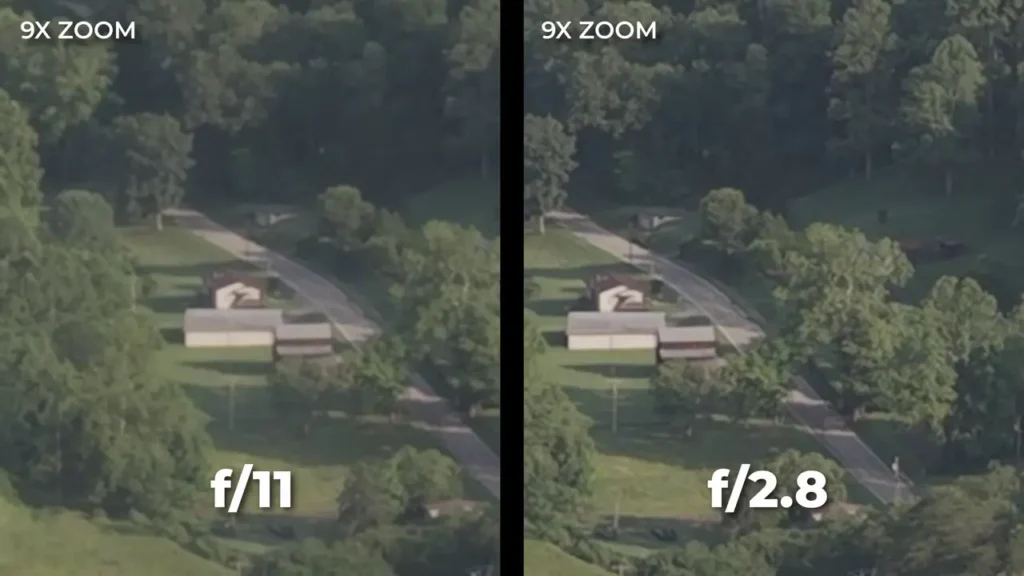
If sharpness is a priority, keep your aperture in the F2 to F4 range. You will get consistently tack sharp footage and avoid the softness that comes with stopping down too far. This is a small but important detail that can noticeably improve the overall quality of your footage.
Hidden Feature 8: Disabling Downward Obstacle Avoidance
This might sound counterintuitive, but there are specific situations where disabling downward obstacle avoidance is actually the right move.
The first situation is hand catching the drone. With downward obstacle avoidance enabled, the drone hesitates before descending into your hand, which is usually fine. But if you are trying to catch it from the back of a moving vehicle or from a boat, that hesitation can create serious problems.
The second situation is flying extremely close to the ground. With obstacle avoidance on, the drone will not let you get below a certain height. Turning it off lets you skim just inches above the surface, which can create stunning low-level shots.
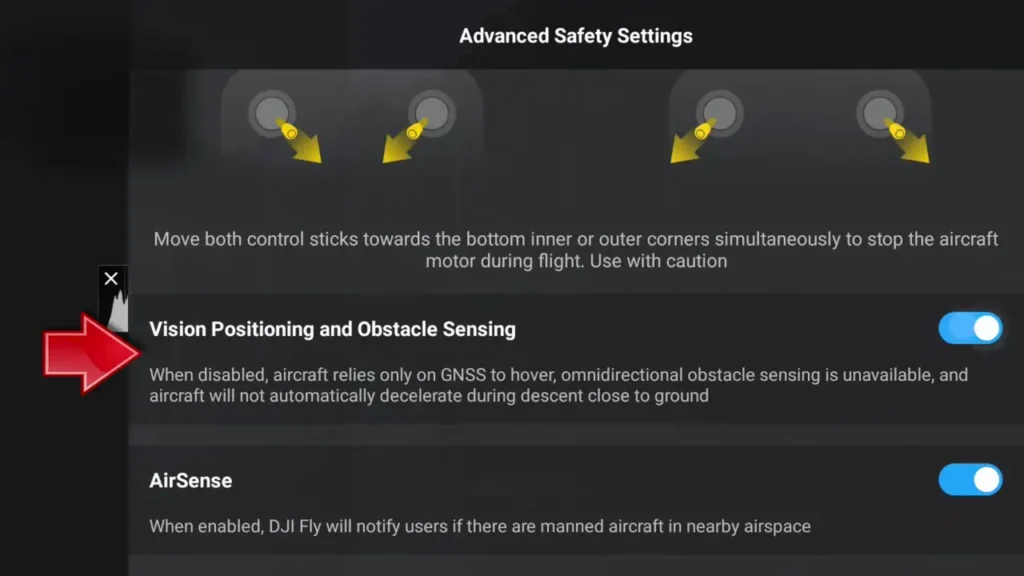
To disable it, go into settings, select the Safety tab, scroll to the bottom to find Advanced Safety Settings, and turn off Vision Positioning and Obstacle Sensing. Just be aware that this completely disables obstacle avoidance, meaning the drone will also not hesitate before hitting the ground. Use this setting with caution and always remember to turn it back on when you are done.
Hidden Feature 9: Manual Focus Peaking
Autofocus on the Mavic 4 Pro works well most of the time, but occasionally it just does not lock onto the right subject. When that happens, tap the AF button next to the camera switcher on your screen to shift into manual focus mode.
The challenge with manual focus is that judging sharpness on the small screen of the RC 2 remote can be very difficult. This is where focus peaking comes in. Go into settings, head to the Camera tab, and scroll down to find Peaking Level just below Histogram and Anti-Flicker. Set it to Low, Normal, or High depending on your preference.
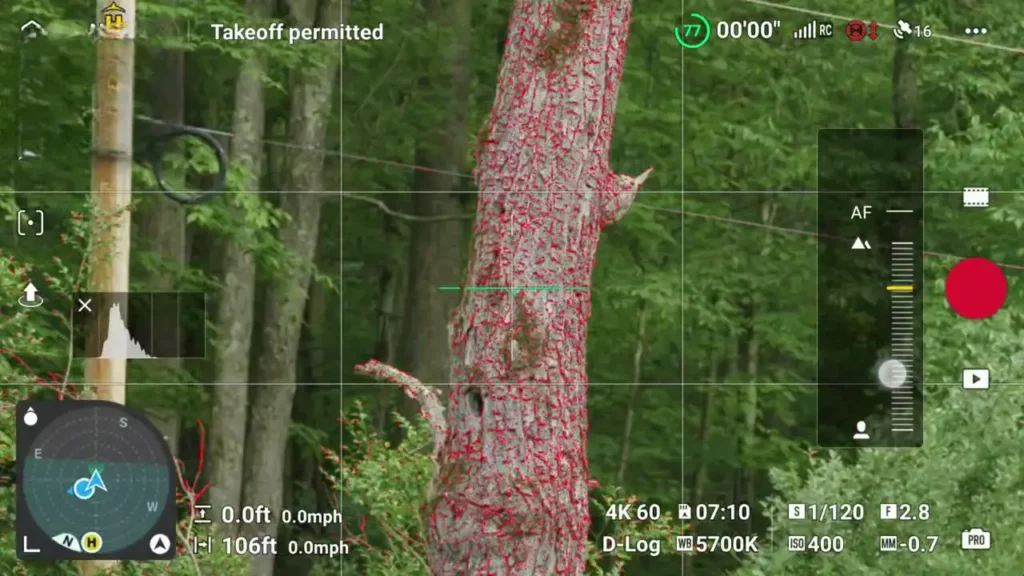
With peaking turned on, the areas of your frame that are in focus will be highlighted in red. This makes it easy to see exactly what is sharp and adjust your focus precisely, even on a small screen. It is a genuinely useful tool for getting precise focus in tricky situations.
Hidden Feature 10: Vision Assist
Obstacle avoidance is helpful, but sometimes you want to actually see what is around your drone rather than just relying on sensors. Vision Assist solves this by giving you a live feed from the obstacle avoidance cameras.
To access it, tap the small icon in the bottom left corner of your screen. It may show a radar view or a map, but if you keep swiping through the options, you will find Vision Assist. It automatically shows you the view in whichever direction you are flying, pulled from the corresponding obstacle avoidance camera.
You can also tap on the Vision Assist view to expand it to full size, which pushes your main camera feed to a small corner window. This gives you a much clearer look at what is in front of, behind, or to the side of your drone and helps you fly with far more confidence in tight spaces.
Hidden Feature 11: White Balance Tint Slider
Most drone pilots are familiar with adjusting color temperature using the Kelvin slider, but the Mavic 4 Pro also has a separate Tint slider sitting right below it in the camera settings. This lets you shift your image toward magenta or green.
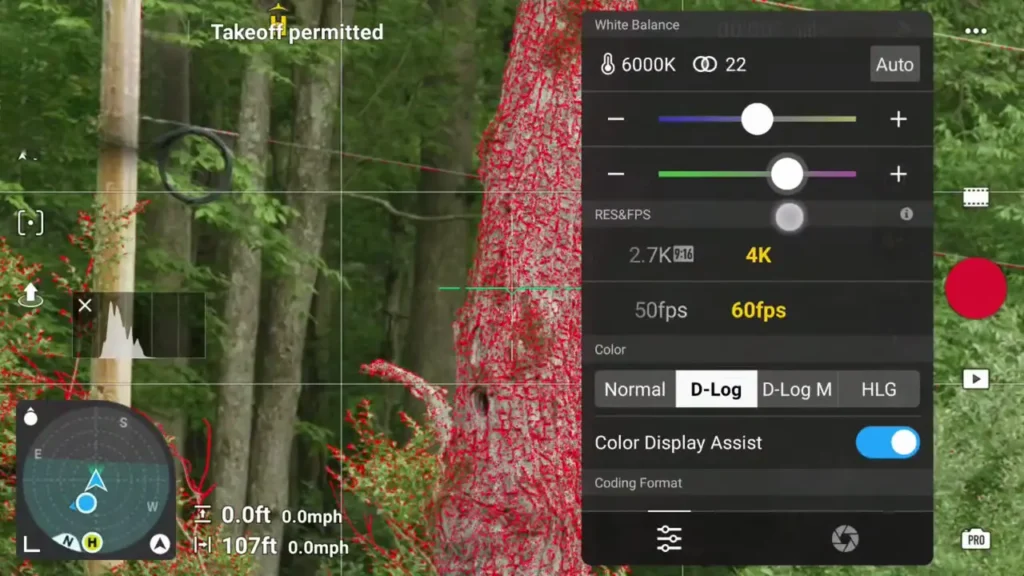
In most outdoor daytime situations, you will want to leave this close to center. Pushing it too far in either direction will make your footage look unnatural. However, in specific scenarios like shooting under stadium lights or other artificial lighting at night, fine-tuning the tint can help you correct color casts that the Kelvin slider alone cannot fully fix.
Hidden Feature 12: Grid Lines and Frame Guides
Grid lines and frame guides are easy to overlook but genuinely helpful for composing better shots. To turn them on, go into settings, head to the Camera tab, and scroll down until you find Grid Lines.
I always keep the Center Marker and Rule of Thirds grid turned on. The center marker helps you line up perfectly centered compositions and also gives you a reference point while flying.
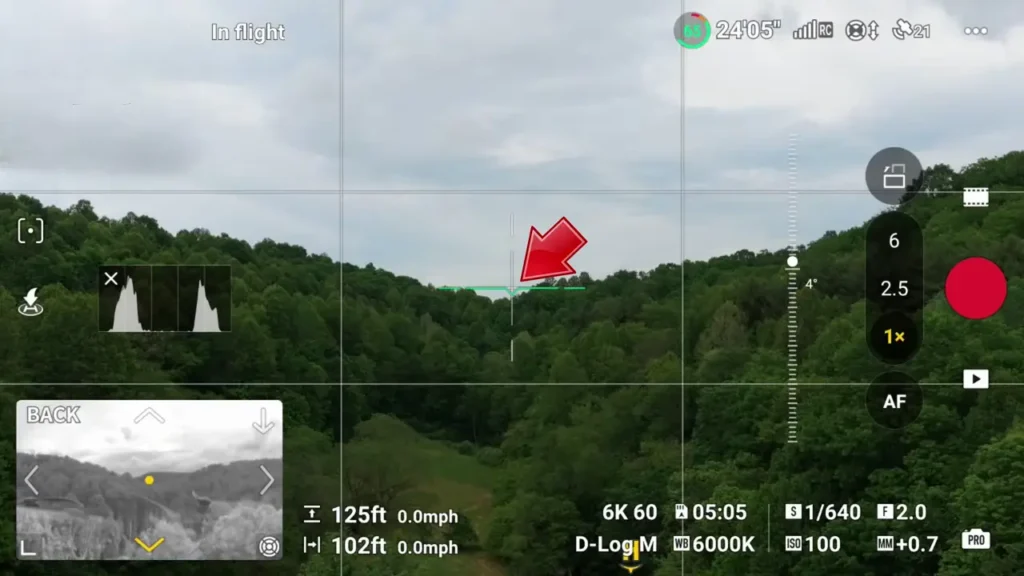
The rule of thirds grid helps you place key elements of your scene on the horizontal or vertical third lines or at the points where they intersect. One of my favorite ways to use this is placing the horizon on the upper or lower third line depending on whether I want to emphasize the ground or the sky.
Just below Grid Lines, you will also find Frame Guides. This feature places a visual overlay on your live feed to show you how your footage will look in a different aspect ratio, such as widescreen cinemascope or a 1:1 square format. It does not affect the footage recorded to your SD card but helps you frame intentionally for specific formats while you are shooting.

Hidden Feature 13: Half Press the Shutter Button to Refocus
This is one of those DJI Mavic 4 Pro hidden features that you will not find anywhere in the menus, and very few pilots know it exists. When you are in autofocus mode, you can press the shutter button halfway down without taking a full photo or switching modes. This triggers a focus reset.
If the drone has focused on the wrong part of the scene or you are unsure whether your subject is sharp, just give the shutter button a gentle half press. It will refocus and confirm that your shot is sharp before you commit to recording. It is a small trick but incredibly useful for ensuring consistent sharpness in your footage.
Hidden Feature 14: Overexposure Warnings and Histogram
Getting exposure right is critical for great footage, and the Mavic 4 Pro gives you two powerful tools to help. Both are found under the Camera tab in settings.
The Histogram is a small graph that you can drag anywhere on your screen. The right side of the graph represents your brightest highlights, the left represents your darkest shadows, and the middle shows your midtones. The height of the graph at any point shows how much of your image falls in that tonal range.
What you want to avoid is the graph being pushed entirely to one side. If it is all bunched up against the right edge, your highlights are clipping and your bright areas will be completely white with no detail.
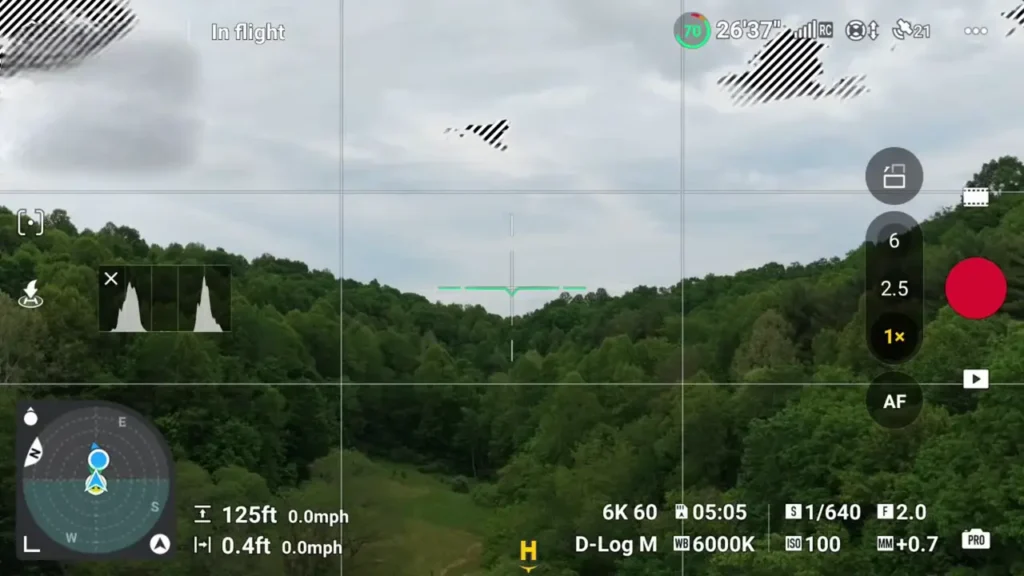
Ideally, your histogram should sit near the center with some room on either side. Having slight peaks on both ends is fine and can be corrected during color grading. Just avoid crushing everything to the left or blowing it all to the right.
The Overexposure Warning is a more visual tool that highlights areas of your frame that are getting too bright. If you are not yet comfortable reading a histogram, this can be a helpful way to get an immediate visual alert when parts of your image are clipping. Over time, the histogram will give you more precise control, but the overexposure warning is a solid starting point.
Hidden Feature 15: Full Gimbal Tilt Range in Vertical Shooting Mode
If you shoot vertical video with the Mavic 4 Pro, you may have noticed that the gimbal tilt range becomes extremely limited. In native vertical mode using the wide-angle camera, you can only tilt down about 16 degrees and up about 14 degrees, which is very restrictive.
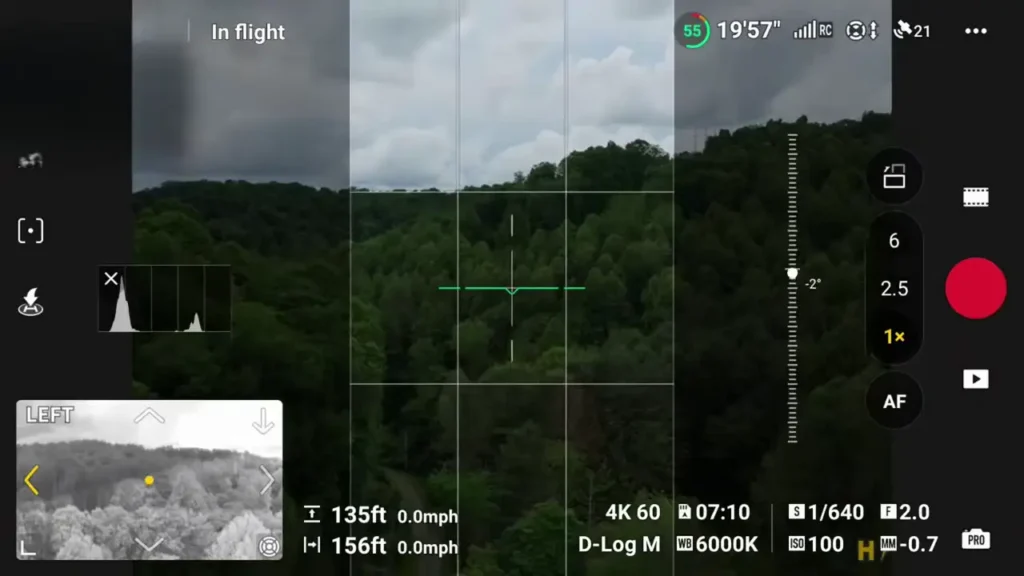
There is a simple workaround. Switch back to horizontal mode, go into your resolution settings, and select 4K 9:16. This captures a vertical crop from the full 4:3 sensor height rather than physically rotating the gimbal.
It is not quite as high quality as the full 6K recording and gives you a slightly narrower field of view, but it restores your full gimbal tilt range, which makes it far more practical for most vertical shooting situations.
Final Thoughts
Those are 15 DJI Mavic 4 Pro hidden features that can genuinely improve your flying and filmmaking. Whether you are using cruise control for buttery smooth autopilot shots, adjusting your gain and expo settings for cinematic movement, or using focus peaking to nail manual focus on a small screen, each of these tips adds real value to how you fly and shoot.
Read More: 28 Must-Know Tips & Settings for DJI Neo 2 (Part 1)