The groundbreaking And particularly designed for cinematic capture Using DJI Inspire 3. In this article, we will delve into the extensive recording and monitor color settings, providing insights into various features that enhance the drone’s capabilities for filmmakers and cinematographers.
Table of Contents
Pilot 2 App Cinematic Settings For DJI INSPIRE 3 Drone
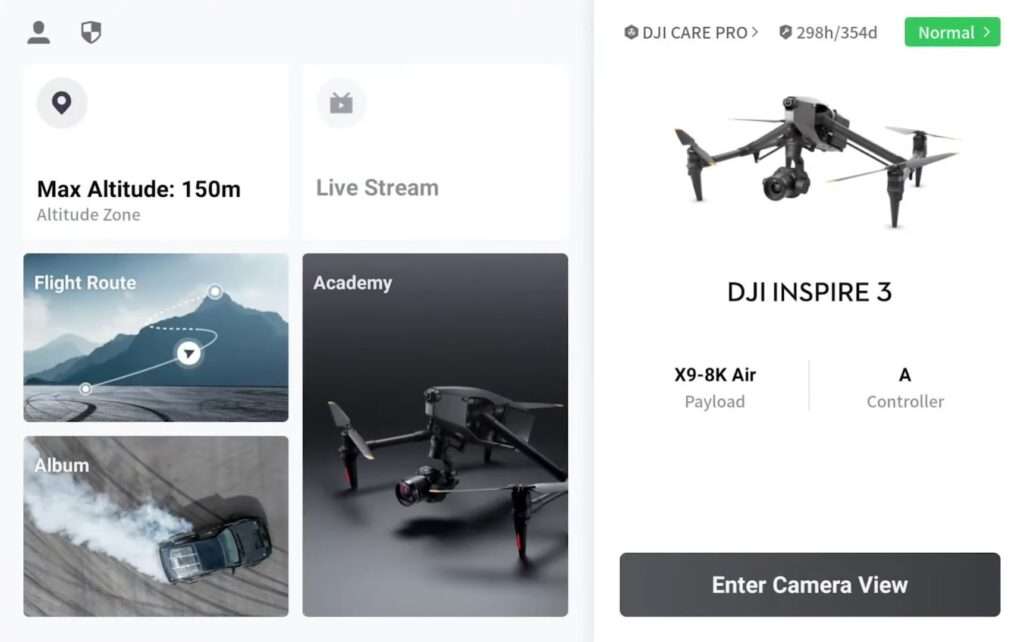
When booting up the controller if you’re familiar with the RC plus from the Enterprise drones it might seem familiar at first with the options for flight route planning in the same location In DJI Inspire 3 Drone.
Flight Route
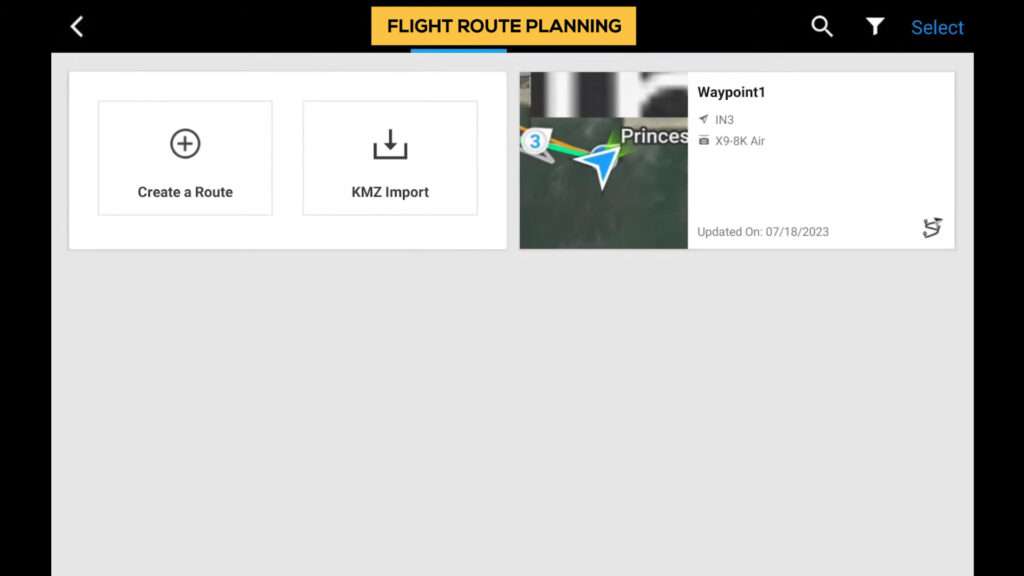
This option allows you to manually plan a route by setting up waypoints or recording a live mission. Additionally, you can perform these tasks directly to DJI Inspire 3 Drone within the app. Furthermore, the app supports the importation of pre-planned flight routes using KMZ files.
Custom Live Streaming
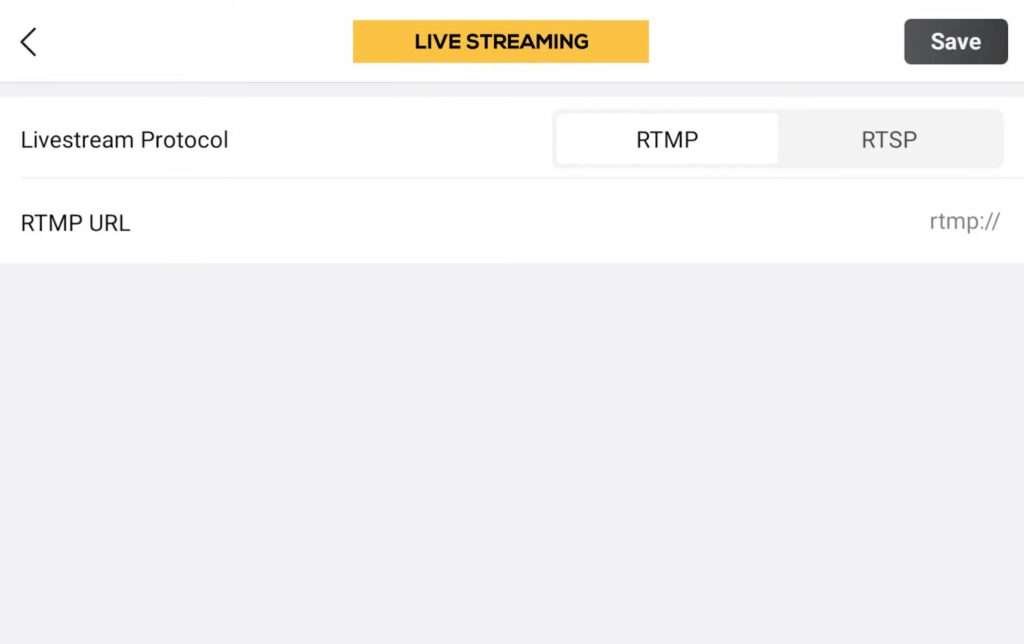
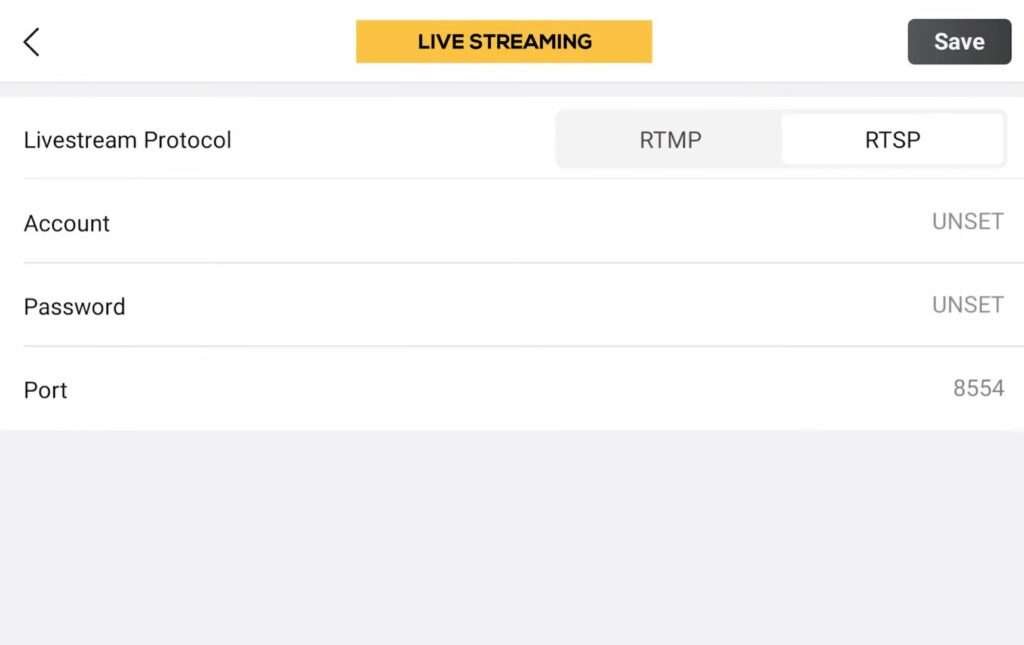
In the Enterprise Pilot 2 app, you’ll notice the absence of Flight Hub integration. Instead, you have access to live broadcast options, where the corresponding live URL and connection status will be displayed if connected to a live service stream.
Main Camera View HUD
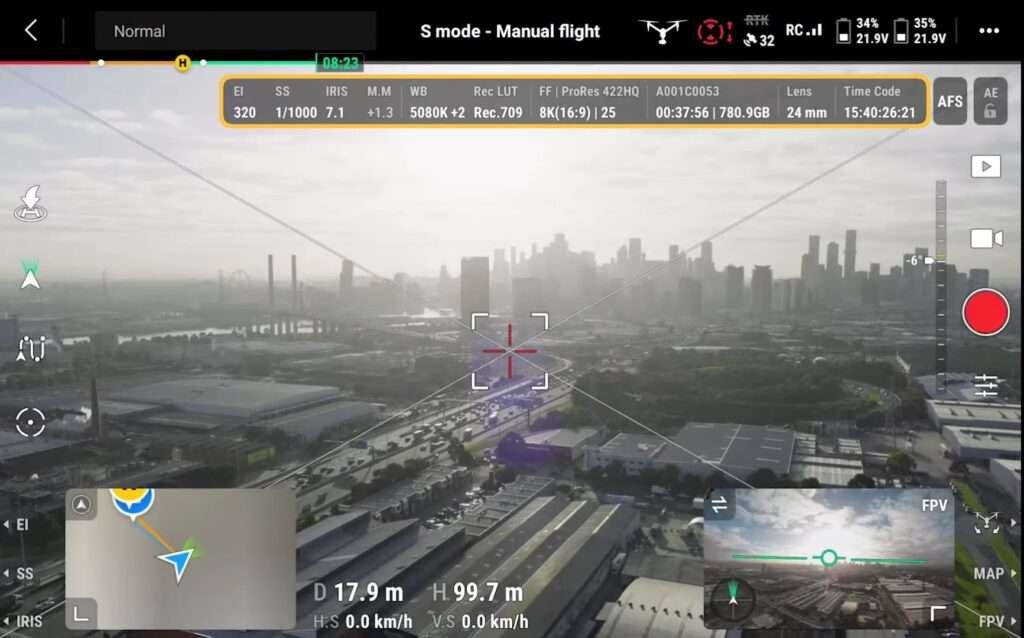
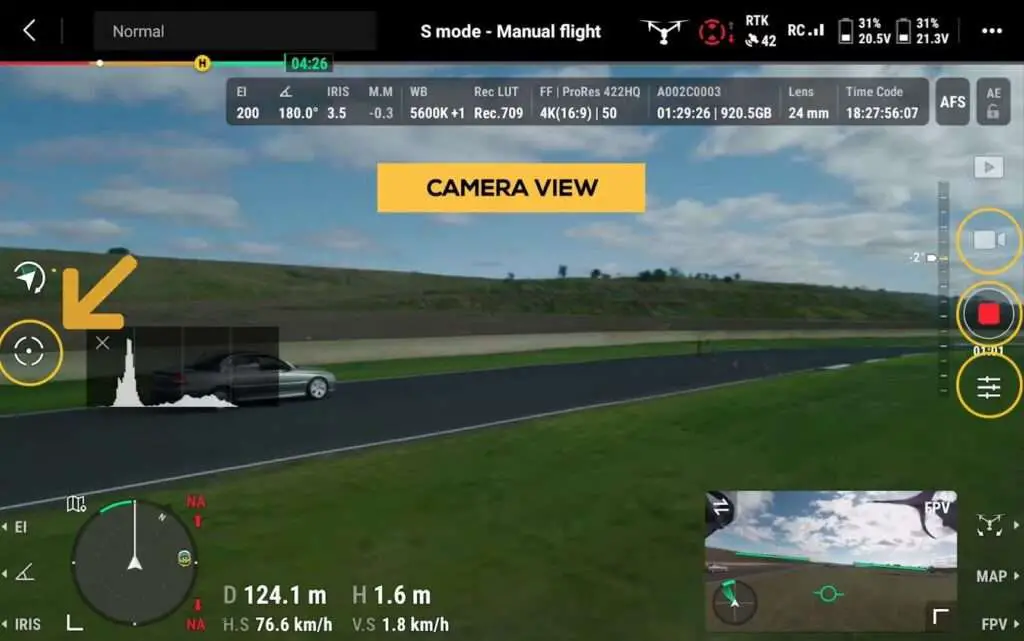
so first thing we should talk about at the DJI Inspire 3 Drone top here is where all the recording and capture details are located at a glance.
Exposure Index Settings
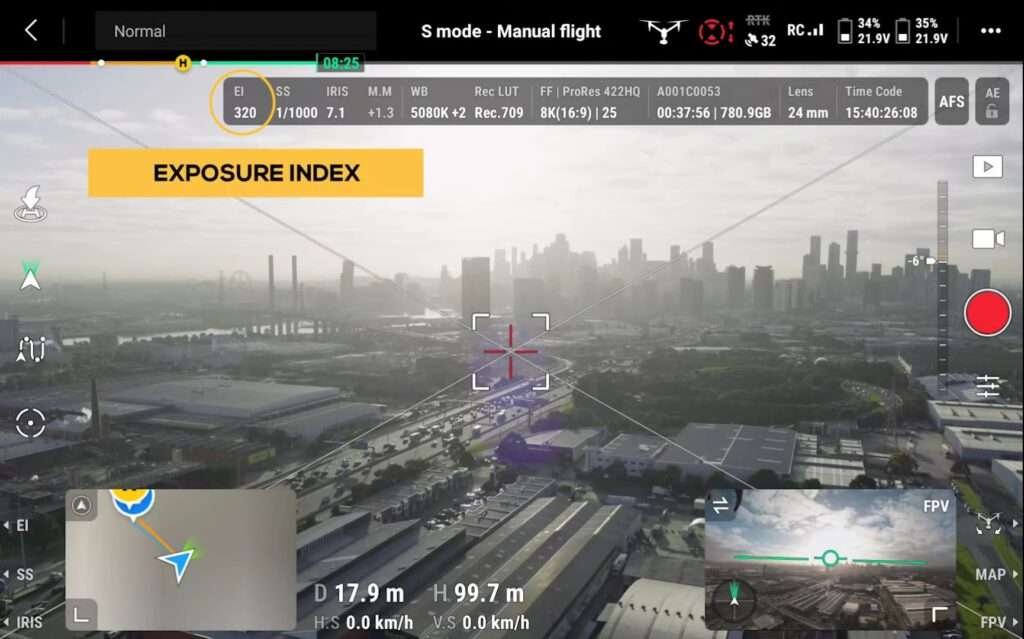
That are back from the Inspire 2 To DJI Inspire 3 Drone. this is similar to your ISO settings if you’re unfamiliar with these cinematic features the very top level there’s no essential difference between EI and ISO as they both use to measure the sensitivity of the sensor to light the
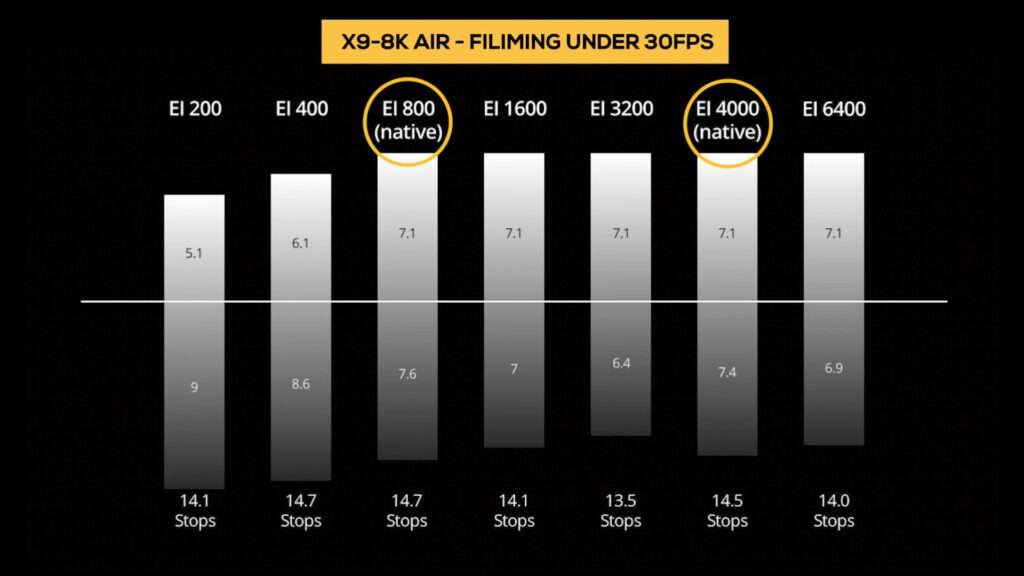
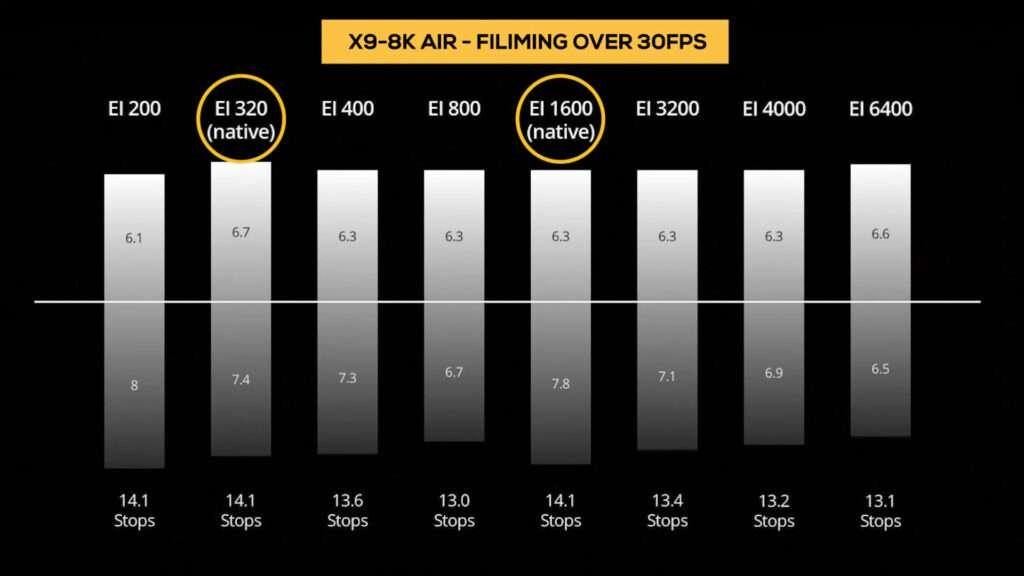
The x98K air has a dual native exposure index of 804 000 when shooting in 30frames and under and 320 and 1600 when above 30 frames.
Shutter Speed & Angle
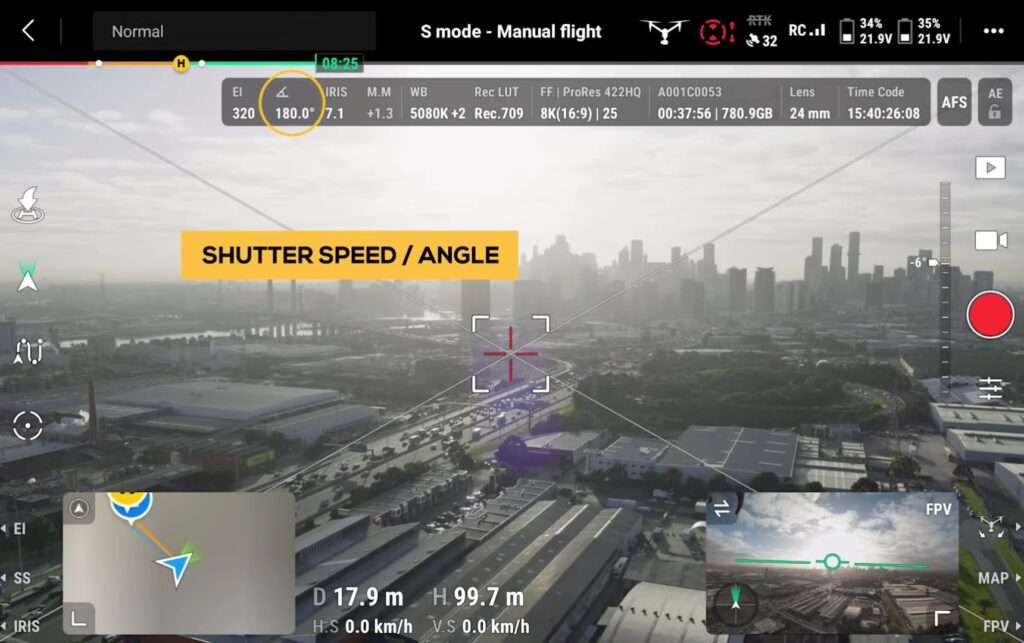
the next feature to highlight is your Shutter Speed & Angle shutter speed In DJI Inspire 3 Drone .now shutter angle and this is one of the new Cinema features not found in the Inspire 2.
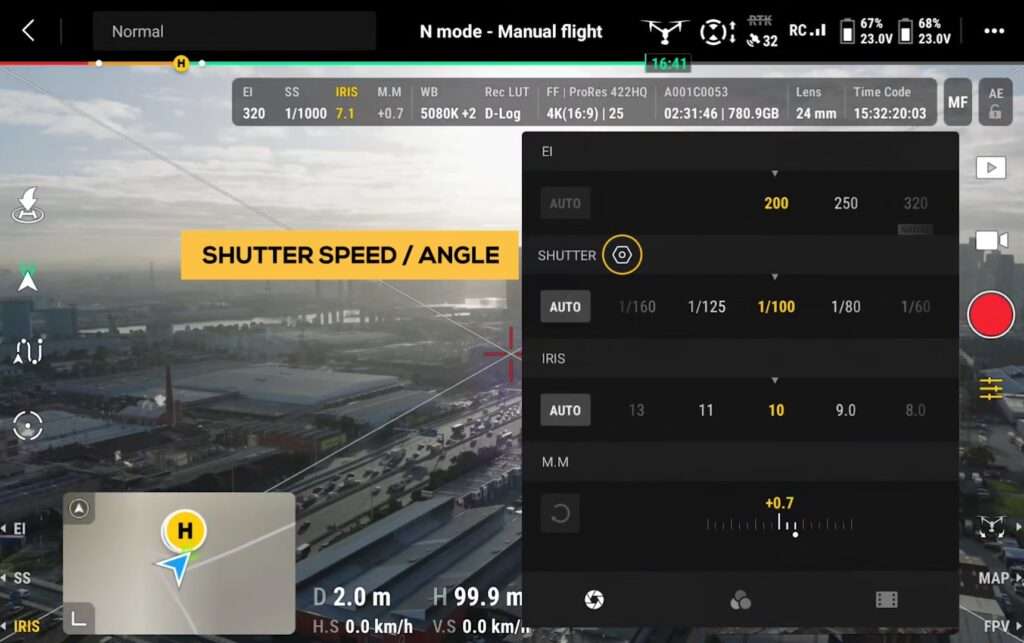
If you head over to your capture settings here you’ll notice a little Cog wheel in the shutter section by selecting this Cog wheel
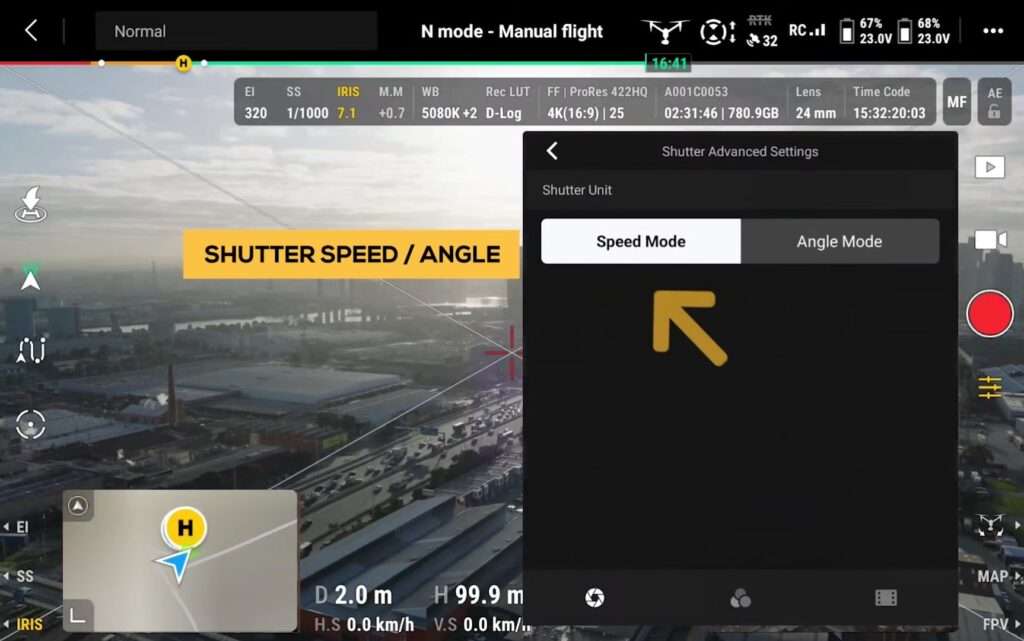
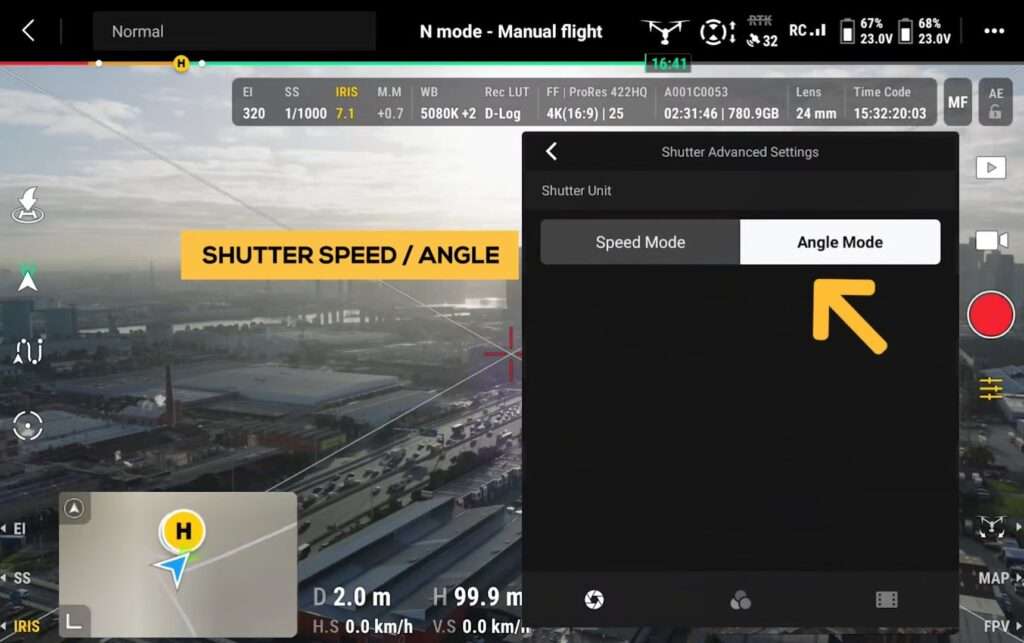
Now, you have the option to switch from shutter speed to shutter angle. Does this make a huge difference? Well, besides shutter angle being the industry standard in cinema cameras, once you set your preferred angle, regardless of the frame rate you’ve selected, the shutter will always be locked to whatever your preferred shutter angle is. This is a first for DJI drones. More often than not, this will be 180 degrees, the standard for capturing that cinematic motion blur. Although, for those old-school cinematographers out there, I’m happy to report you can also select 172.8 for those mechanical shutter days
Recording & Monitor Color Settings
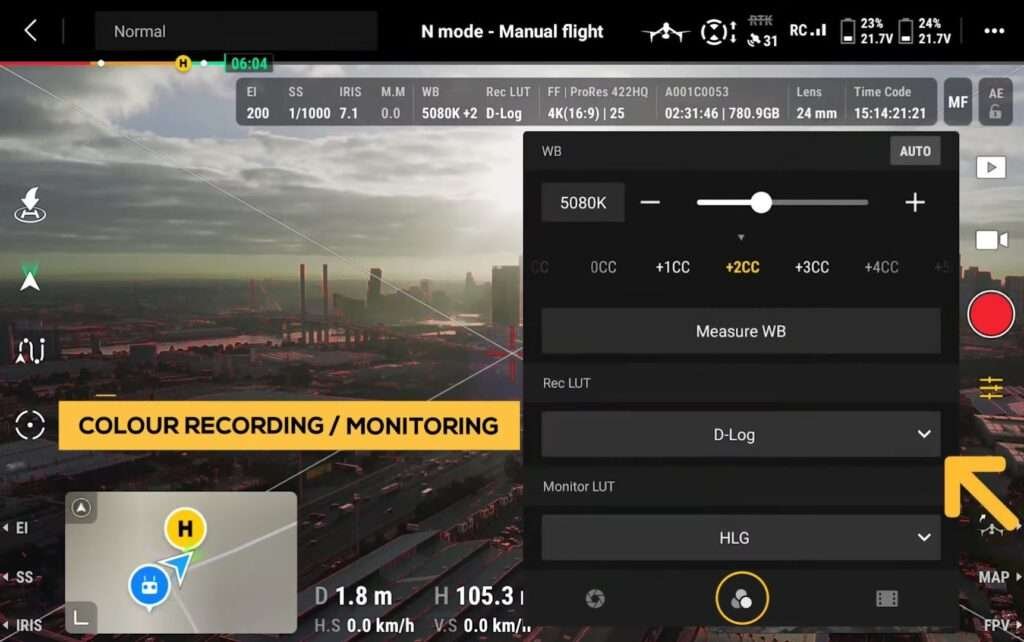
Moving over to the color settings, this provides options for what your recorded footage will look like by selecting your LUT profile.
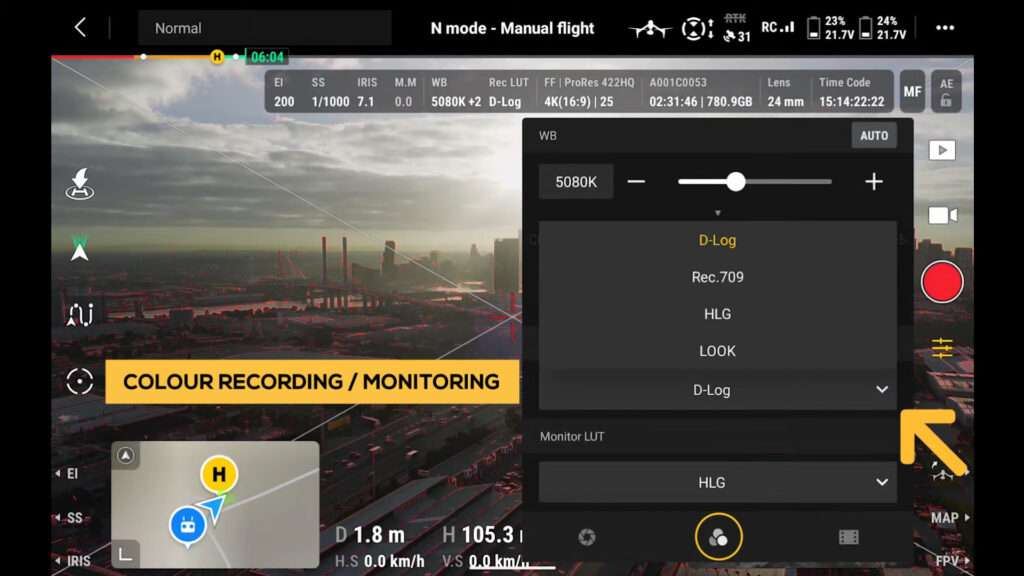
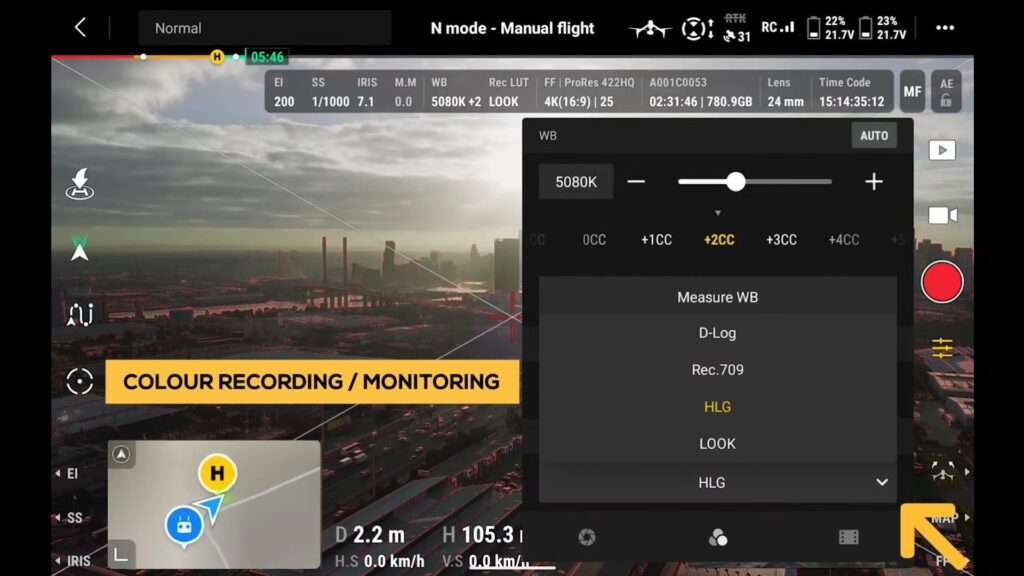
Of course, LUT stands for lookup table. Your options here include D-log, Rec 709, Hybrid Log Gamma, or Look, which is a custom LUT that you can upload via the controller. Then, you have the monitor light options, which are basically the color output applied to your controller screen for monitoring what your Final Footage May Look Like.
This is a new feature, and it’s great to see it included in the Cinematic capture settings. Before moving on to the recording settings, it’s important to note that I won’t be able to cover all the specifics of the recording resolutions, compatible codecs, frame rates, and aspect ratios. However, DJI has put together a comprehensive guide for users to delve into the details
Sensor Settings
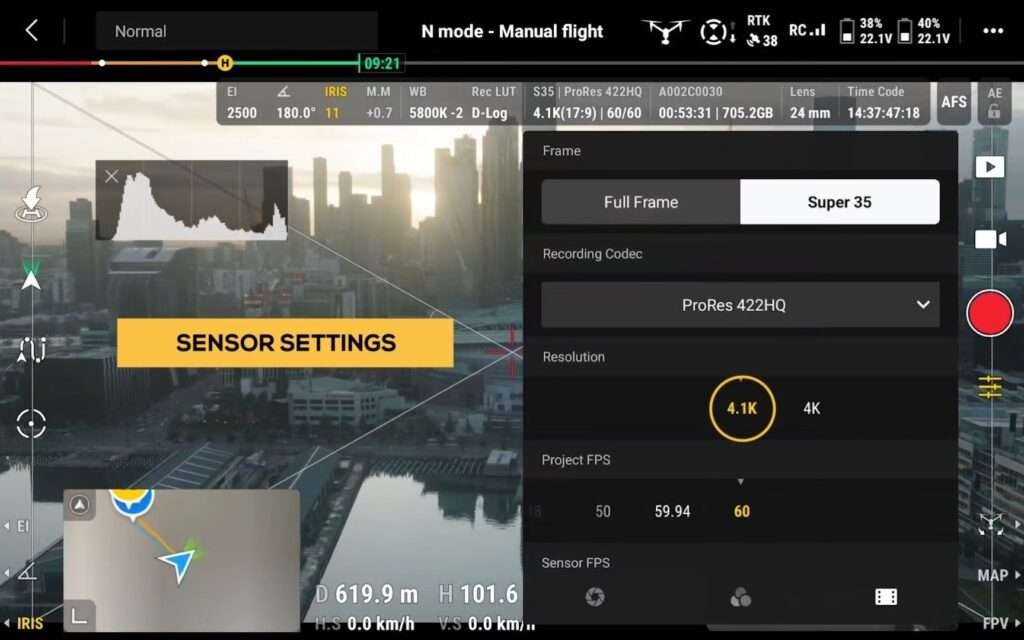
At the top, you can select either Full Frame to utilize the entire sensor or the cropped super 35 to punch in a little more if needed. Now, your maximum output resolution will be limited to 4.1K in the super 35 mode without the ProRes RAW license, but with it, this increases to 5.5K.
Recording Codec Settings
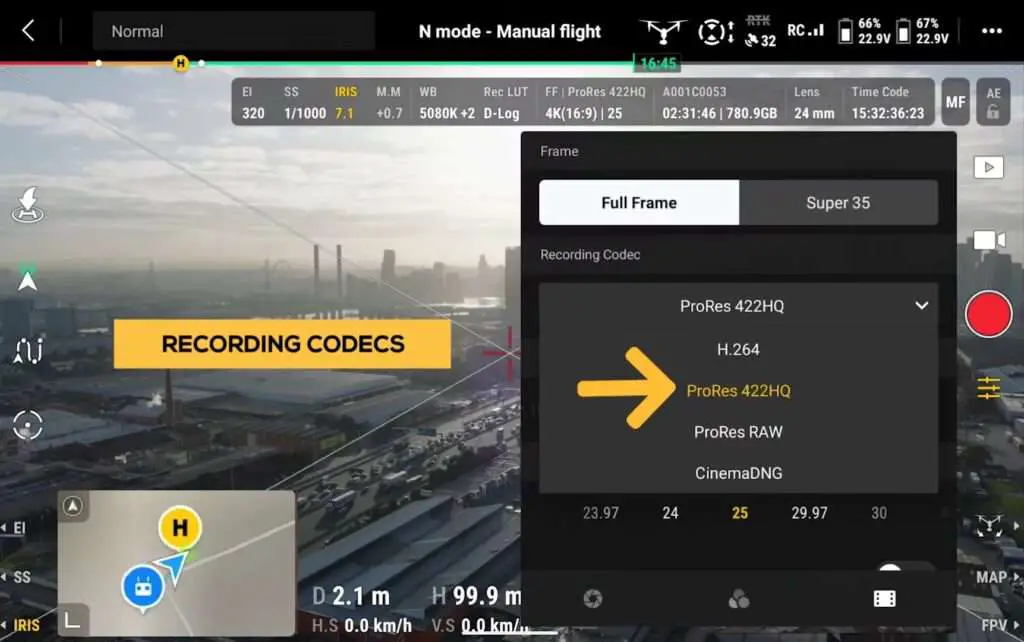
The recording codecs that come standard with the DJI Inspire 3 Drone right out of the box are H.264 and ProRes 422 HQ.
Note:
There is no H.265 or ProRes 444 included at the time of Sep 4, 2023.
Resolution
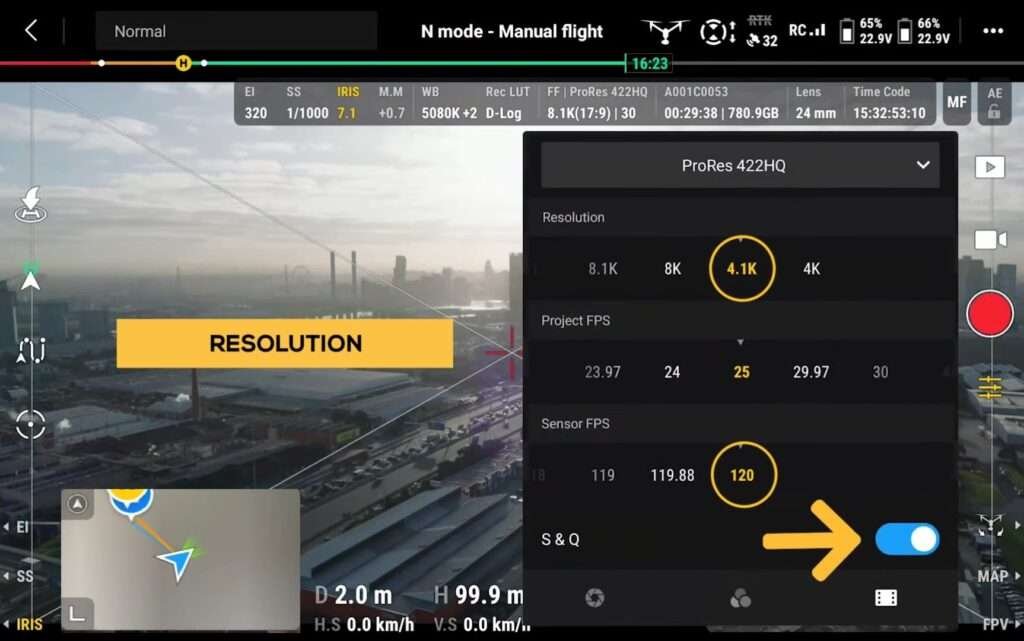
The max resolution is 8.1K in ProRes 422 at 30 frames per second, but this can go up to 120 frames per second in 4.1K. After SQ is selected, you can, however, unlock up to 75 frames per second in 8.1K by purchasing a license for ProRes RAW and CinemaDNG.
S&Q Mode
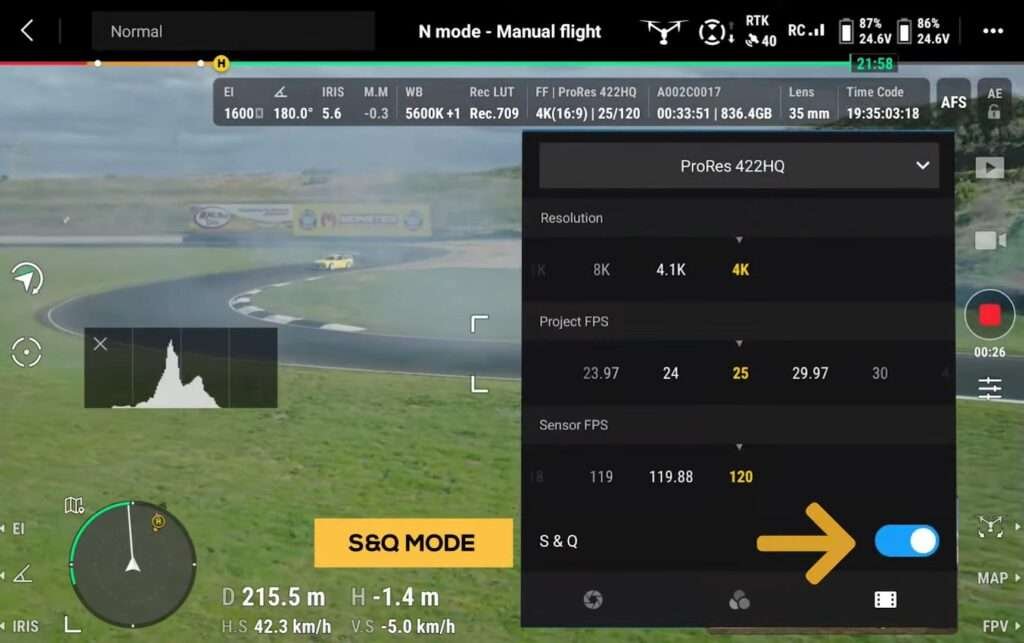
SNQ, which stands for Slow and Quick, is another new feature for the Inspire series. By selecting this, you unlock the ability to set your project’s frame rate, essentially the playback speed you want. You can then also select the sensor frame rate, determining how many frames are captured per second. This allows you to access that buttery smooth slow motion straight out of the camera with no post-production needed. You can find this selection displayed under the recording settings
Intelligent Features (Spotlight Pro & Waypoint Pro)
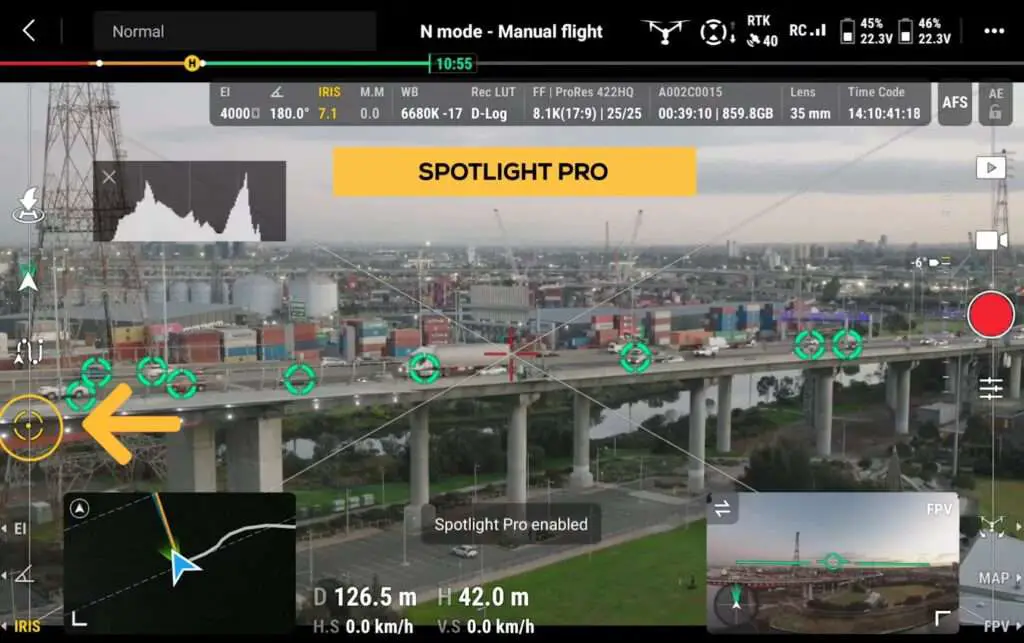
When selecting Spotlight Pro, the app will start identifying subjects in the area. Once a subject is chosen by tapping on the screen, you can confirm the tracking by pressing the C2 button on the back of the controller.
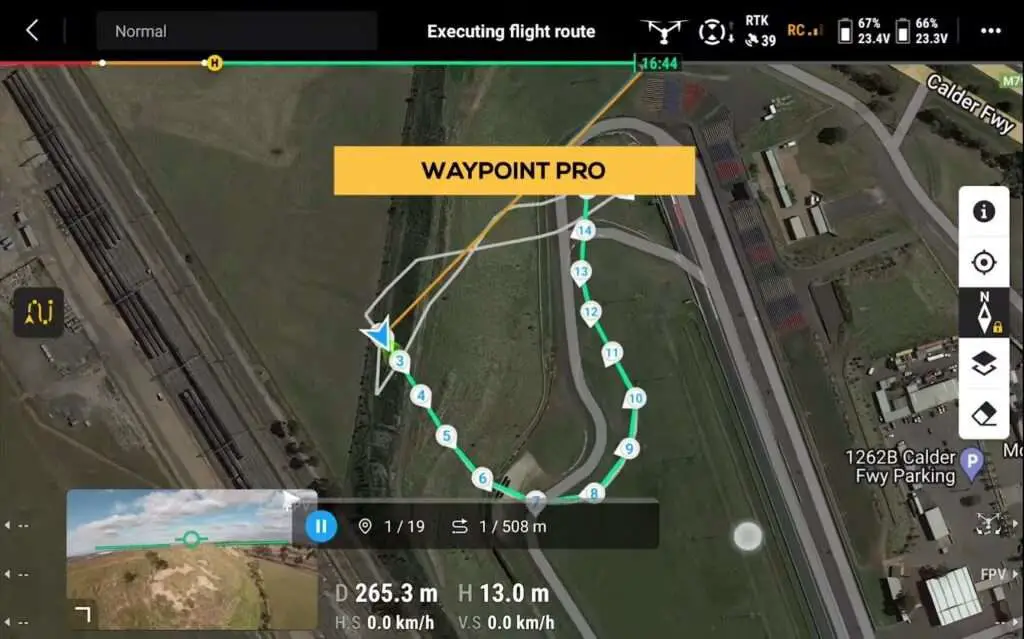
Waypoint Pro is a powerful tool that leverages RTK compatibility to enable accurate and repeatable missions. It can also be used as a 3D Dolly, allowing the drone to follow a pre-determined route. This feature is particularly beneficial for large productions where specific actions are planned with subjects moving in and out of frame. In a dual-operation scenario, once the mission is set, the pilot only needs to push forward or back to move the drone along the route, while the camera operator Retains Full Control over the camera’s composition.
Dual Operations
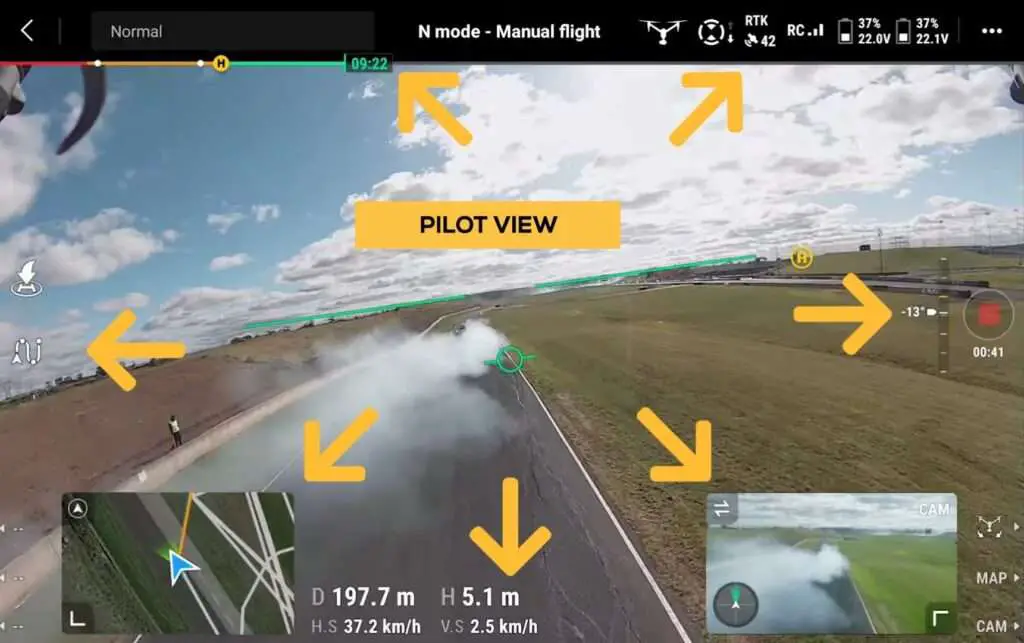
In Dual-Operating scenarios, when you take on the role of the pilot, the upgraded FPV camera becomes an excellent tool for confident navigation. The user interface (UI) has been streamlined in the capture settings, focusing on essential inputs for flying. The FPV window now occupies the previous main camera image location, and you can toggle it to full view if necessary. The DJI Inspire 3 Drone minimap indicates the camera’s position, pointing direction, and gimbal limits, providing valuable information for the pilot to make informed decisions, such as repositioning the airframe.
The Quick Turn feature automatically performs a 360-degree maneuver when the gimbal reaches its limit, a functionality carried over from the Inspire 2. Additionally, the pilot can access Waypoint Pro functionalities from here, and any flight route mission created is displayed on the minimap with a progress bar, offering a clear overview of the route’s spatial orientation in DJI Inspire 3 Drone.
As the second operator controlling Controller B In DJI Inspire 3 Drone, you gain access to all the capture settings, including Spotlight Pro for subject tracking. In addition, you can choose between free or follow modes for the camera, providing flexibility in controlling the gimbal. If desired, control of the gimbal can be returned to the pilot, allowing them full access to the capture settings. This dynamic setup enables seamless collaboration between the two operators.
Key System Settings
Now, let’s explore the customizable key system settings on the RC Plus to enhance your flying and filming experience for optimal efficiency. If you’ve been flying for a while, especially with the Inspire 2 or another heavy-lift cinema drone, you likely have a significant amount of muscle memory In DJI Inspire 3 Drone. This is the perfect place to smoothly transition and adapt these settings to suit your preferred flying style.
Control Stick Modes & Customize RC Buttons
The controller stick mode remains consistent with all DJI drones, allowing you to customize inputs for both flight and camera controls. This customization extends to dual operation, where controls can be tailored to your preferences. With a total of 13 buttons and three dials available for customization, each option is conveniently categorized under subjects such as exposure, Focus, Monitoring, gimbal control, fly control, and app settings.
Additionally, you have the option to disable the display of side button icons. The system also supports the linking of additional controllers for dual operation. It’s worth noting the compatibility of this DJI Inspire 3 drone with the DJI Hybrid Remote Monitor, which serves as a secondary remote controller
High-Bright Monitor Compatibility
The compatibility of the monitor with the DJI Inspire 3 Drone offers the ability to receive live feeds and control the gimbal and focus. It seamlessly integrates with other Pro accessories like the Ronin 4D hand grips, three-channel follow focus, and master wheels. The remote controller features HDMI and SDI ports, facilitating the output of live feeds to various monitoring devices. This eliminates the need for a USB A output converter from the RC Plus to transmit an uncompressed digital signal. While these features may incur additional costs and could be considered overkill for most projects, they provide end-to-end functionality that is particularly appealing to high-end productions.
The DJI Inspire 3 drone image transmission settings bring another cinematic advantage to the table with 4K image transmission capabilities. When the recording format is lower than 30 frames, the video output type allows you to choose between a duplicate view or a clean camera view for external monitoring. This is particularly useful for directors on set who want a real-time view of the captured footage By DJI Inspire 3 Drone . The video output resolution options cater to different down streaming needs when connected to an external monitor.
Read More: Supercharge Your DJI Inspire 2 Drone: Ultimate Fixes for Battery Problems!


