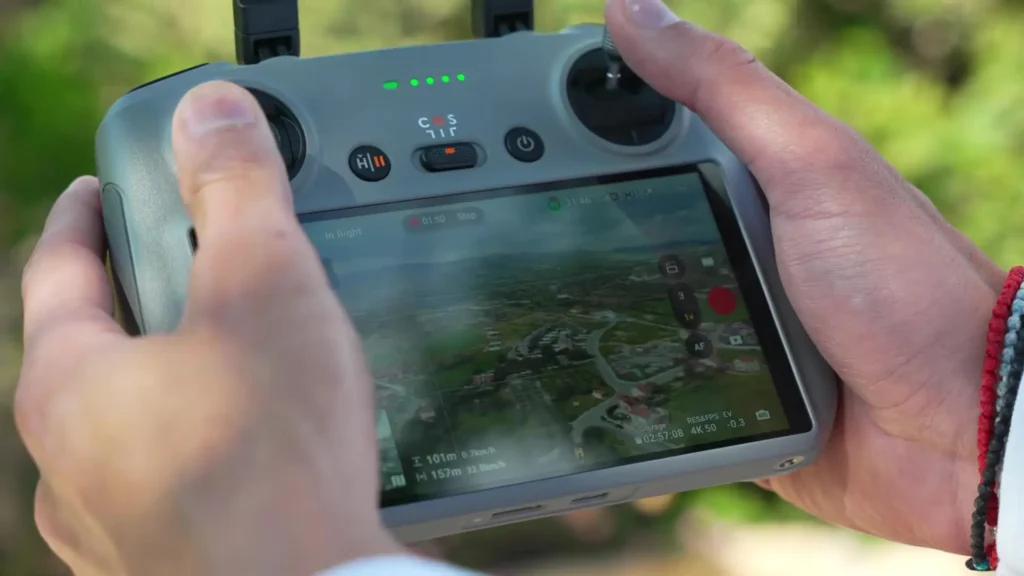
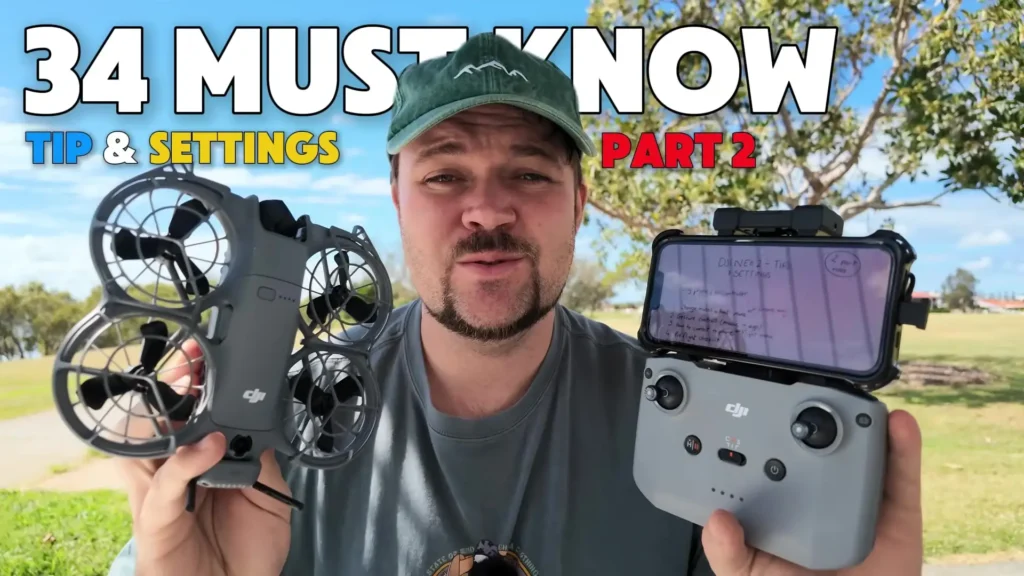
If you just got yourself the DJI Neo 2 and you are feeling overwhelmed with all the different settings available through this drone, then you have stumbled across the perfect guide. This is part two of the must know tips and settings series for the DJI Neo 2, and this one is focused purely on the controller itself.
Everything covered here is what you can access through the DJI Fly application when you have the controller connected. This guide covers 34 must know DJI Neo 2 settings, so it is packed with value from start to finish.
Table of Contents
The Flight Menu
The flight menu is the menu you are going to be using and seeing most of the time when you are flying the drone. It is your primary interface during flight, and understanding everything within it will make a significant difference in how confidently and safely you operate the aircraft.
Tip 1: The Pre-Flight Checklist
Right in the top left of the screen, where it says takeoff permitted, if you press on that, it will bring down a pre-flight checklist. You can see information like aircraft not in flight, vision systems and obstacle avoidance disabled. This is where you are going to see errors and messages that might be important.
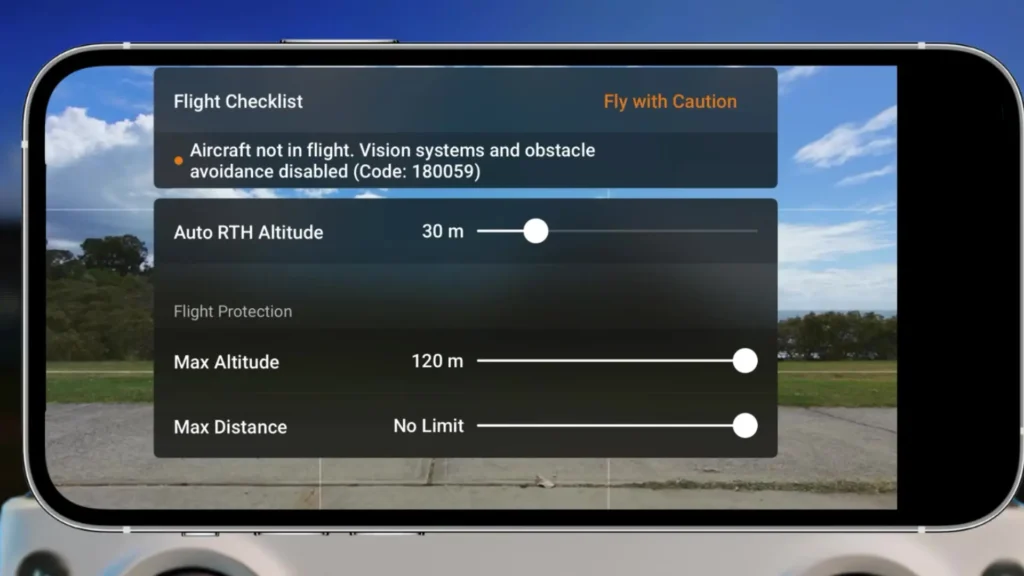
Any crucial information is going to be displayed here, and what it says will change depending on the error or situation at hand. You can just tap on it to bring down this menu, and there are also other things you can adjust in here like return to home altitude, maximum altitude, and maximum distance. It is a handy spot to check before every single flight to make sure everything is in order.
Tip 2: Battery Info
Where it says the battery percentage on screen, if you press on that, it will tell you how long until returning to home, how long until a forced landing, and how long until the battery is completely depleted.
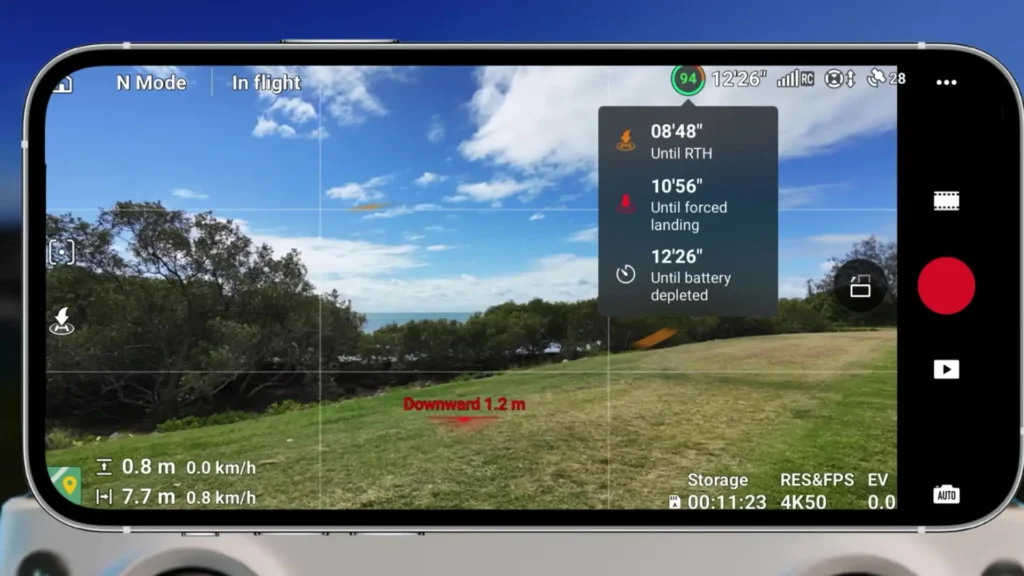
This is really handy to know mid-flight. If you are flying away from yourself and you are unsure how much time you have left, just tap on that and it will give you crucial information right away. It updates in real time, so the data you are seeing is always current and relevant to where your drone is at that moment.
Tip 3: RC Signal and Satellites
Where it says RC on the screen, you can tap on it and it will tell you what the remote controller signal is sitting at. It is really handy to check, especially if you are flying further away. Alongside that, you will notice the satellite count jumping around.
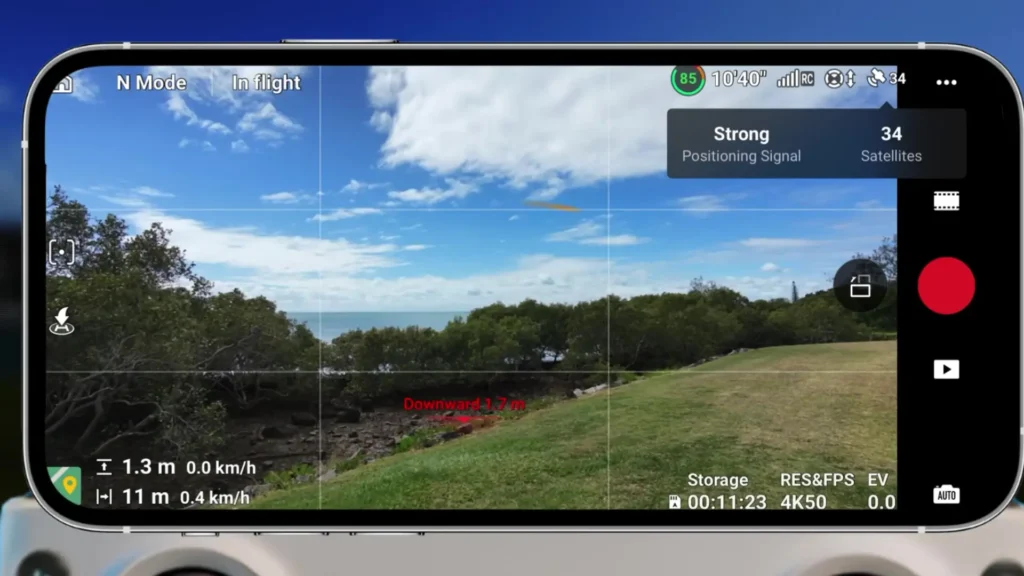
If you tap on the satellite indicator, it will actually tell you if you are in a strong position or not. If you are under 10 satellites, it will come up with a warning. The default recommendation is to wait until the satellite count has populated properly before taking off. Sitting in the 30s for satellite count is a very strong position to be in.
Tip 4: Obstacle Avoidance
There is a small icon on screen that looks like an arrow pointing up and an arrow pointing down. If you tap on that, it will show you the sensing system and allow you to change it in real time. You can turn off obstacle avoidance entirely, which is not recommended, and you will see the icon go red to warn you that nothing is being avoided.
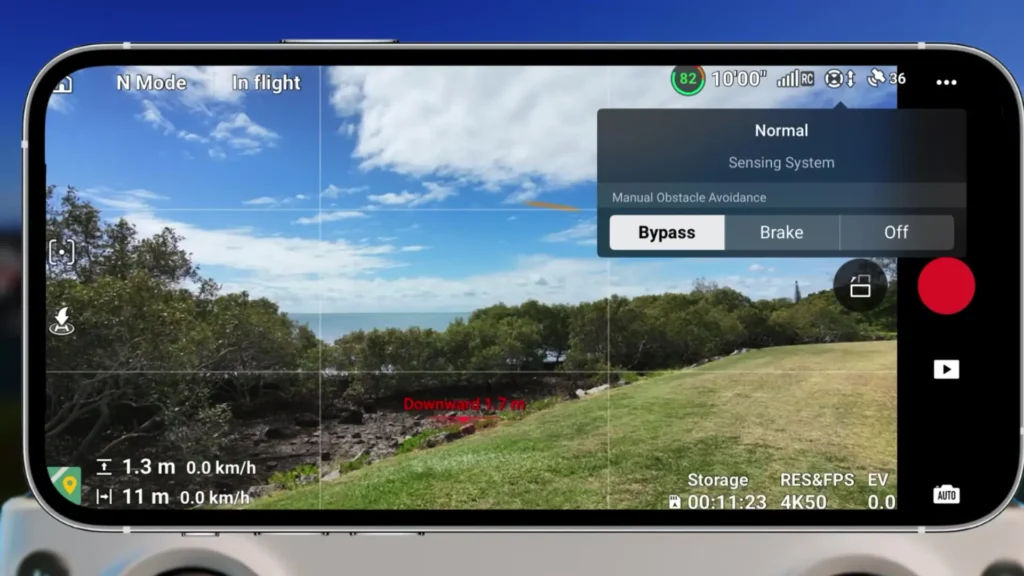
You can also tap into brake mode, which means the drone will stop if it detects an obstacle ahead. Then there is bypass mode, where the drone will navigate around an obstacle and continue on its path. It is easy to switch between these at any point directly through the flight menu, which is especially useful if you are flying in a tight area and need to make a quick adjustment.
Tip 5: Focus Track and Manual Tracking
The icon on the left-hand side of the screen looks like a square with a dot in the center. If you tap on that, it will enable focus track, and you will immediately see a plus symbol appear. You can press that plus to begin tracking a subject, which defaults to spotlight mode.
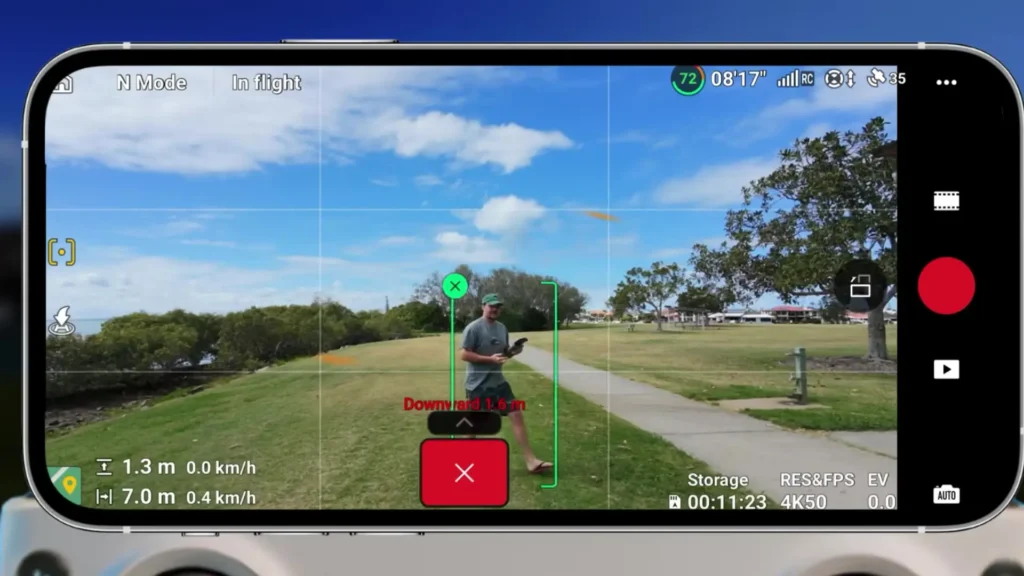
In this mode, the drone orients itself to look at the subject but does not physically move to follow them. You can press the small arrow to switch into active track, where the drone will then start following the subject just like any standard active track mode.
If focus track is disabled, you can also press, hold, and drag your finger across the screen to draw a box around a subject. The drone will recognize the subject and lock onto it straight away.
This works not just for people but for anything including animals, trees, and buildings. You can then use the control stick to move around while that subject remains the tracked focus point. It works really well and gives you a lot of creative flexibility in the field.
Tip 6: Touch Screen Camera Control
By default, you would use the scrolling wheel on the controller to angle the camera up or down. However, if you press and hold on the screen, it will vibrate, and then you can drag your finger down or drag it up to manually adjust the camera using the touch screen.
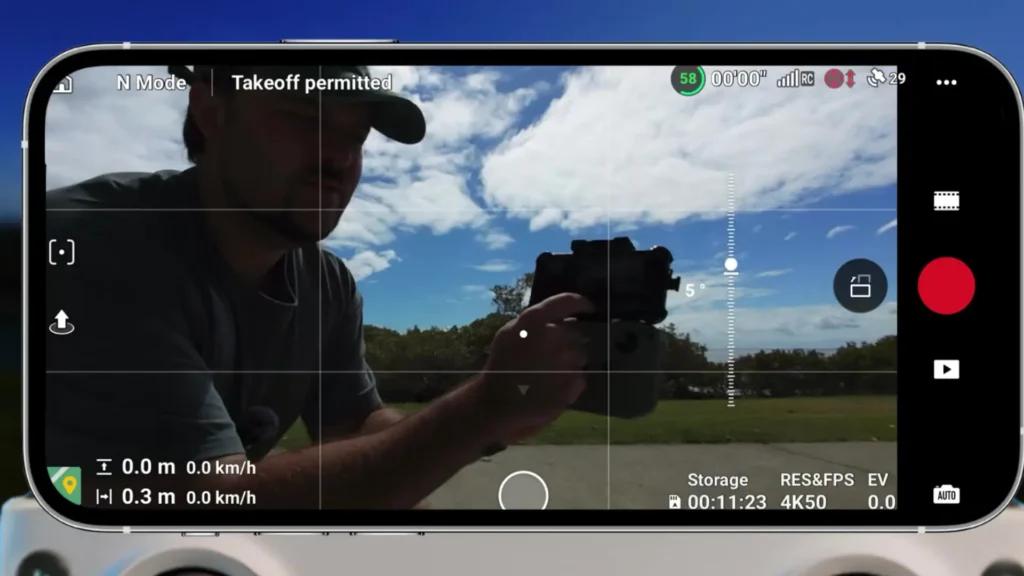
It really is that simple. You press and hold, feel the vibration, and then drag to control the camera angle without needing to reach for the scroll wheel.
Tip 7: The Map and Find My Drone Feature
In the bottom left corner of the screen, there is a small map icon. If you press that, it will bring up a larger map interface. Press on the map again and it takes you into the full map interface with proper satellite view so you can see everything going on around you. You still get the video feed in the bottom left corner while navigating this view.
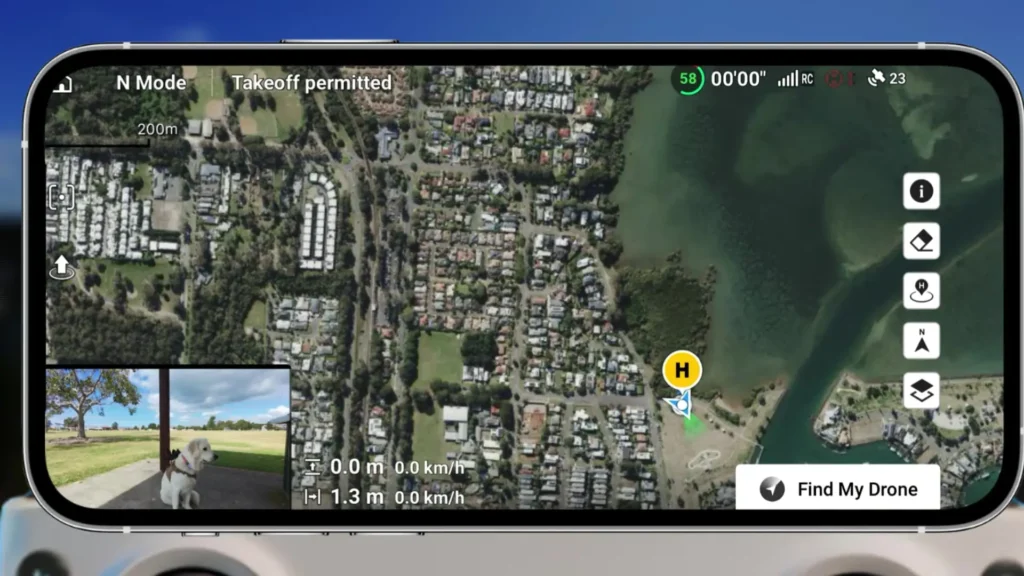
In the bottom right corner, you will find the find my drone option. If you tap on that, it will show you the last known location of the drone. You can also press enable flashing and beeping, which will create a very noticeable beeping sound. This is exactly what you want to use if the drone has crashed into a tree or gone missing. It will help you locate it quickly.
Tip 8: The Attitude Indicator
In the bottom left corner, you can swipe left or right to move between different display modes. If you swipe left from the map, it takes you into the attitude indicator. This gives you really useful visual information about what is happening with the drone. It shows you a rough idea of how much wind the drone is experiencing, and if you tilt the drone, the indicator in the bottom left corner will reflect that movement visually.
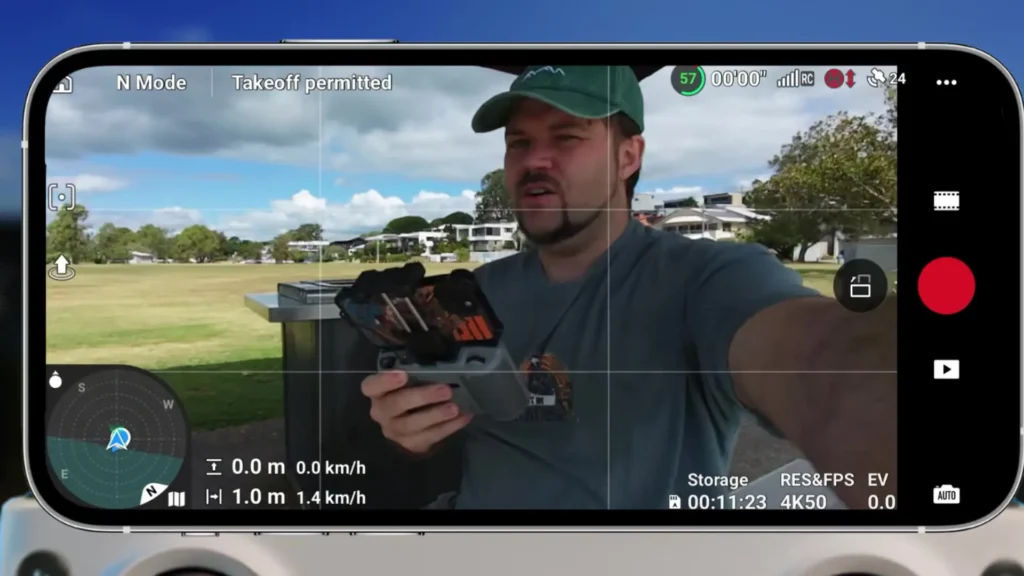
The controller is also tracked here, showing you where the drone is and where you are as the operator. When the icon turns green, it means you are facing the drone directly, which is the optimal position for signal strength. You can press the button in the top left corner to switch the focus point between the controller and the drone, giving you even more context about your positioning relative to the aircraft.
Tip 9: Pro Mode
In the bottom right corner, the drone is set to auto by default, which works fine in most scenarios. If you press on that, it will take you into pro mode, which opens up a whole new level of control. There are two panels available at the bottom of this interface. One lets you adjust ISO, shutter speed, and EV. The other gives you control over white balance, resolution, frame rates, storage, and color profile.
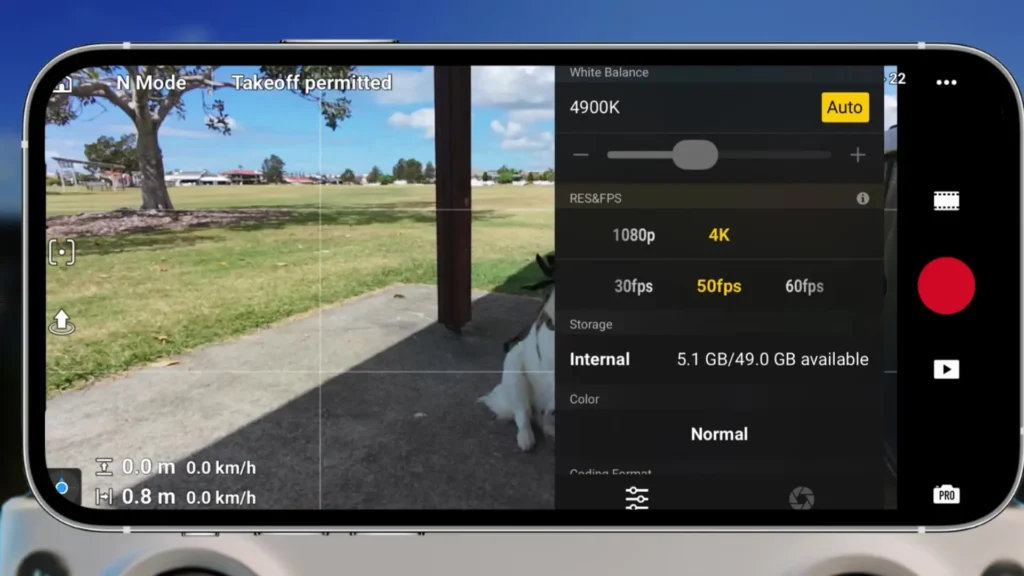
You can change from 4K to 1080p in real time, and you can adjust ISO and shutter speed on the fly or leave them on auto. It is well worth exploring pro mode if you want to get the absolute most out of the drone and your footage.

Tip 10: Flight Mode Selection
Just above the record button, there is a small icon you can tap on. This is where you can switch between different flight and capture modes. QuickShot mode is not available until the drone is launched, but once it is in the air, you can tap into video normal, video slow motion, and photo mode. Within photo mode, you have single photo, burst photo in sets of three or five, and time shot.
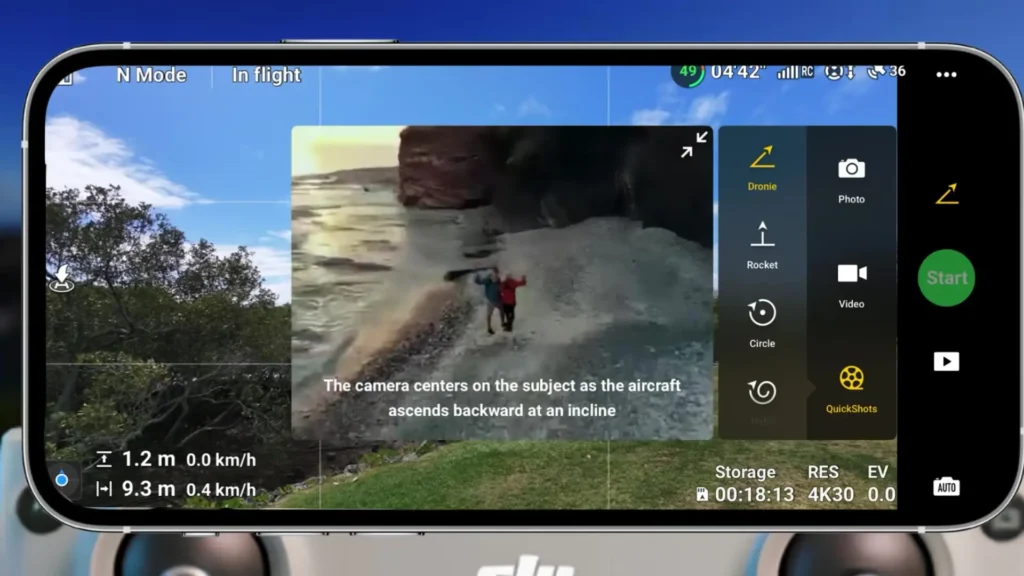
The interface is clear and intuitive, making it very easy to switch between modes mid-flight. When you select a QuickShot, it will even show you a short preview video of what that movement looks like before you commit to it.
Tip 11: Enabling Vertical Video
There is an icon on the left-hand side of the record button. If you tap on that, the drone will switch straight into vertical video mode, capturing at 2.7K at your chosen frame rate.
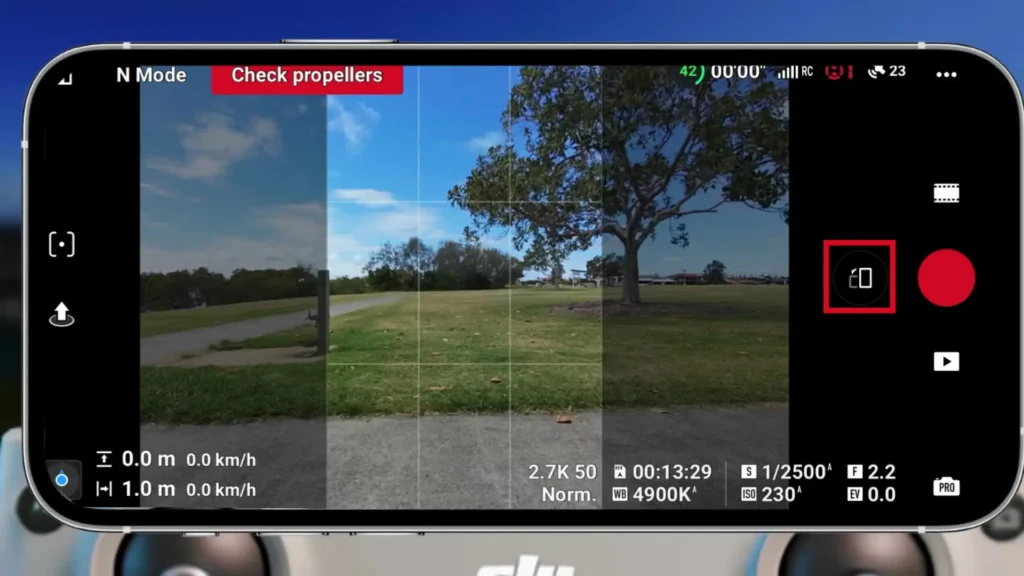
The camera does not physically rotate. Instead, it crops the image into a vertical format immediately. It is really obvious when you are in vertical mode versus horizontal mode, and switching between them is instant. This is a great feature if you are creating content for TikTok, YouTube Shorts, or any other platform that favors vertical framing.
The Safety Menu
To access the safety menu, press the three dots in the top right corner of the screen. This will take you into a dedicated menu with a range of important settings.
Tip 12: Obstacle Avoidance Settings
You can also access obstacle avoidance settings through the safety menu, and it gives you a bit more control and context compared to the quick toggle in the flight menu.
A helpful visual explains exactly what each mode does. Bypass navigates the drone around an obstacle, brake stops the drone before it hits something, and off removes obstacle avoidance entirely, which even comes with an on-screen warning advising against it.
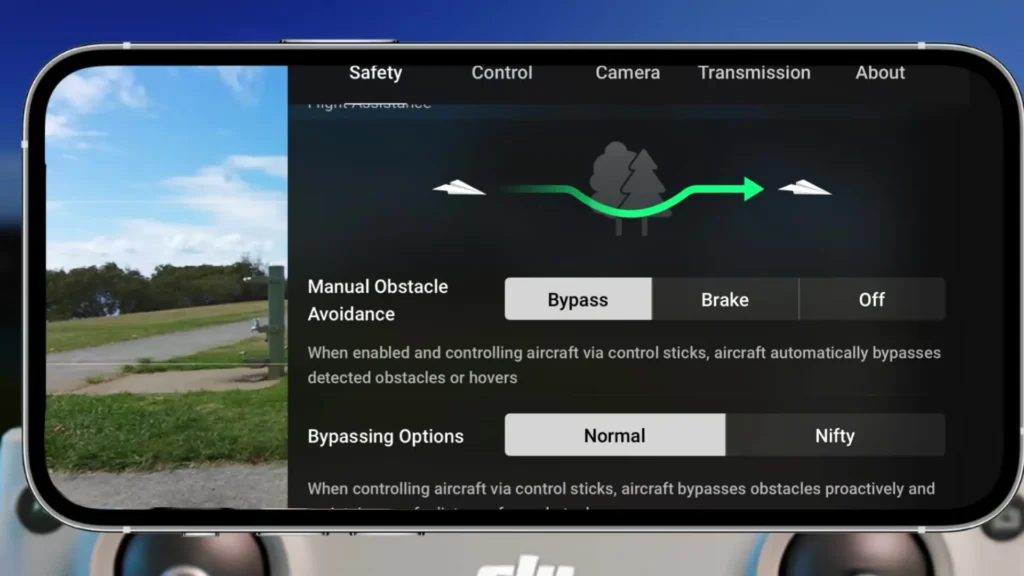
When bypass mode is selected, an additional option appears where you can choose between normal and nifty. The nifty setting allows the drone to avoid obstacles with a more subtle attitude change and smoother flight, but it does come with increased collision risk. This is not recommended for beginners, and leaving it on normal is the safest and most practical choice for the majority of situations.
It is also worth keeping the display radar map enabled. When this is on, you will see subtle curved lines on the screen showing you where obstacles are being detected.
Red indicates the obstacle is very close, and orange means it is relatively close. As you move toward or away from objects, the colors update in real time so you always have a clear picture of what is around the drone.
Tip 13: Advanced Return to Home
Scrolling down in the safety menu, you will find the advanced return to home option. There are two modes available: optimal and preset. Preset means the drone will rise to whatever the auto return to home altitude is set to before flying back to you.
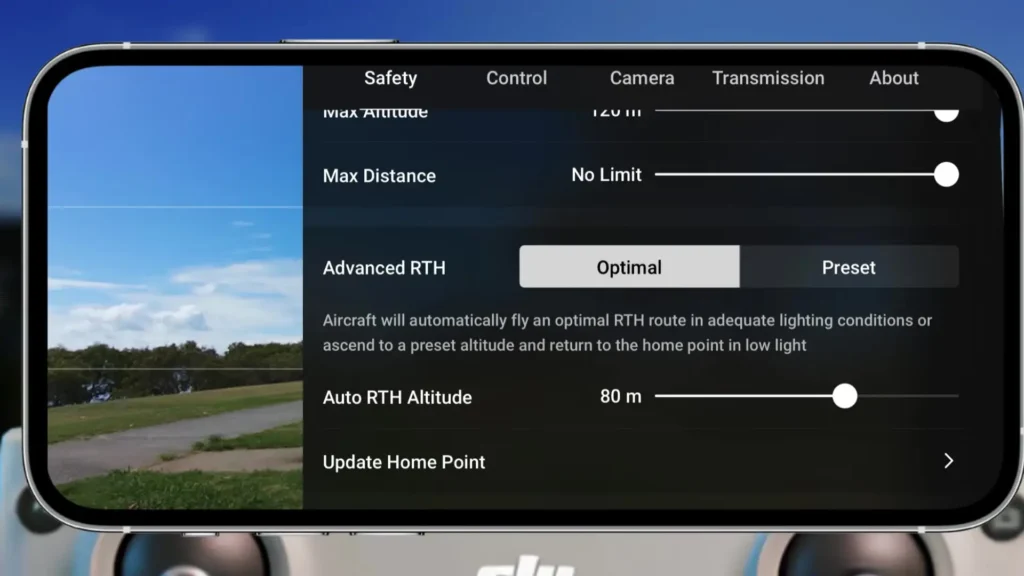
Optimal, as the name suggests, attempts to create the most efficient return path by potentially decreasing in altitude and navigating around obstacles on the way back. The optimal mode is impressive to watch in action, but you should always monitor the flight carefully and not just trust it entirely to handle things on its own.
Tip 14: Auto Return to Home Altitude
This setting is worth emphasizing on its own. By default, the return to home altitude is set to around 30 meters, which can be problematic in certain environments. If you are flying from a lower elevation and there are trees on a raised hill between the drone and the home point, the drone returning at 30 meters may not have enough clearance.
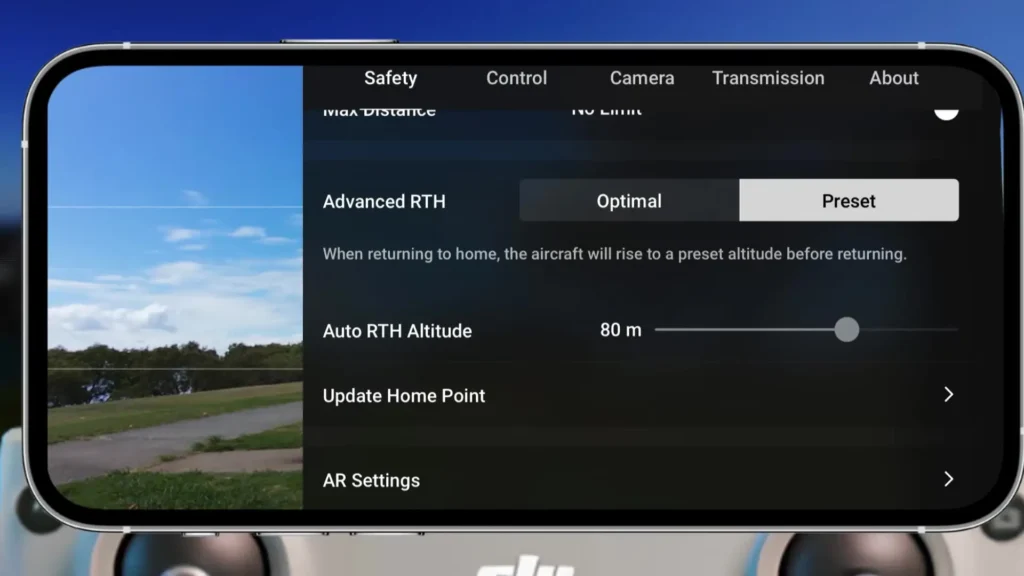
Raising this to at least 80 meters, or even 100 meters, gives you much better peace of mind and significantly reduces the risk of the drone encountering obstacles during its return flight.
Also Read : 28 Must-Know Tips & Settings for DJI Neo 2 (Part 1)
Tip 15: AR Settings
The AR settings in the safety menu provide augmented reality overlays during flight. It is recommended to leave all of these enabled. Once the drone is in the air, you will see the home point displayed on screen with a visual marker. If you angle the camera down, you will also see a shadow of the drone displayed through augmented reality.
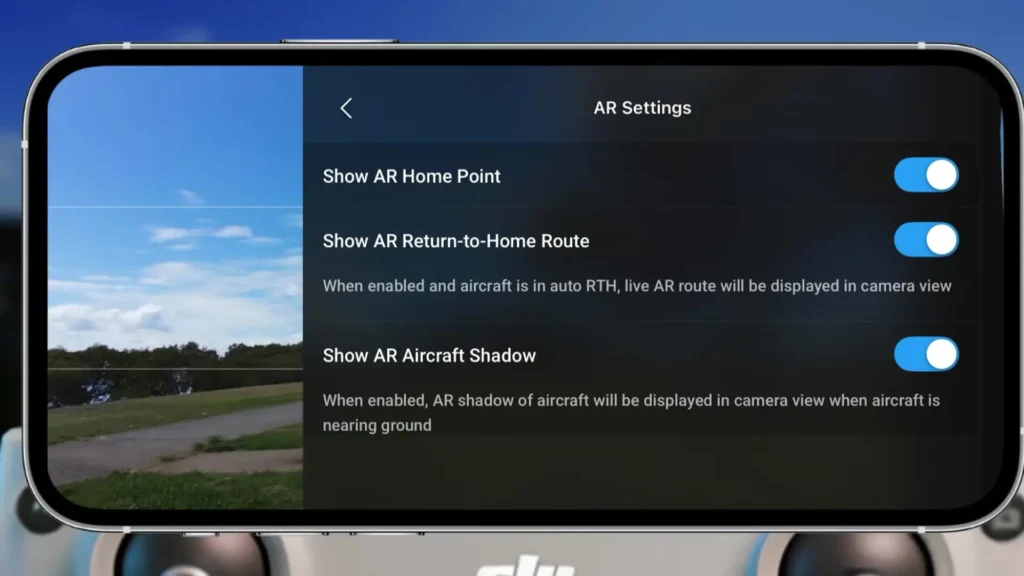
When you initiate a return to home, the screen will show you the path the drone plans to take as it increases in altitude and returns to the home point. These overlays are enabled by default and they work really well, adding useful visual context without being distracting.
Tip 16: Calibrate Sensors
In the safety menu, you will find the option to calibrate both the compass and the IMU. If either of these ever shows a warning or reads as not normal, this is where you come to address it.
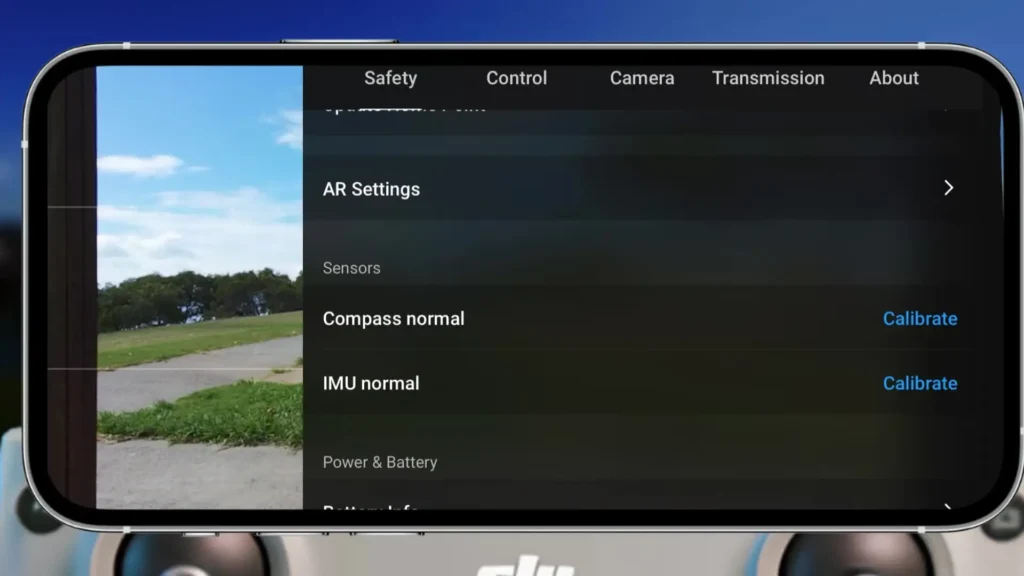
Tapping on calibrate will bring up a guided interface that walks you through the entire calibration process step by step. The same applies to the IMU. The process is straightforward and the interface guides you clearly through what you need to do.
Tip 17: Advanced Battery Info
Tapping on battery info in the safety menu reveals detailed information including the voltage, temperature, battery cycle count, and serial number. One of the most useful things to check here is the battery cell status. If the cells are reading close to the same voltage, everything is operating normally.
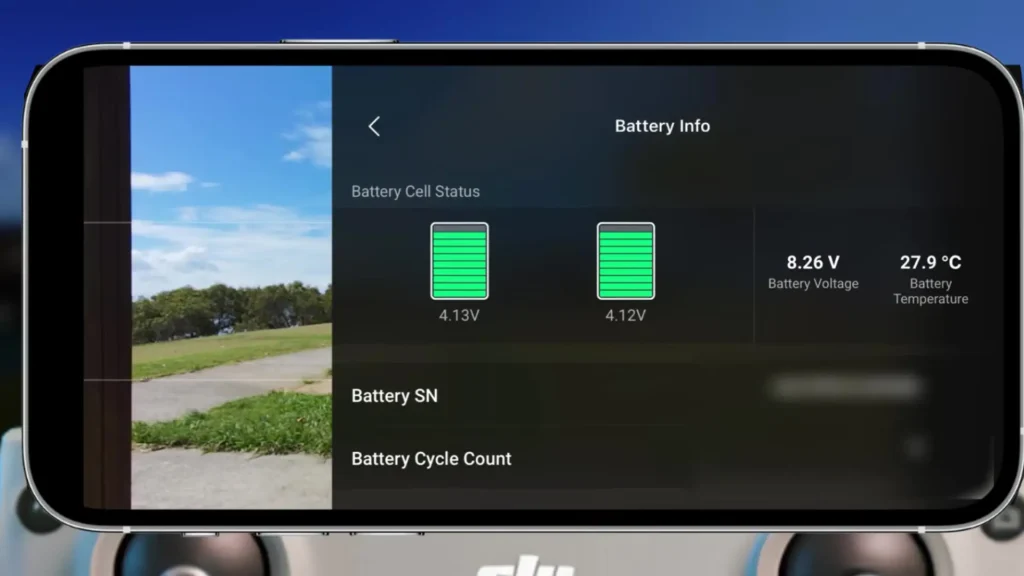
If one cell is significantly lower than the other, that could indicate an issue with the battery that is worth having looked into. Keeping an occasional eye on this information is a good habit that can help you catch potential problems early.
Tip 18: Vision Positioning and Obstacle Sensing
Right at the bottom of the safety menu, there is an advanced setting called vision positioning and obstacle sensing. By default this is enabled, and it is what prevents the drone from flying too close to the ground. The drone will hover at a certain height and require you to hold the left stick down to bring it in for landing.
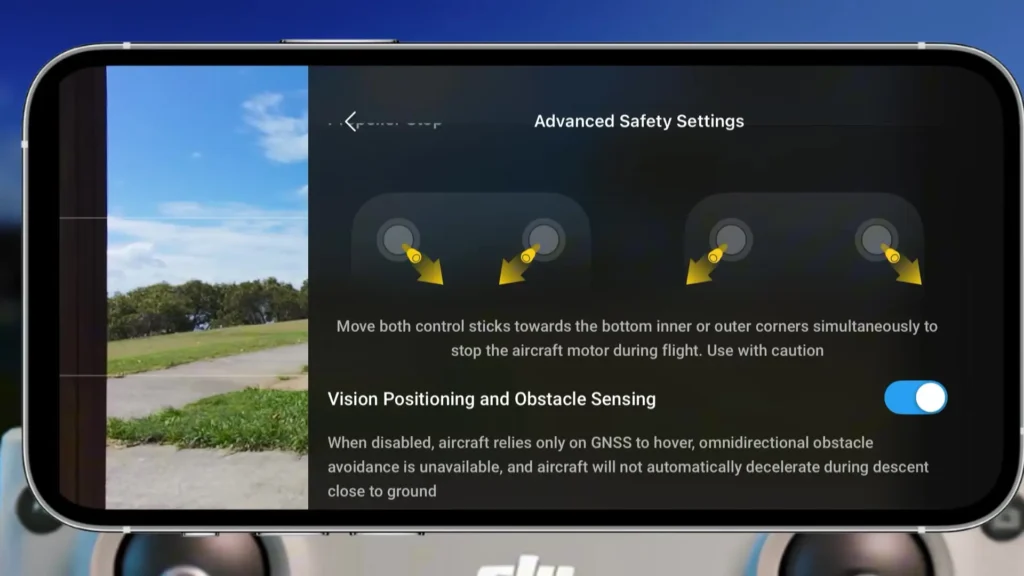
If you disable this setting, the drone can get much closer to the ground, which is useful if you need extremely low shots. However, disabling it comes with increased risk, and for most situations it is best left on. Only disable it if you have a specific creative need for very low altitude footage.
The Control Menu
Pressing on control will take you into the control menu, which contains several important customization options.
Tip 19: Focus Track Settings
Within the control menu, there is a dedicated focus track settings section. There are a lot of options in here covering person tracking, vehicle tracking, and shooting scenes including standard, cycling, and skiing. For each mode, you can customize the inner radius, outer radius, and the height of each circle.
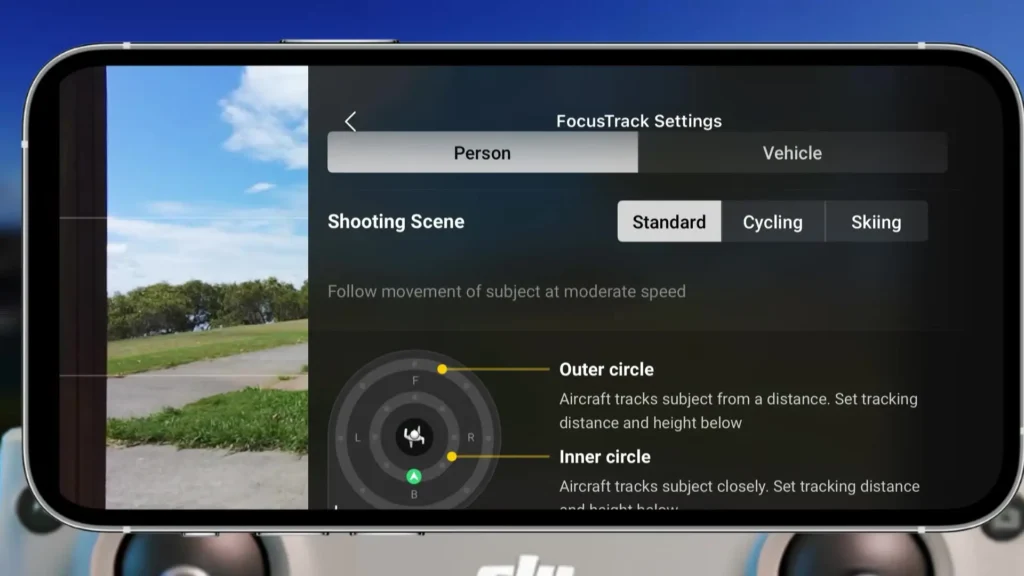
Vehicle tracking has different parameters since it requires the drone to fly further away, and each specialized scene mode like cycling and skiing has its own unique set of adjustable values.
It is worth taking the time to explore these settings and practice them in an open area so you understand exactly what the drone is doing when tracking different types of subjects.

Tip 20: Gain and Expo Tuning
Back in the control menu, the gain and expo tuning section lets you customize how the drone feels when you are flying. There are separate profiles for cine, normal, and sport mode. Within each profile, you can adjust how the drone moves, how the gimbal responds, ascent and descent speed, and braking sensitivity.
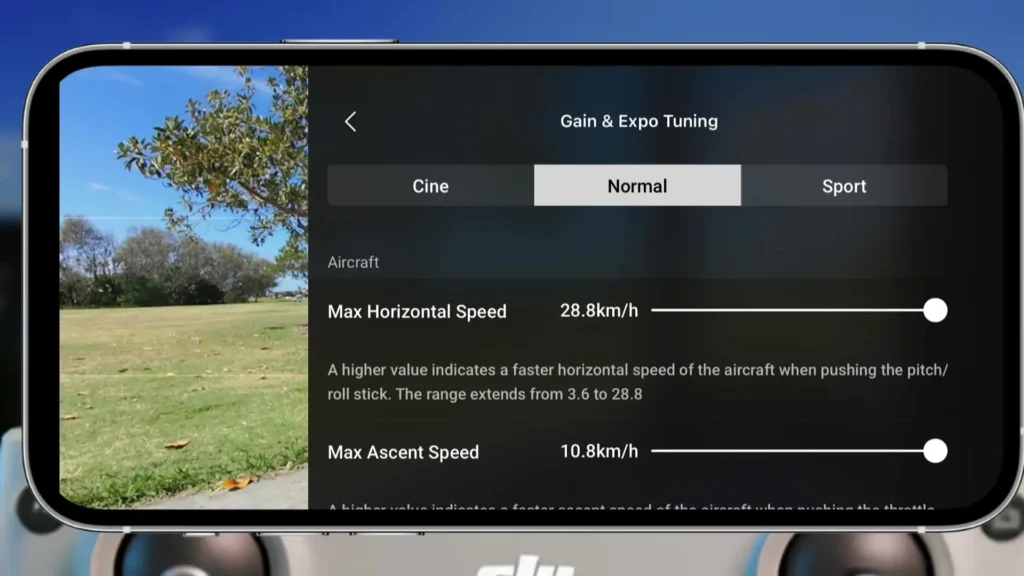
The gimbal settings in particular are very worthwhile experimenting with. You can increase the gimbal tilt speed to make it react faster, or dial in the smoothness so that when you release the tilt, the gimbal has a gentle trailing effect before stopping.
Reducing the smoothness makes the movement sharper and more precise. Every aspect of the flight feel can be dialed in here to suit your personal style, and at any point you can scroll down and press reset to return everything back to the factory default settings.
Tip 21: FPV Mode
Once the drone is in the air, you can enable FPV mode through the control menu. In the standard follow mode, the gimbal counters any banking movements to keep the horizon steady and the footage looking smooth. When you switch into FPV mode, the gimbal no longer counters those movements.
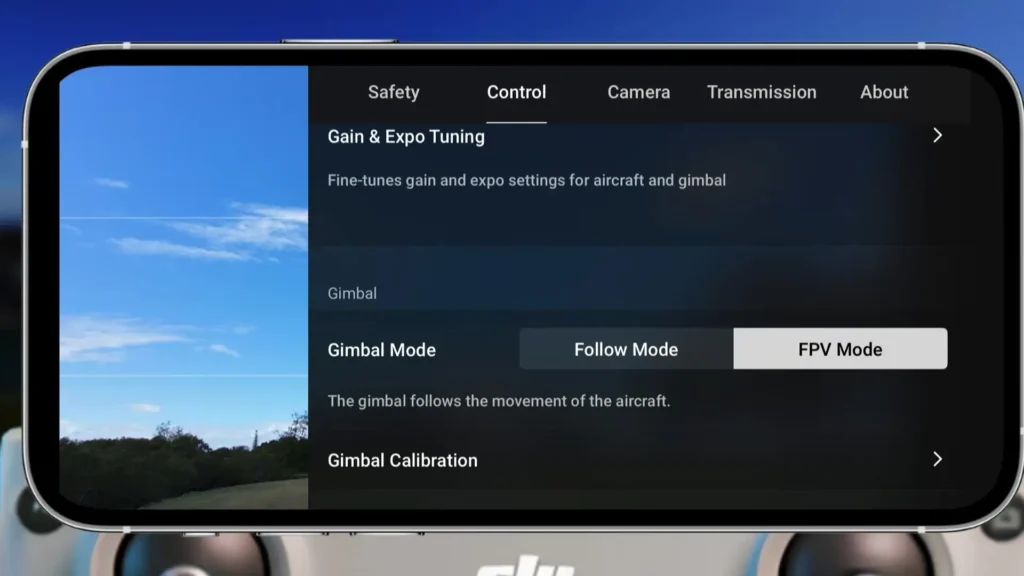
Instead, you get that distinctive banking effect where the camera rolls as the drone turns, which is exactly what you would recognize from FPV drone footage.
This adds a unique creative layer to your videos and is a great option if you feel your footage has started to look too static or conventional. It gives the viewer a much more immersive and dynamic perspective.
Tip 22: Gimbal Settings
Within the gimbal settings in the control menu, you will find the gimbal calibration option. If you ever experience an error or notice an issue with how the gimbal is behaving, you can tap on calibrate and it will walk you through the process. You can also re-center the gimbal from this menu.
settings > Control > Gimbal > Recenter gimbal
Pressing the re-center button will move the camera back to a horizontal position if it has been tilted down during a shot. It is a quick and easy way to reset your camera angle without having to manually scroll it back up.
Tip 23: Phone Charging (iOS Exclusive)
This tip applies specifically to iPhone and iPad users. Inside the control menu, under remote controller, there is an option to enable phone charging. By default this is off for iOS devices, and you will need to enable it manually each time you want to charge your phone from the controller’s battery.
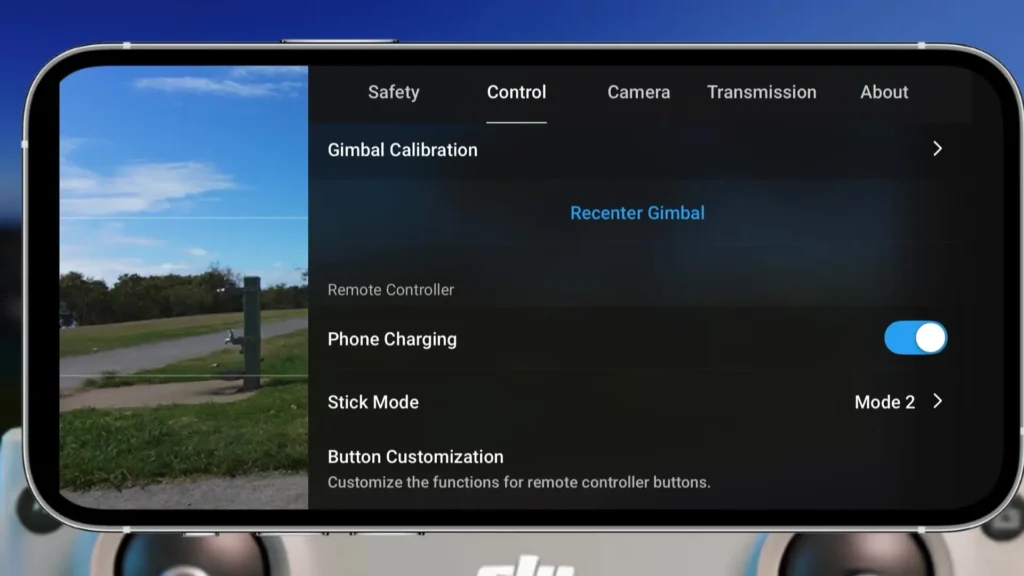
Once enabled, you will see the charging indicator appear in the top right corner of your phone screen. Android users appear to have charging enabled by default, but for iOS users, remembering to enable this can be really useful on longer flying sessions since the controller has a solid battery life to draw from.
Tip 24: Button Customization
In the control menu, you will find the option to customize the FN key on the controller. The FN key sits in the top left corner of the controller, and you have two functions available: a single press and a double press. By default, both may be set to the same action, but you can customize each one independently.
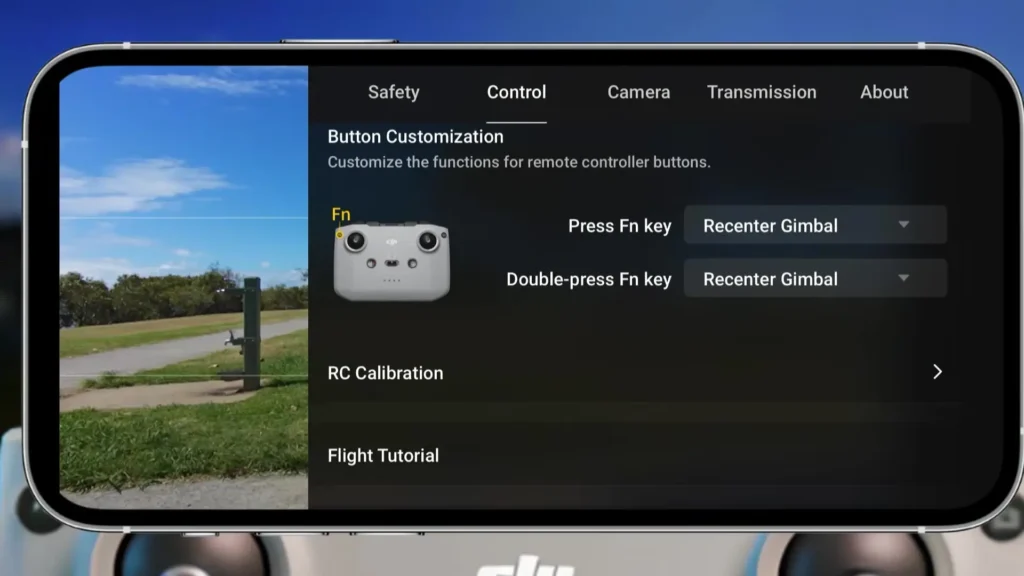
The available options include switching the gimbal into FPV mode, AE lock and unlock, increasing or decreasing EV, and accessing camera settings. For example, you could set a single press to re-center the gimbal and a double press to jump straight into the camera menu.
Experimenting with these options and setting them to the actions you use most frequently will save you time and keep your workflow efficient while flying.
The Camera Menu
On the right-hand side of the control menu is the camera menu, which contains a range of settings related to how your footage looks and is captured.
Tip 25: App Recording
Inside the camera menu, there is an app recording option that allows you to use your mobile device or an external microphone to record audio alongside your aerial video. You can enable or disable this depending on whether you want audio captured.
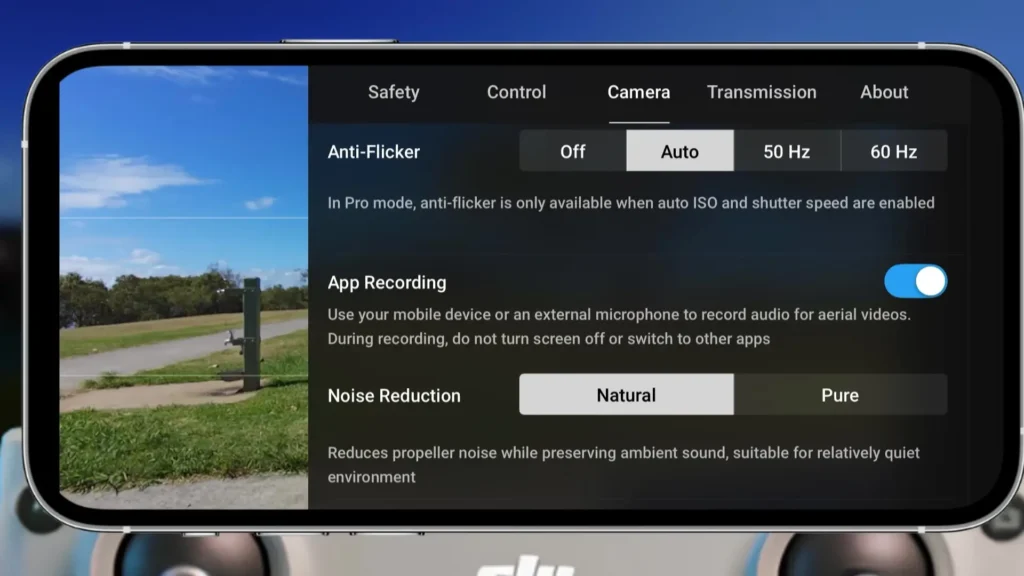
There is also a noise reduction setting with two options: natural, which captures ambient sounds from the environment, and pure, which preserves only human voices. If you are creating content where narration or on-location audio is important, this is a great feature to have enabled and configured correctly before you start recording.
Tip 26: The Histogram
Enabling the histogram in the camera menu will bring up a histogram overlay on your screen that you can drag to any corner for easy reference. The histogram gives you a quick visual indication of your exposure. The left side represents underexposure and the right side represents overexposure.
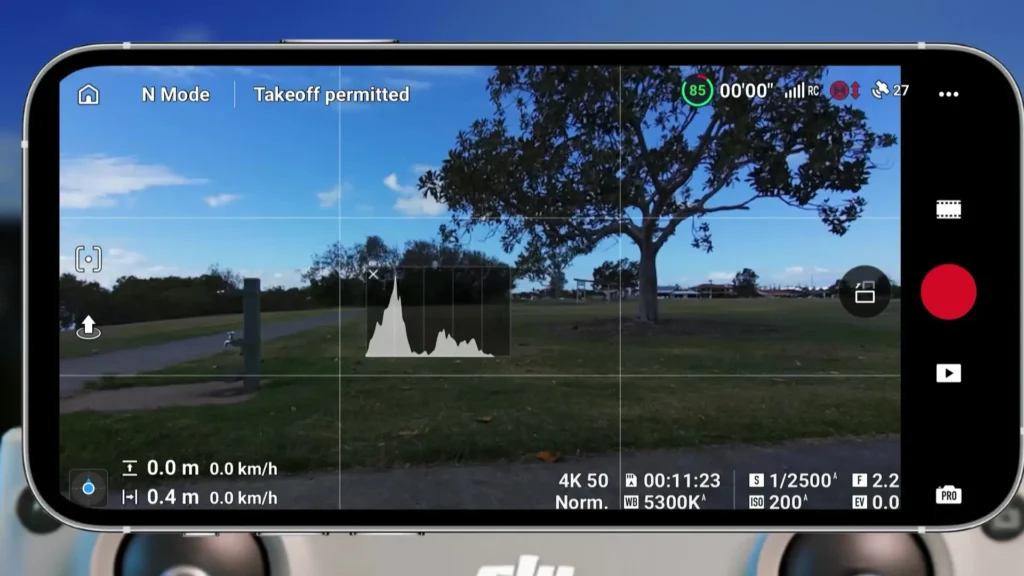
You are looking for a bell curve sitting in the center, which tells you the image is well exposed. If you adjust the EV slider and watch the histogram move in real time, you can dial in your exposure much more accurately than relying on the image alone. It is a small but powerful tool for anyone who wants to take more control over the look of their footage.
Tip 27: Overexposure Warning
The overexposure warning, when enabled, will display a striped pattern over any areas of the image that are blown out or overexposed. If you push the EV too high, those stripe patterns will become very prominent and cover a large portion of the screen, making it very clear that the image is overexposed.
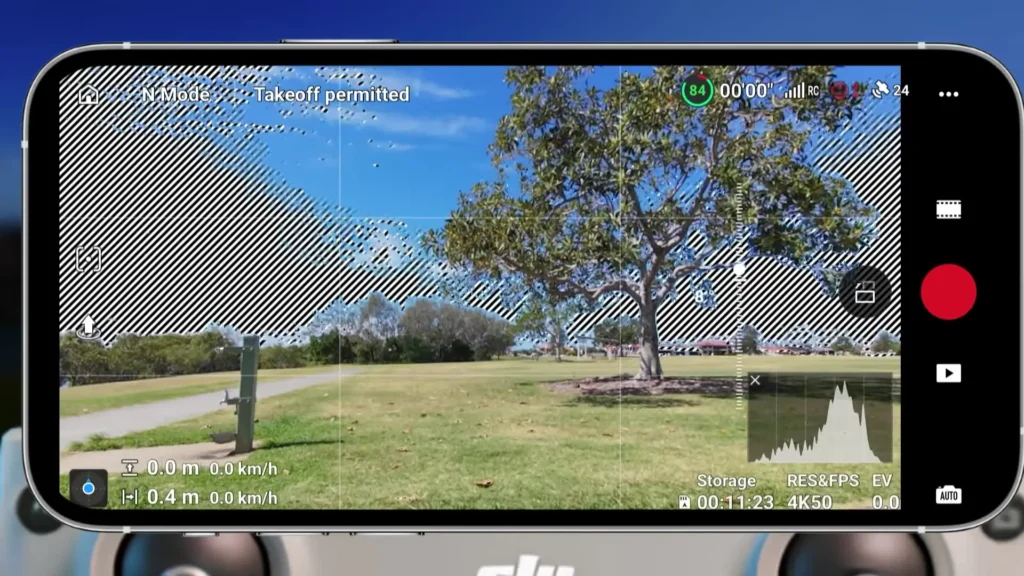
Conversely, if you pull the EV too low, the patterns will disappear, indicating underexposure. The goal is to find the balance where those warning patterns are minimal or absent.
Some people find this overlay a bit overwhelming visually, and if that is the case, you can simply disable it. However, it is a useful calibration tool for those who want to be precise about their exposure.
Tip 28: Grid Lines
The camera menu also lets you toggle grid lines on and off. The rule of thirds grid is the most commonly used option and makes it easier to frame your shots in a visually balanced way. There is also a diagonal grid line option that works particularly well in FPV mode when the drone is banking.
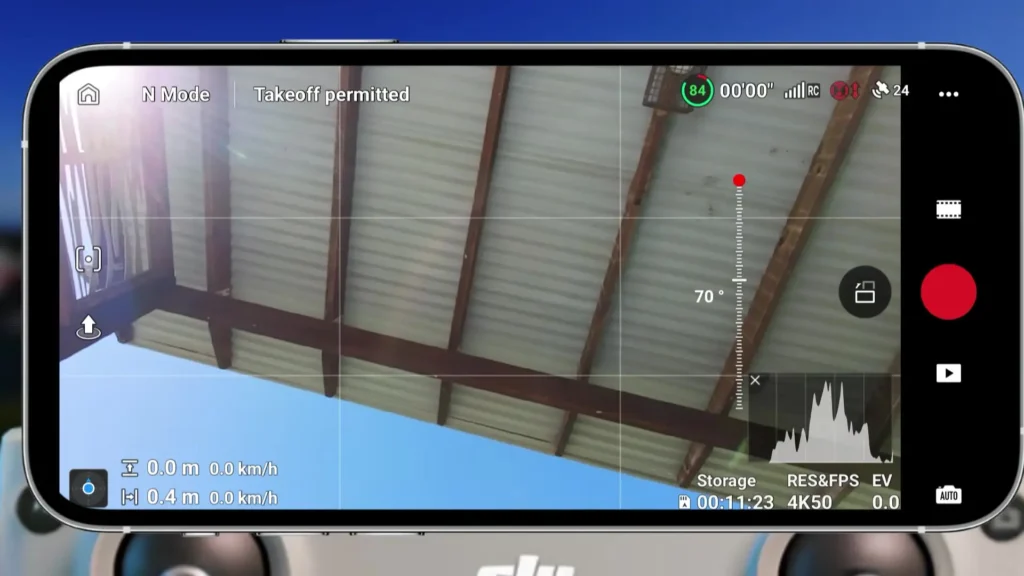
A center dot option is available if you want a simple reference point in the middle of the frame, and you can enable multiple grid types at the same time if you prefer. For most shooting situations, the rule of thirds grid is the most practical and helpful option to have enabled.
Tip 29: Frame Guide
The frame guide feature is especially useful for content creators who shoot for multiple platforms. When enabled, it overlays a guide on the screen to show you how your footage will be framed in different aspect ratios such as 9 by 16 for TikTok and YouTube Shorts, or square for social media ads.
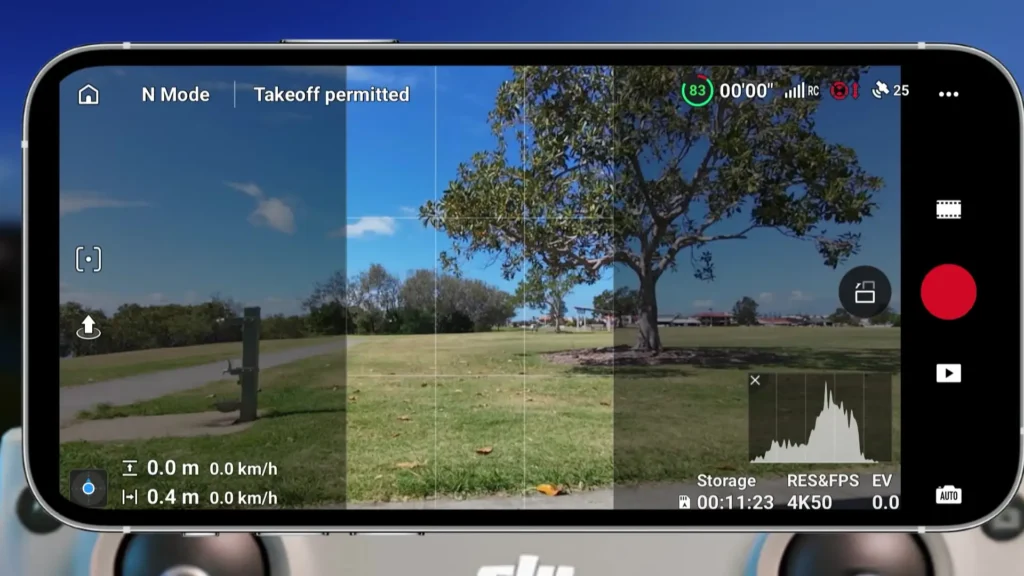
Importantly, the drone is still recording the full frame, so you are not losing any footage. The guide is simply showing you where to frame your subject so you know exactly how it will look when cropped for that particular format. This is a smart way to shoot content that works across multiple platforms without having to film separate shots for each one.

Tip 30: Style Settings
Scrolling down in the camera menu reveals a dropdown for style settings, which includes sharpness and noise reduction controls. If you feel the default sharpness is too high, you can bring it down and then sharpen the footage in post-production instead.
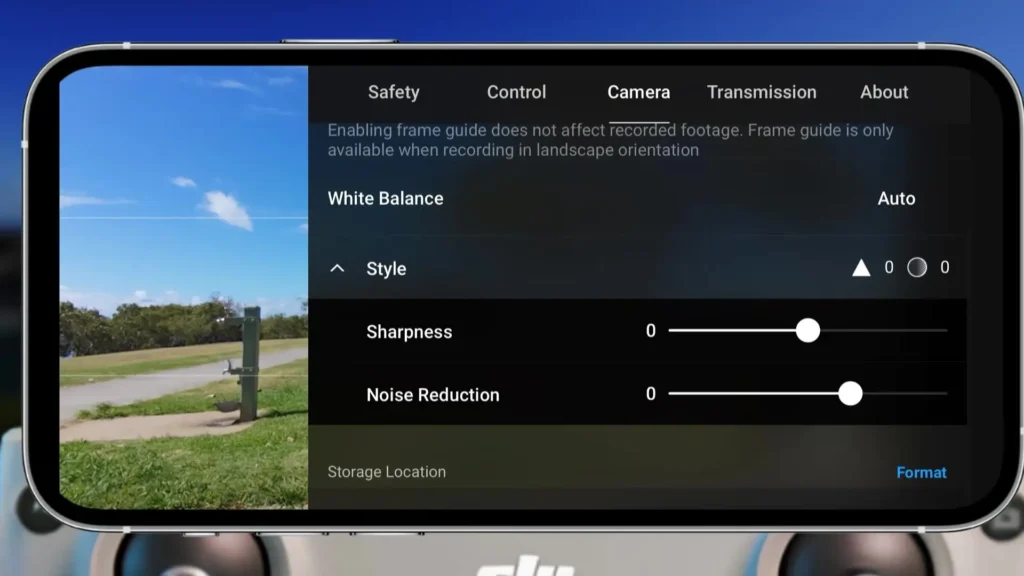
If the noise reduction applied by the drone is not to your liking, you can adjust that as well. Sharpness can be set anywhere from minus two to plus two, and noise reduction ranges from minus two to plus one. These controls are a bit tucked away behind the dropdown, but they give you a finer level of control over the look of your image straight out of the drone.
Tip 31: Formatting Storage
In the camera menu, you will find a format option displayed in blue text. Tapping on it will allow you to format the internal storage of the drone directly from the app. It also shows you your current storage status so you can see how much space is remaining. Settings > Camera > Storage Location
Being able to format from within the app is convenient and means you do not need to remove the storage or connect to a computer just to clear it out before a new shoot.
The Transmission Menu
To the right of the camera menu is the transmission menu, which deals with signal and streaming settings.
Tip 32: Live Streaming
The live streaming option is found in the transmission menu. While it would be more convenient to have direct one-tap options for platforms like YouTube or Facebook, the current implementation uses RTMP streaming. If you are familiar with RTMP and know how to set it up, you can enter your stream address, stream key, and choose your resolution, which maxes out at 1080p, along with the bit rate.
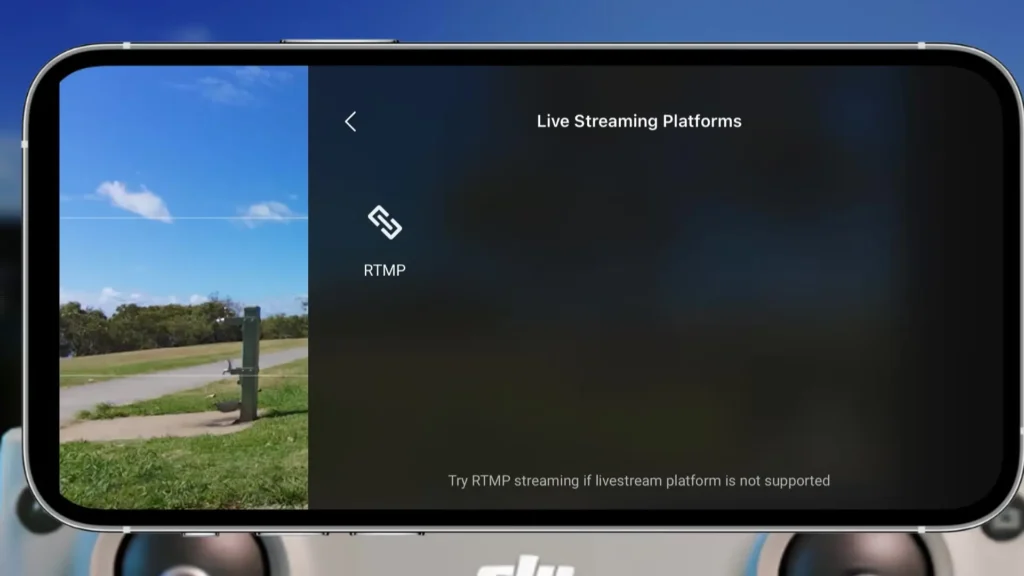
If you are not familiar with RTMP, it is worth researching online before attempting to use this feature. It is a powerful tool for those who want to live stream drone footage but does require some technical setup knowledge to use effectively.
Tip 33: Viewing Signal Interference
Within the transmission menu, you can scroll down to see a live view of signal interference in your current area. By default, the drone uses dual band auto, which is the recommended setting as it automatically selects the best available frequency. If you switch to 2.4 GHz, which is a frequency commonly used by Wi-Fi networks, you may notice more interference signals in the display.
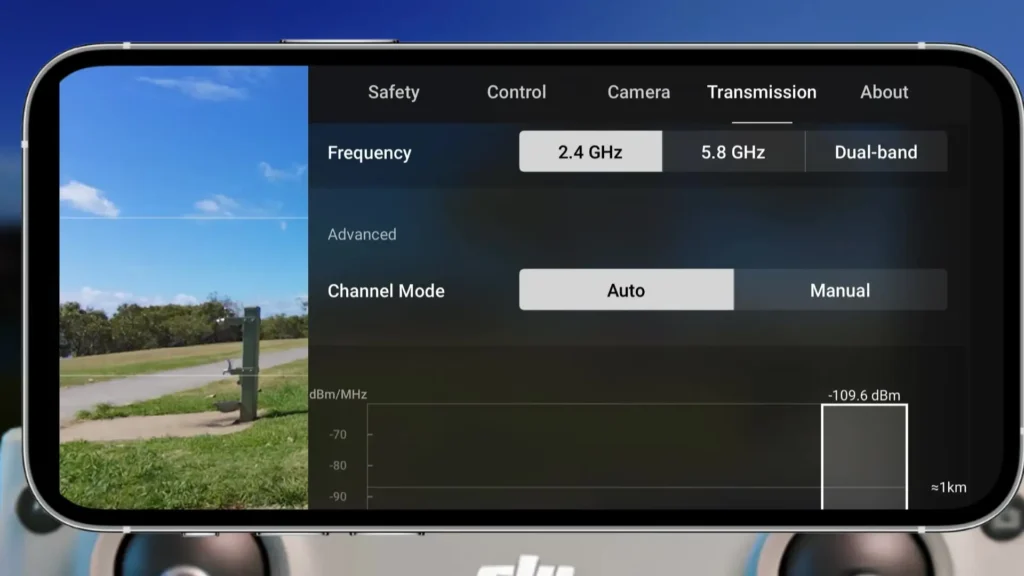
Switching to 5.8 GHz will generally show less interference. You can also go into manual mode and select a specific channel if needed. For the vast majority of situations, keeping it on dual band auto is the most reliable choice and requires no extra configuration on your part.
The About Menu
To the right of the transmission menu is the about menu, and it contains one final important tip.
Tip 34: Checking for Firmware Updates
In the about menu, if you scroll down, you will find options to check for updates for both the aircraft firmware and the app itself. Tapping on check for updates will prompt the system to verify whether your firmware is current.
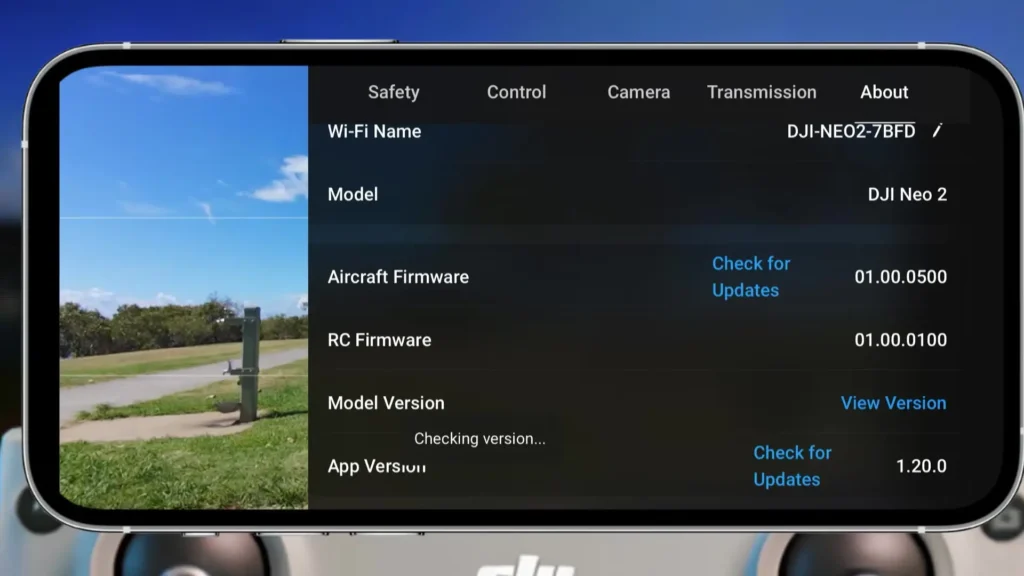
It will display the result and let you know if an update is available or if everything is already up to date. Keeping your firmware updated is important for ensuring you have access to the latest features, performance improvements, and safety fixes. This manual check is a great habit to build in alongside your regular pre-flight routine.
settings > About >
Final Thoughts
Those are 34 must know DJI Neo 2 settings covering everything available through the DJI Fly application when the controller is connected. From the pre-flight checklist and obstacle avoidance to pro mode, focus track, live streaming, and firmware updates, these settings cover a huge range of scenarios and give you the tools to fly with more confidence, creativity, and control.
Read More: 7 Drone Footage Mistakes You Must Fix Now