
Drones are capable of stunning footage, but the camera doesn’t do the work for you. Use the wrong settings and even the most expensive drone will produce footage that looks flat, shaky, or amateurish. The good news is that a handful of key settings make an enormous difference, and once you know them, they become second nature. These apply to DJI drones and most other camera drones on the market, so whatever you’re flying, this is worth reading.
Here are the 10 settings that actually matter.
1. Exposure: Switch to Pro Mode and Take Control
A lot of beginners leave the drone on auto exposure and assume it’ll figure things out. Sometimes it does. But auto mode can shift the brightness mid-shot, and it doesn’t always get the settings right. That inconsistency is hard to fix in editing.
Switch to Pro mode in the DJI Fly app to take manual control. The two settings to focus on are shutter speed and ISO.
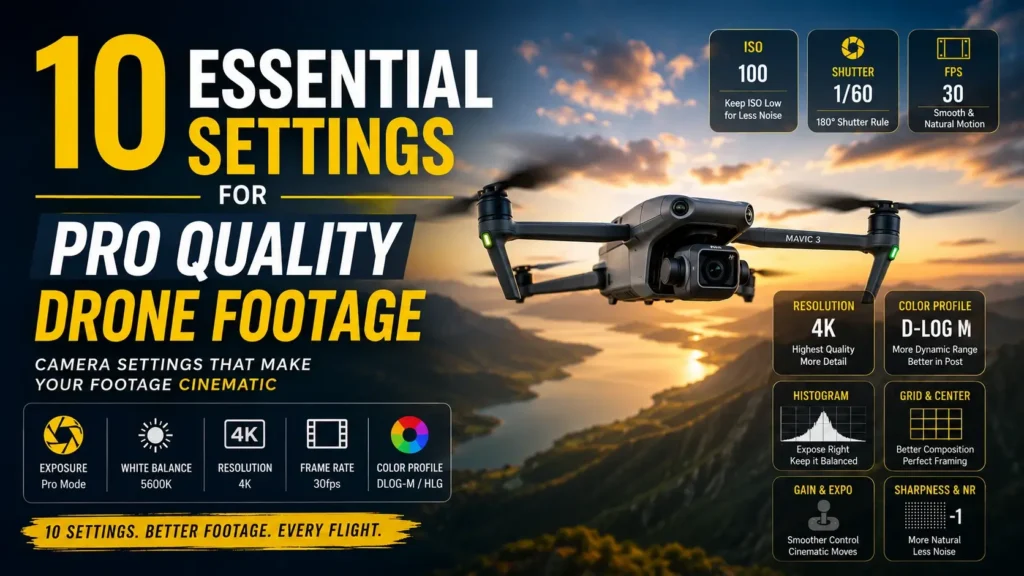
Keep your ISO as low as possible. ISO 100 works for most daylight situations. The higher you push it, the more noise and grain creep into the footage. How high you can go before quality falls apart depends on your specific drone, so it’s worth testing in low light to find your limit.
For shutter speed, the goal is to follow the 180° shutter rule: set it to roughly double your frame rate. Shooting at 30fps? Aim for 1/60th of a second. This gives your footage natural motion blur and makes movement look smooth. The catch is that in bright conditions, this shutter speed will overexpose the shot, which is where ND filters come in. They attach to the camera and cut down incoming light, letting you use a slower shutter without blowing out the image.
That said, ND filters aren’t always essential. For static landscape shots with little motion, a higher shutter speed won’t look noticeably different. It matters most when there’s fast movement in the frame.
2. White Balance: Lock It In Manually
White balance controls how warm or cool your footage looks. Leave it on auto, and it’ll do a reasonable job most of the time, but the same problem applies as with exposure: it can shift during a shot, and that’s distracting.
Set it manually based on the conditions:
- Sunny: around 5600K
- Cloudy: around 6300K
- Sunrise or sunset: 5600K or slightly higher to keep those warm tones
A quick trick if you’re in a rush: tap auto to let the drone set it, then switch back to manual to lock that value in. It’s not perfect, but it’s usually a solid starting point.
3. Resolution: Always Shoot at the Highest Setting
Simple rule: shoot at the highest resolution your drone supports. If it does 4K, shoot 4K. If it goes higher, use that.
Higher resolution means more detail, more flexibility when cropping in post, and a better end result overall. The only downside is larger file sizes, but that’s a storage problem, not a quality problem.
If you’re shooting vertical video, check whether your drone has a dedicated vertical mode. Some drones let you flip the camera to use the full sensor area for vertical content, which is much better than cropping a horizontal shot in post.
4. Frame Rate: 30fps as Your Default
The 24fps look is considered cinematic, but it requires strict adherence to the 180° shutter rule to avoid looking jittery. For most situations, 30fps is a more forgiving and practical default.
If your drone shoots 4K at 60fps, consider using that as your standard setting. You’ll have the option to slow footage down to half speed in editing, which adds a lot of creative flexibility without committing to slow motion in the moment.
For dedicated slow motion, many drones offer 100fps or even 120fps at 4K, which can look genuinely impressive when there’s actually something worth slowing down. Fast action, wildlife, and flowing water are great candidates. Don’t waste high frame rates on slow-moving landscape shots. There’s nothing to slow you down, and you’ll just fill your card faster.
5. Colour Profile: Shoot in DLOG-M or HLG
The colour profile determines how the drone processes the image before saving it to the card. There are three main options:
Normal adds contrast and saturation straight out of the camera. It looks good on a quick scroll, but it gives you less to work with in editing.
DLOG-M is flat and low contrast, which sounds undesirable until you colour grade it. It retains significantly more detail in highlights and shadows, giving you far more flexibility in post. This is the best option for professional results.
HLG (Hybrid Log Gamma) sits between the two. It looks better straight out of the camera than DLOG-M, but still offers more dynamic range than normal.
For anything serious, shoot in DLOG-M or HLG. Normal colour profile on newer DJI drones has improved, but DLOG-M still wins when you want the best final result.
6. Zoom: Use Optical, Avoid Digital
If your drone only has one camera, like the DJI Mini series, avoid digital zoom entirely. It’s just a crop of the sensor and noticeably degrades image quality.
If your drone has multiple cameras, like the Air 3S or Mavic 3 line, use them properly. The wide-angle camera works well for classic drone shots. The telephoto camera is great for isolating subjects, making backgrounds appear larger, and adding a sense of depth and scale that the wide lens can’t replicate. Mixing both in your edit gives you more variety and makes the final video more interesting to watch.
Either way, don’t use digital zoom between focal lengths. Switch cameras, don’t zoom.
7. Gain and Expo Tuning: Smoother Movements Start Here
These settings control how the drone responds to your stick inputs. Getting them right makes a noticeable difference to how smooth your footage looks. You’ll find them under Settings > Control > Gain and Expo Tuning.
Here’s a starting point that works well for most scenarios:
Normal mode: Max horizontal, ascent, and descent speeds at maximum. Angular velocity at 75°/sec, yaw smoothness at 15, braking at 100. Expo settings: up/down at 0.25, yaw at 0.15, pitch/roll at 0.15. Gimbal tilt speed at 15°/sec, smoothness at 10.
Sport mode: Max speeds at maximum, angular velocity at 120°/sec, yaw smoothness at 12, brake sensitivity at 100. Expo: up/down at 0.3, yaw at 0.15, pitch/roll at 0.25. Gimbal max speed at 20°/sec, smoothness at 15.
These aren’t the only settings that work, but they’re a solid foundation. Adjust based on how your particular drone handles.
8. Histogram: A Simple Way to Nail Exposure
The histogram sounds technical, but it’s actually easy to read once you understand it. Turn it on under Settings > Camera > Histogram, and a small graph will appear on your camera feed.
The right side of the graph represents highlights, the left side represents shadows, and the middle is your midtones. Ideally, the bulk of your data should sit in the middle. If it’s pushed far to the right, your shot is overexposed. Far to the left, it’s underexposed. It takes a few minutes to get used to reading it, but once you do, it’s much more reliable than trusting your screen in bright sunlight.
9. Grid Lines and Centre Marker: Compose Better Shots
Found under the same camera settings tab, these two tools help with composition and are worth turning on and leaving on.
Grid lines overlay a thirds grid on your screen, making it easy to apply the rule of thirds. The idea is to place important elements like the horizon, a subject, or a landmark along the grid lines rather than dead centre. It’s one of the simplest ways to make shots look more deliberate and visually interesting.
The centre marker shows exactly where the middle of your frame is. Useful for centred compositions or simply knowing where you’re headed when flying.
10. Sharpness and Noise Reduction: Turn Both Down Slightly
DJI drones tend to over-process the image by default, applying aggressive sharpening and noise reduction that can actually remove detail rather than preserve it. This becomes especially noticeable in low light.
A small adjustment makes a meaningful difference. Set both sharpness and noise reduction to -1. It pulls back the heavy-handed processing without leaving you too much work to do in post. Think of it as finding the middle ground between over-processed straight out of the camera and overly noisy footage that needs heavy editing to clean up.
Final Thought
None of these settings is complicated once you know what they do and why they matter. The biggest shift is moving away from auto mode and taking control of the camera yourself. Start with exposure and colour profile, and the rest will follow naturally. Get these ten right, and your footage will look noticeably better from the very first flight.
Read More: FPV Gear Every Beginner Needs to Know About